

Connect Kolide to Okta
With Kolide, you can easily deploy a state-of-the-art Zero Trust Access model for all the apps currently protected by Okta.
In this guide, we will walk you through the exact steps to securely integrate Kolide with your existing production Okta instance and enable it on a handful of Users.
- The ability to control (through an Okta Group) the Users in your organization that are in-scope for Kolide Zero Trust Access
- The ability to control which apps are in-scope for Kolide protection through your existing Okta Access Policies
- The ability to automatically sync users to Kolide’s app via SCIM
Minimum Requirements
Before we can start the process, we first need to ensure you have everything needed to successfully integrate Kolide. Please check the following requirements before you get started.
Okta Identity Engine (OIE)
Kolide makes heavy use of authentication policies in Okta’s Identity Engine
(abbreviated OIE). To determine what version of Okta you are on, simply
sign into the admin portal https://${yourOktaDomain}-admin.okta.com and
look at the version in the footer.
From the Okta Docs:
If you’re not sure which solution you’re using, check the footer on any page of the Admin Console. The version number is appended with E for Identity Engine orgs and C for Classic Engine orgs.
If you have classic, you will need to contact your Okta representative to request an upgrade. You may also want to review the upgrade documentation.
A Kolide account that has Device Trust enabled
At the time of this writing, Kolide’s Okta integration is only available to customers that have explicitly requested access. To see if you have access, simply attempt to sign into Kolide at the url https://app.kolide.com.
If after signing in, if your top-level navigation includes the item Requests
then you are all set. If you don’t have access, you’ll be redirected back to
https://k2.kolide.com.

app.kolide.com.
With that said, don’t worry, even after the upgrade, k2.kolide.com will remain
accessible to your administrators.
To request access, you can reach out to our team here.
Step 0: Activate your Kolide Account
If you haven’t already, you will need to sign into the administrative dashboard of Kolide via magic link authentication.
- Go to the Kolide Sign-in page (https://app.kolide.com/signin)
- Enter your email address
- When prompted, go to your email provider and click the magic link.
- Accept the 1Password Extended Access Management Terms and Conditions
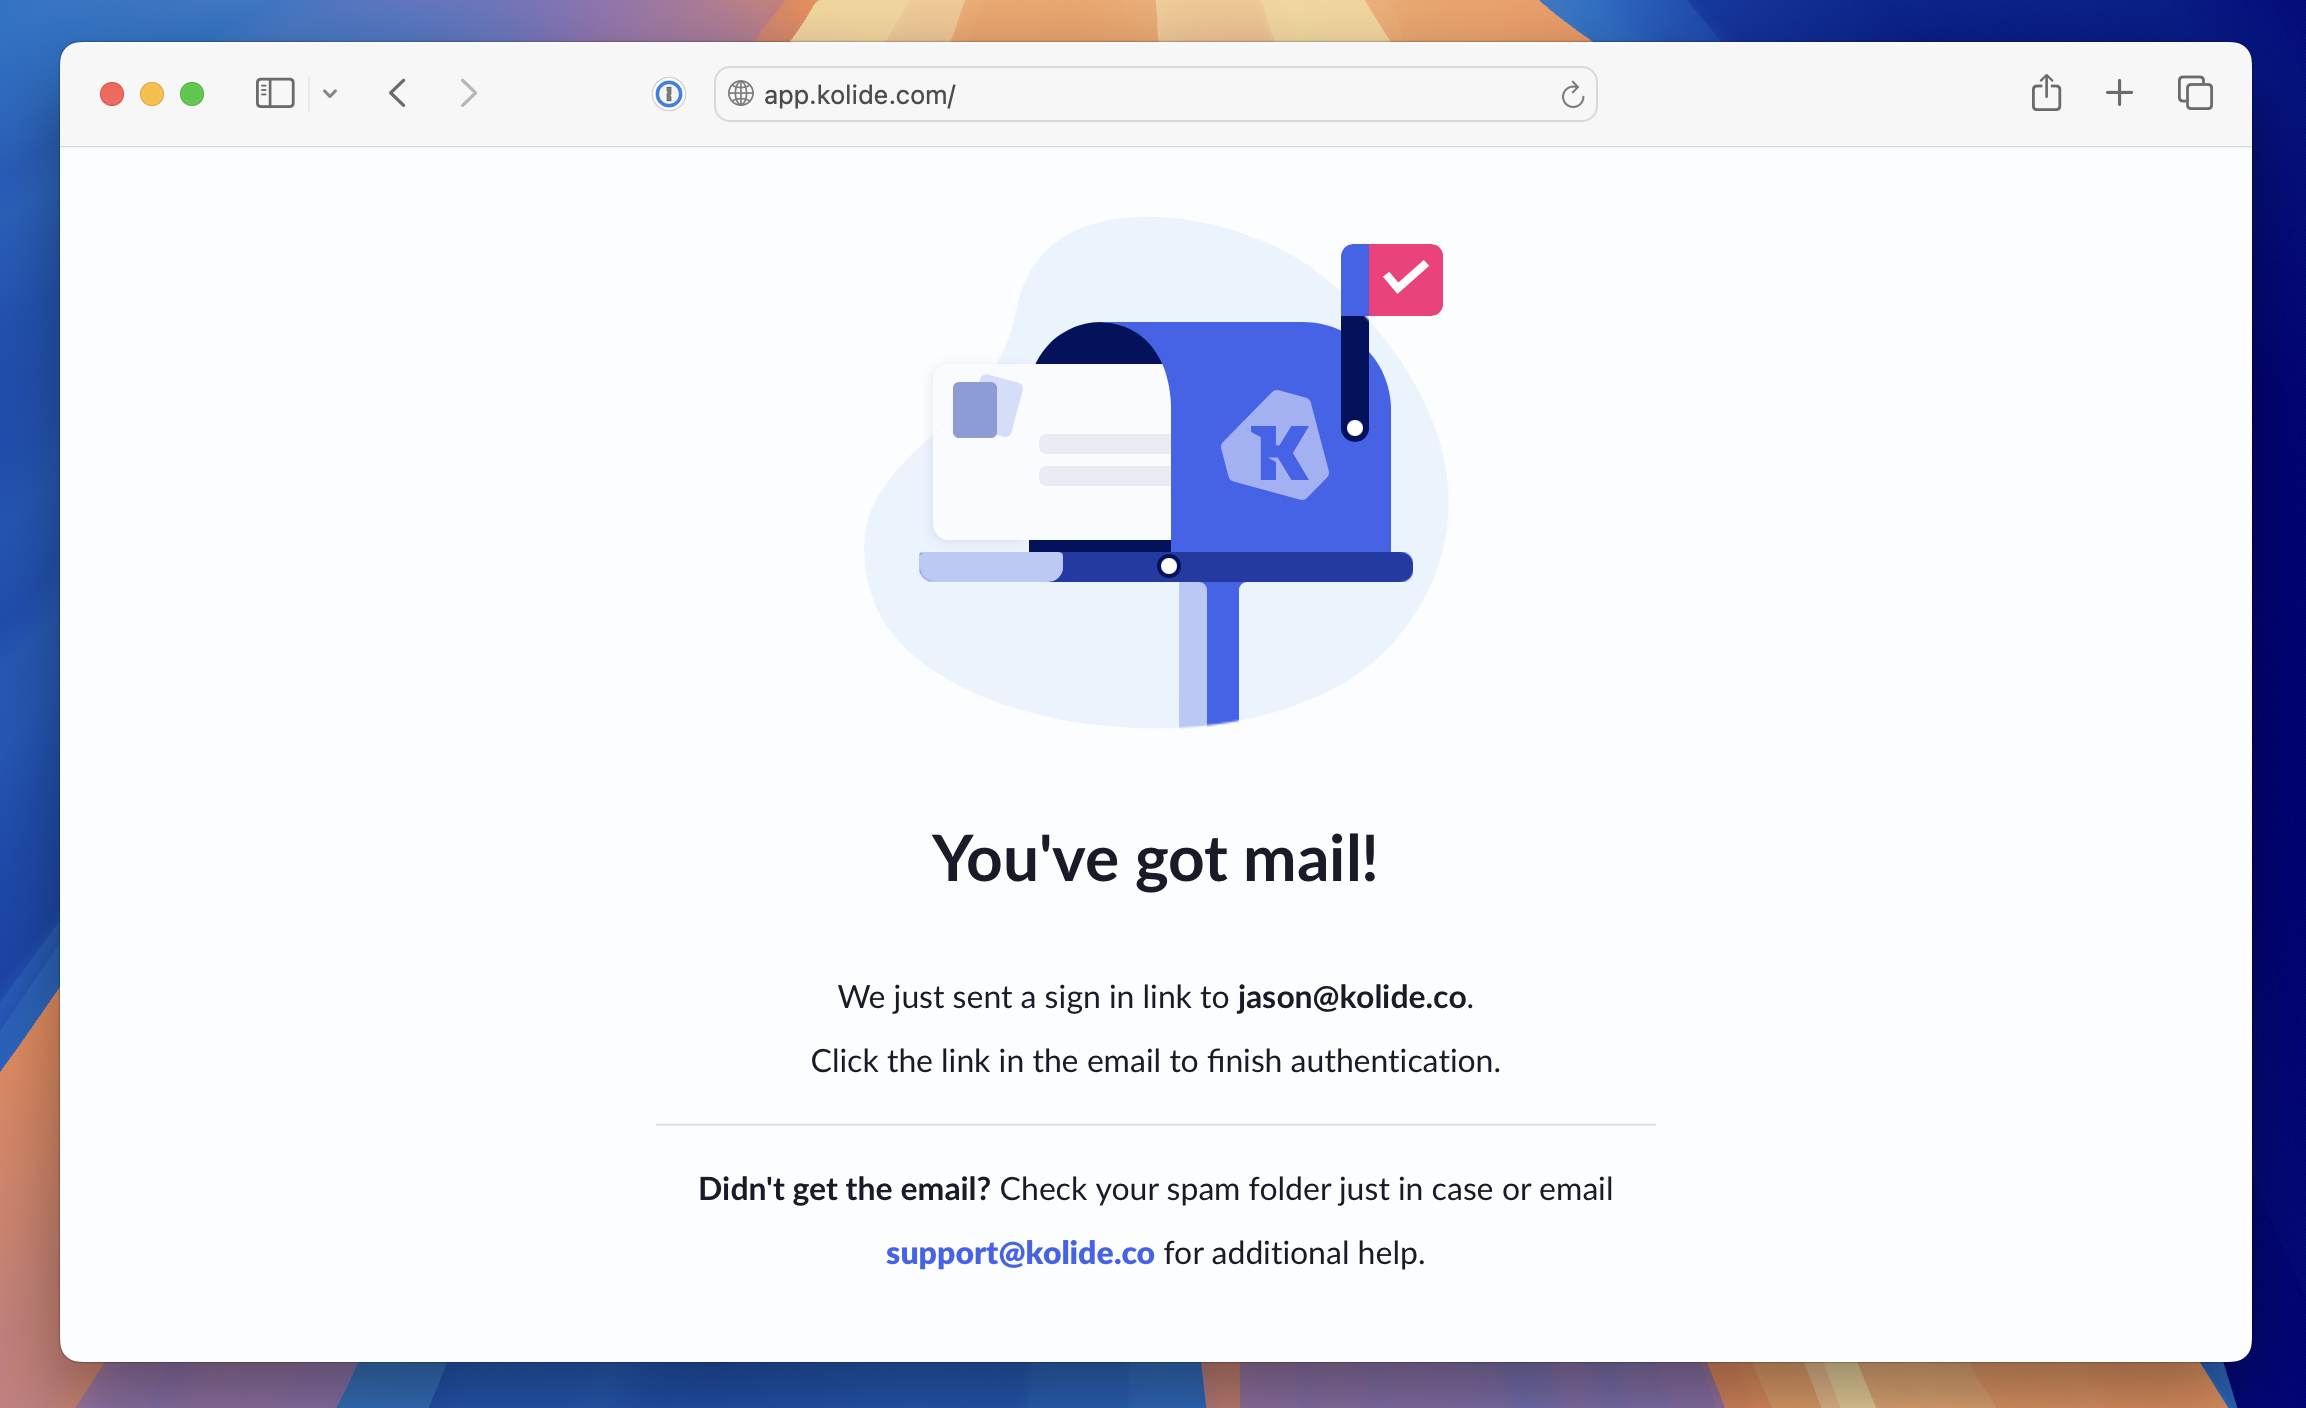
If you do not see the prompt to check your email, please contact support.
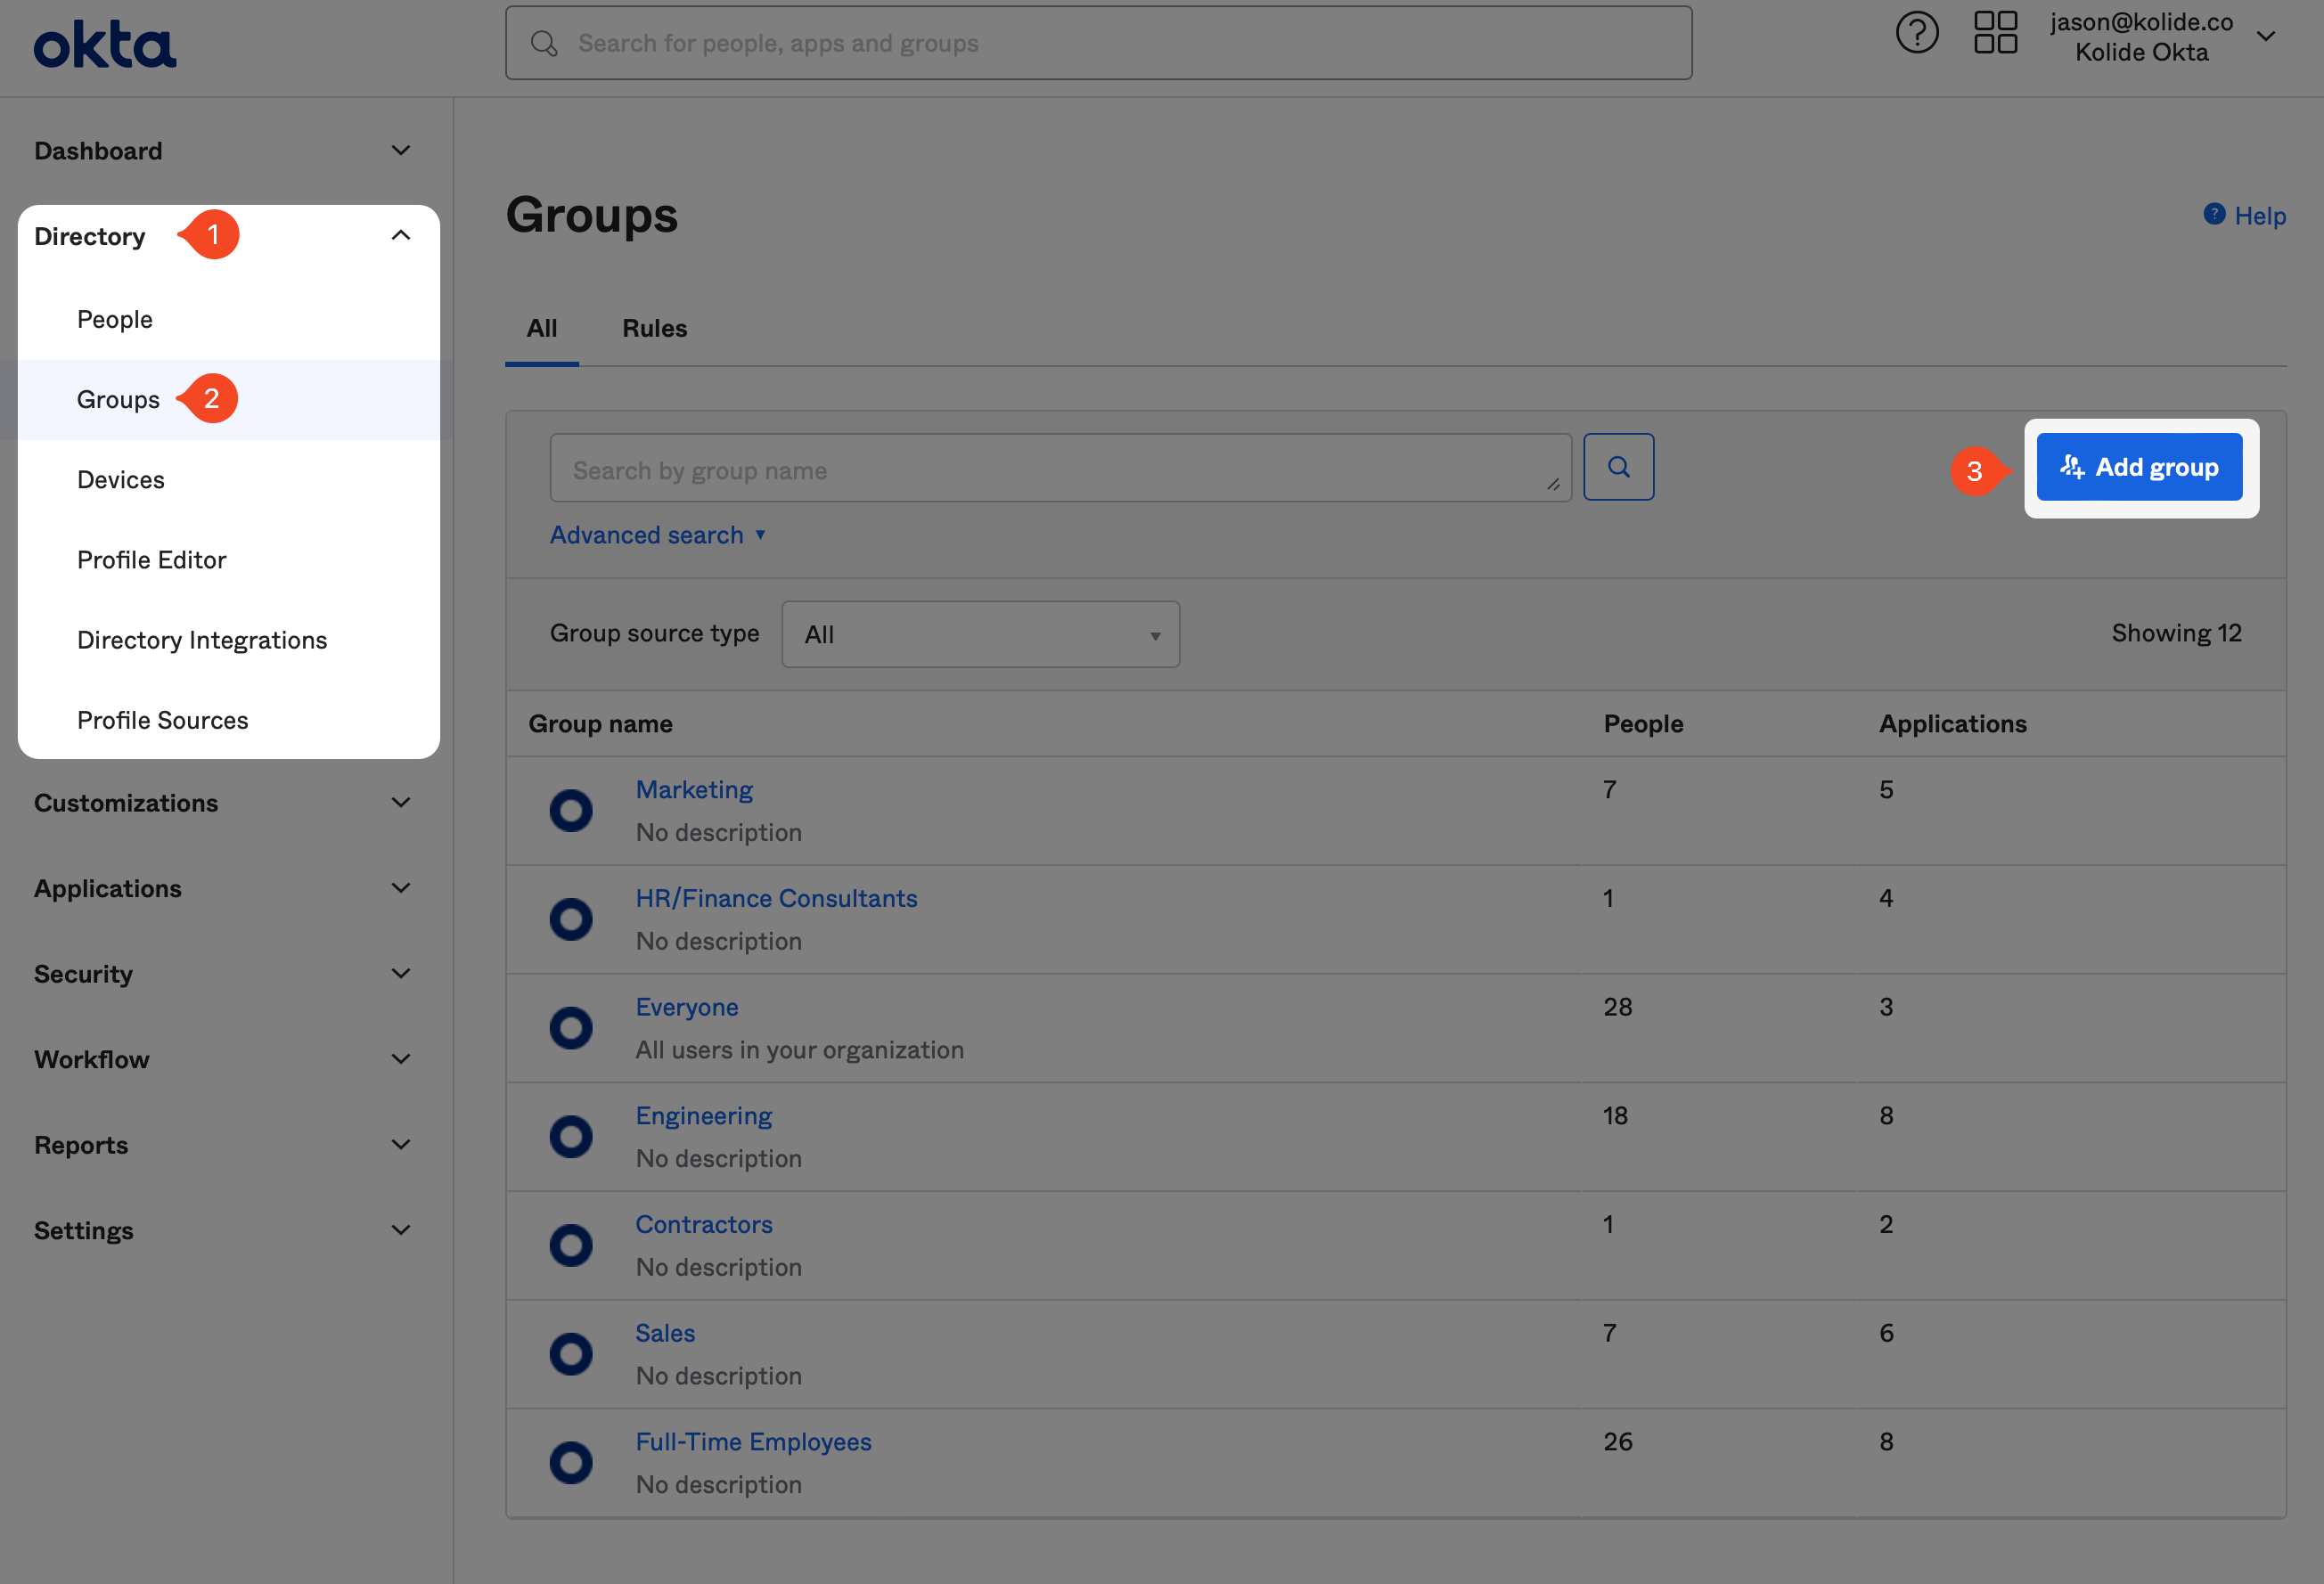
Step 1: Create a Group for People In-Scope for Kolide
In this step, we will create an Okta Group that we will use throughout this guide to precisely define the exact Users in your Okta instance that will use Kolide’s Okta Integration to sign in to apps. At first, this Group will only contain a few people but you can expand it at anytime.
To begin, first sign into your Okta Administrative portal
https://${yourOktaDomain}-admin.okta.com. Once signed in, in the left-hand
sidebar click Directory > Groups, and then click Add Group in the
top-right corner of the resulting page.
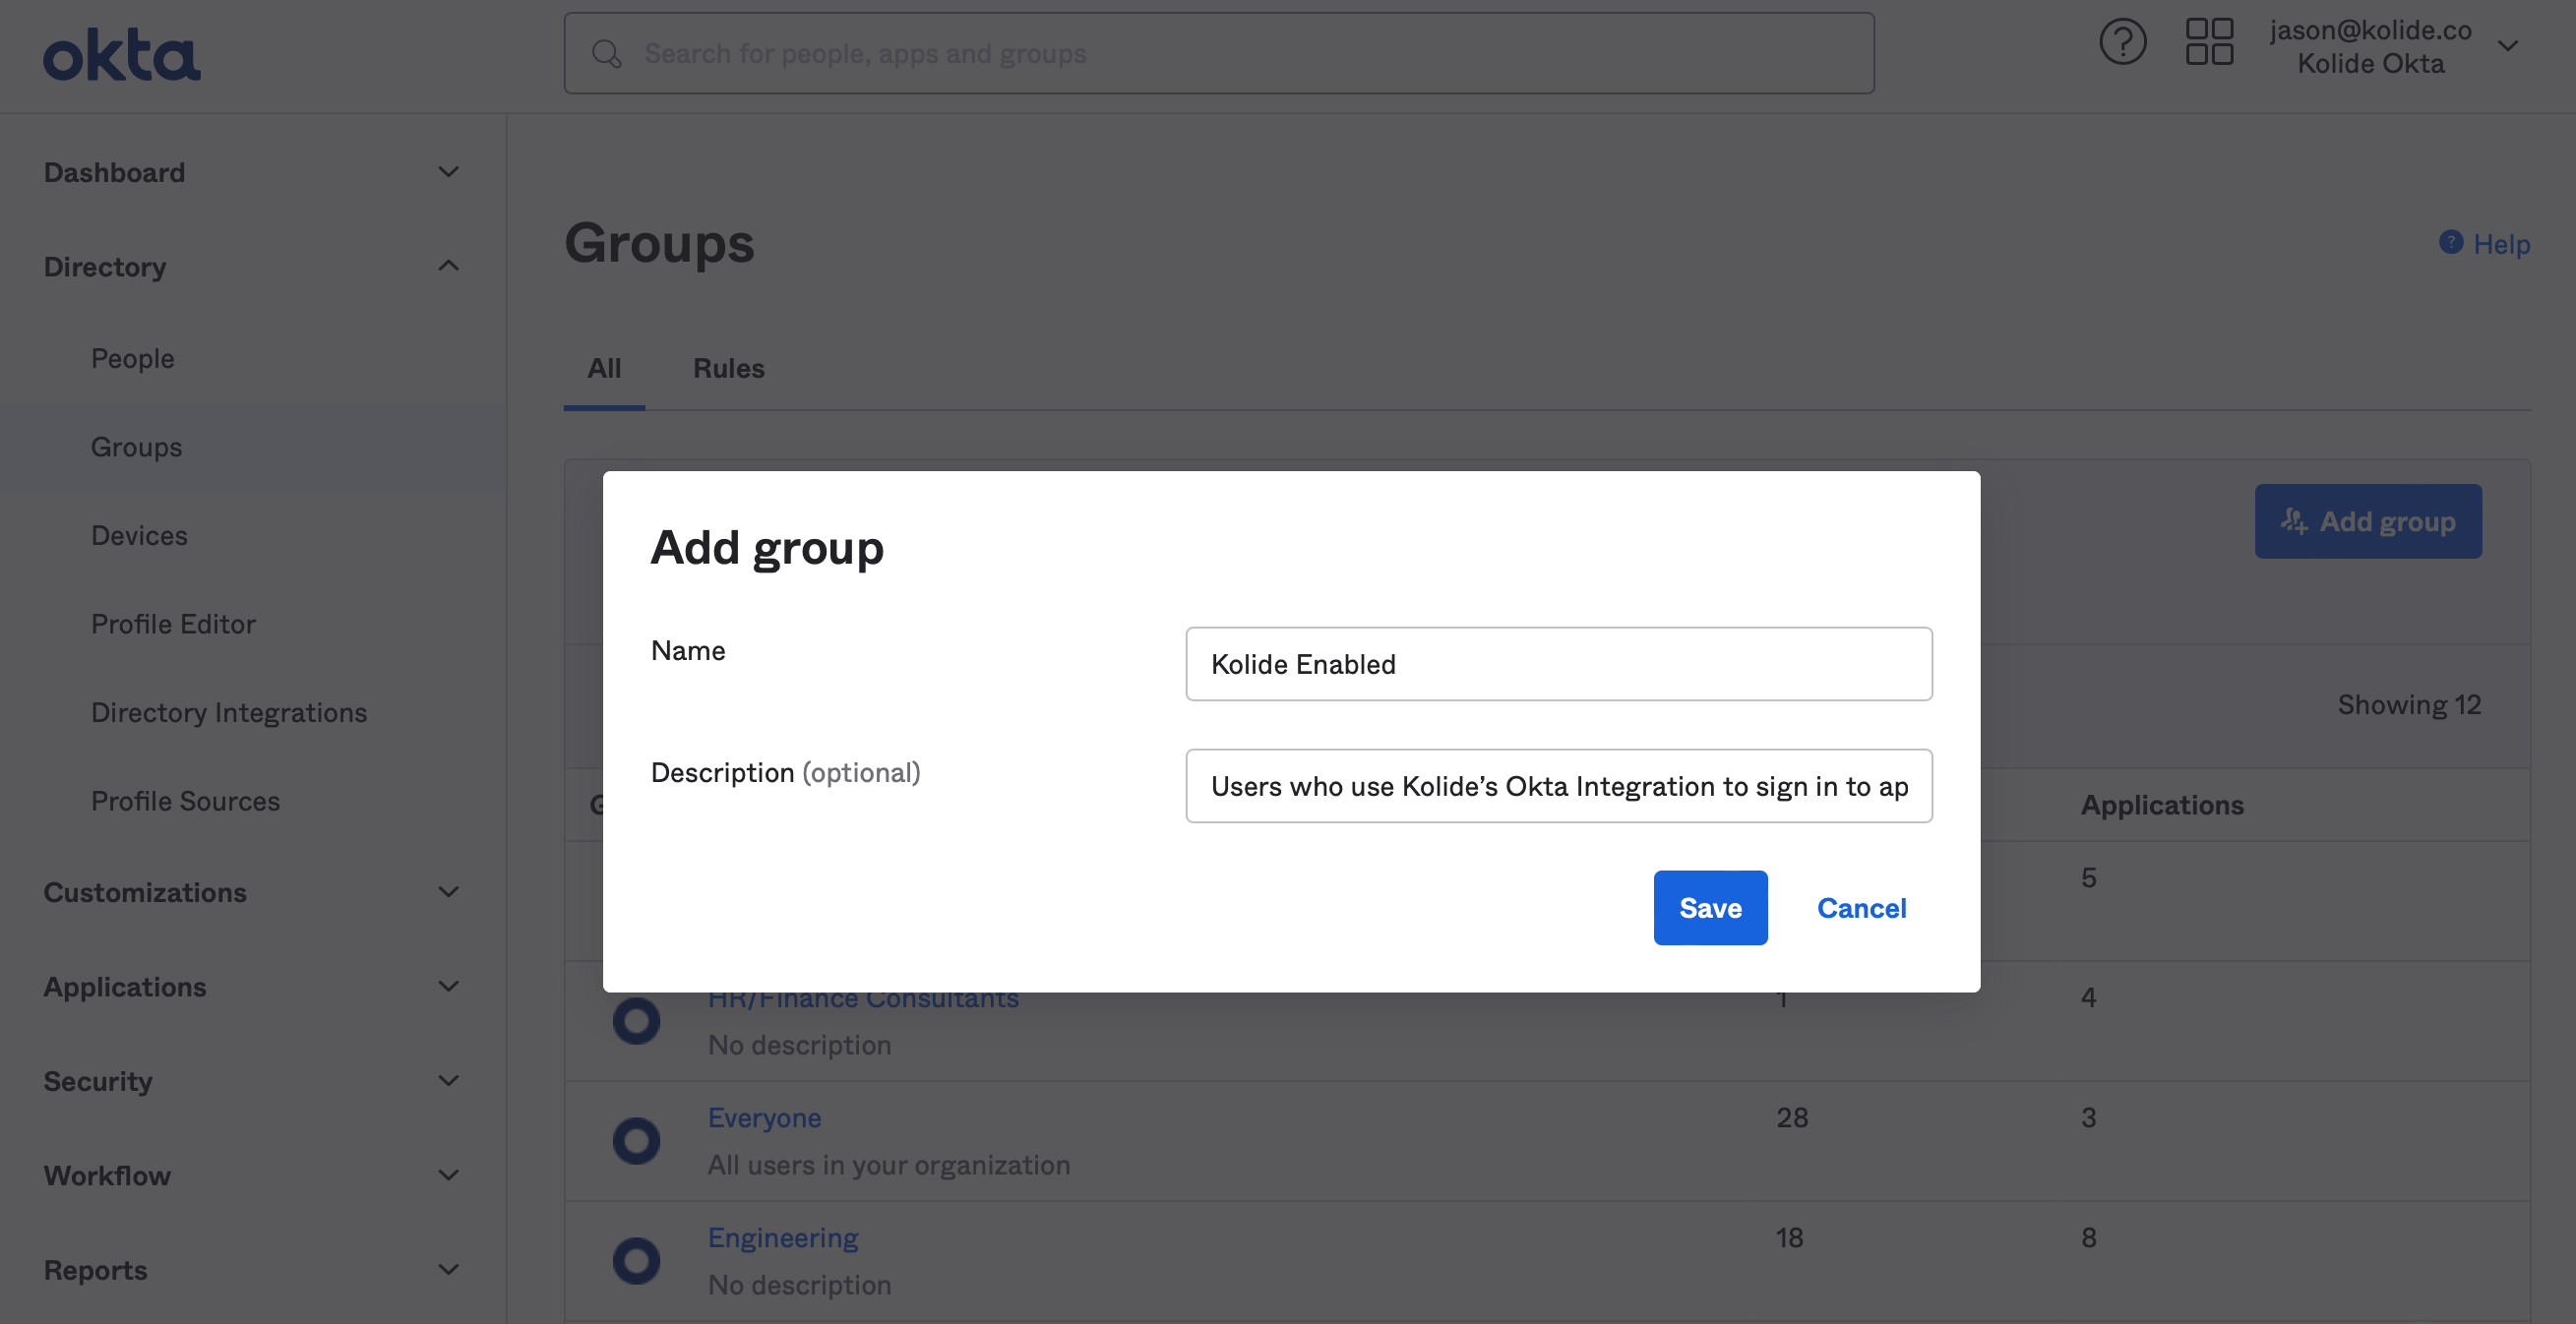
When the modal appears, fill it out with an easy to understand name and description. Feel free to use the suggestions below:
- Name: Kolide Enabled
- Description: Users who use Kolide’s Okta Integration to sign in to apps.
Finally, click Save to create the new Okta Group.
Once the Group is created, you’ll be redirected to the People tab. From there, click Assign people to begin adding people to the group.
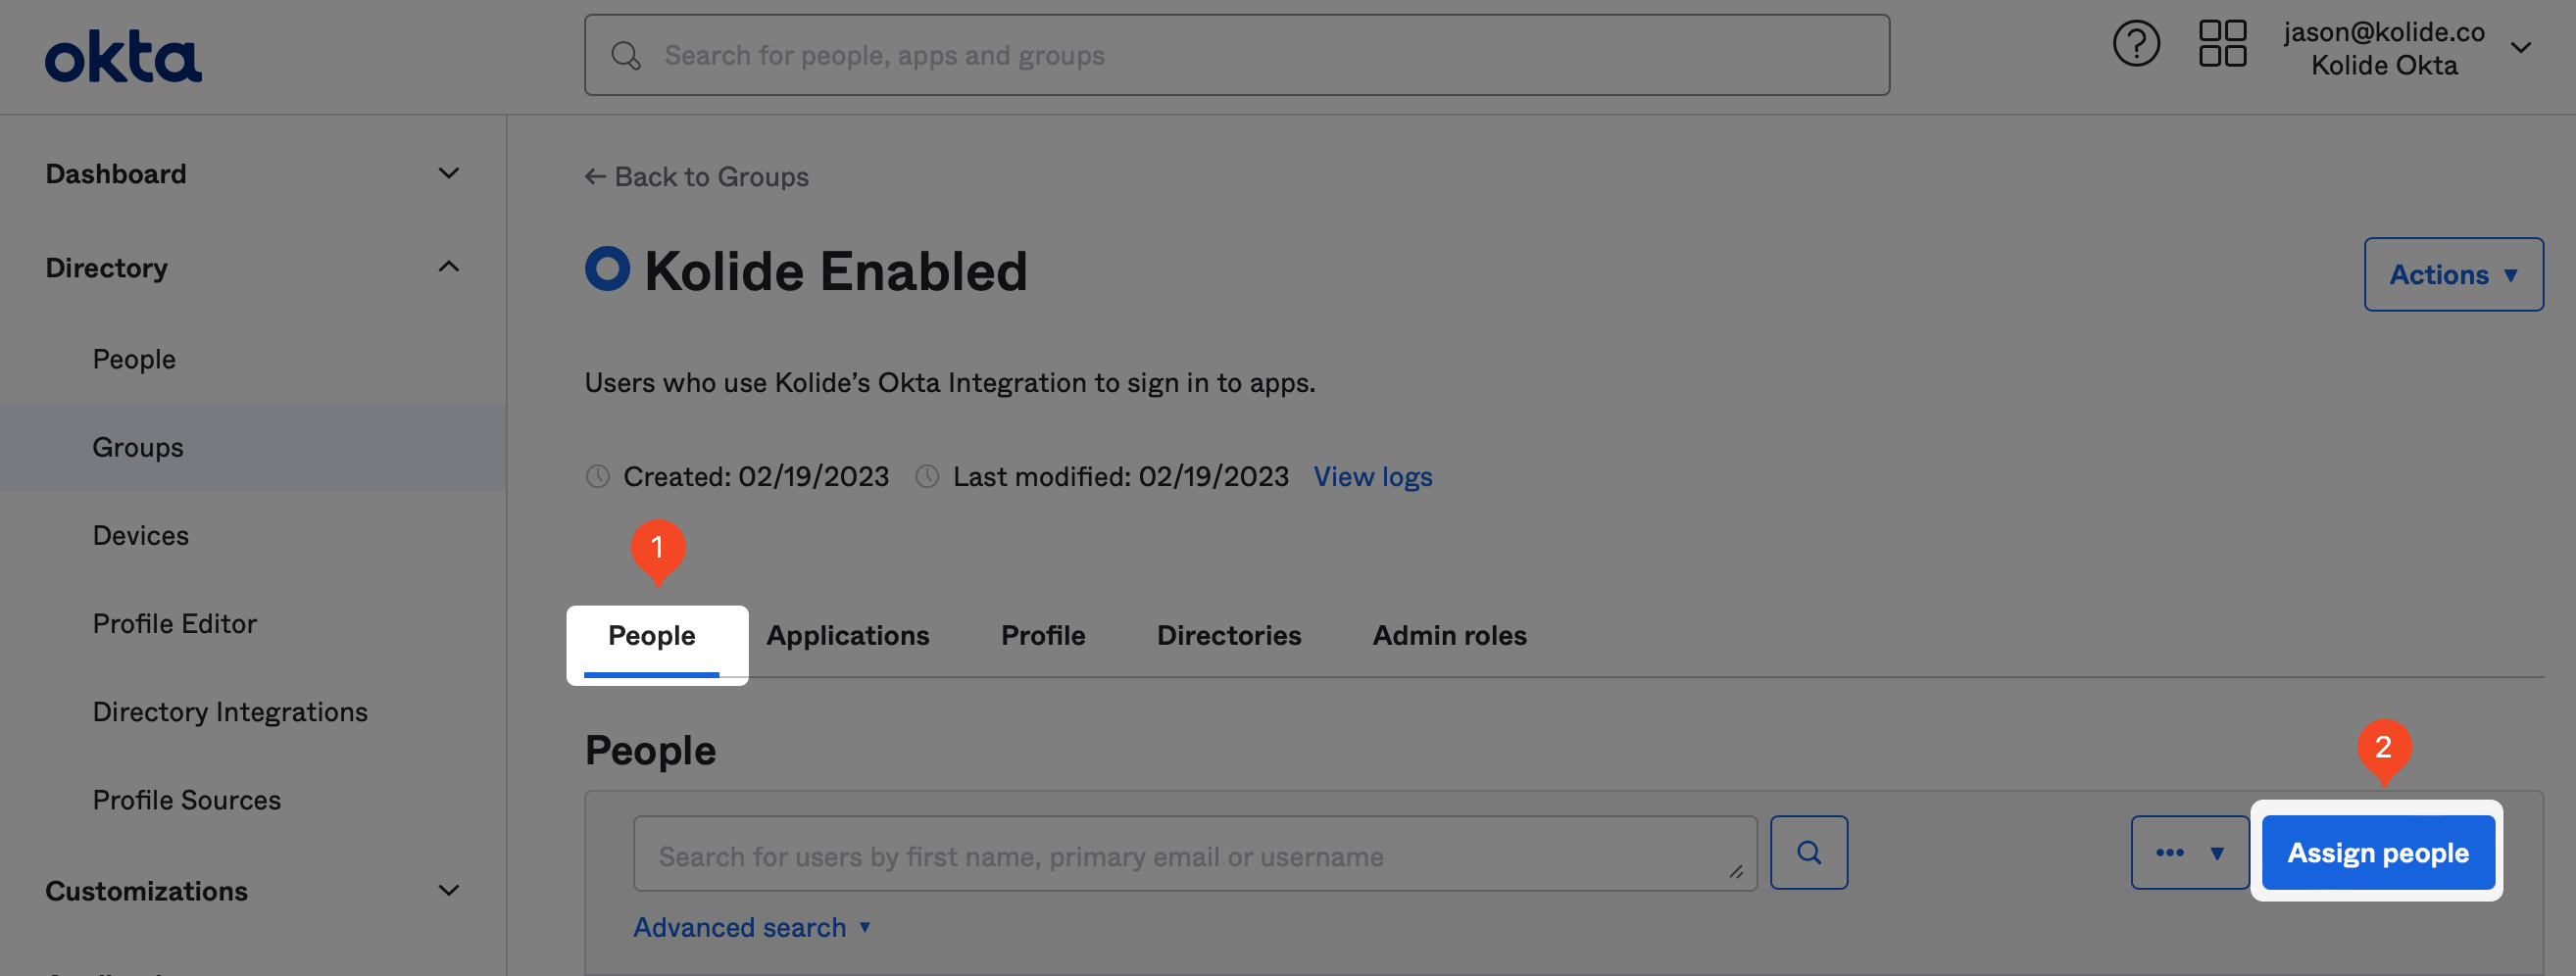
To add people, simply search for the people you would like to add in the search field and click the plus icon at the end of their respective row in the UI.
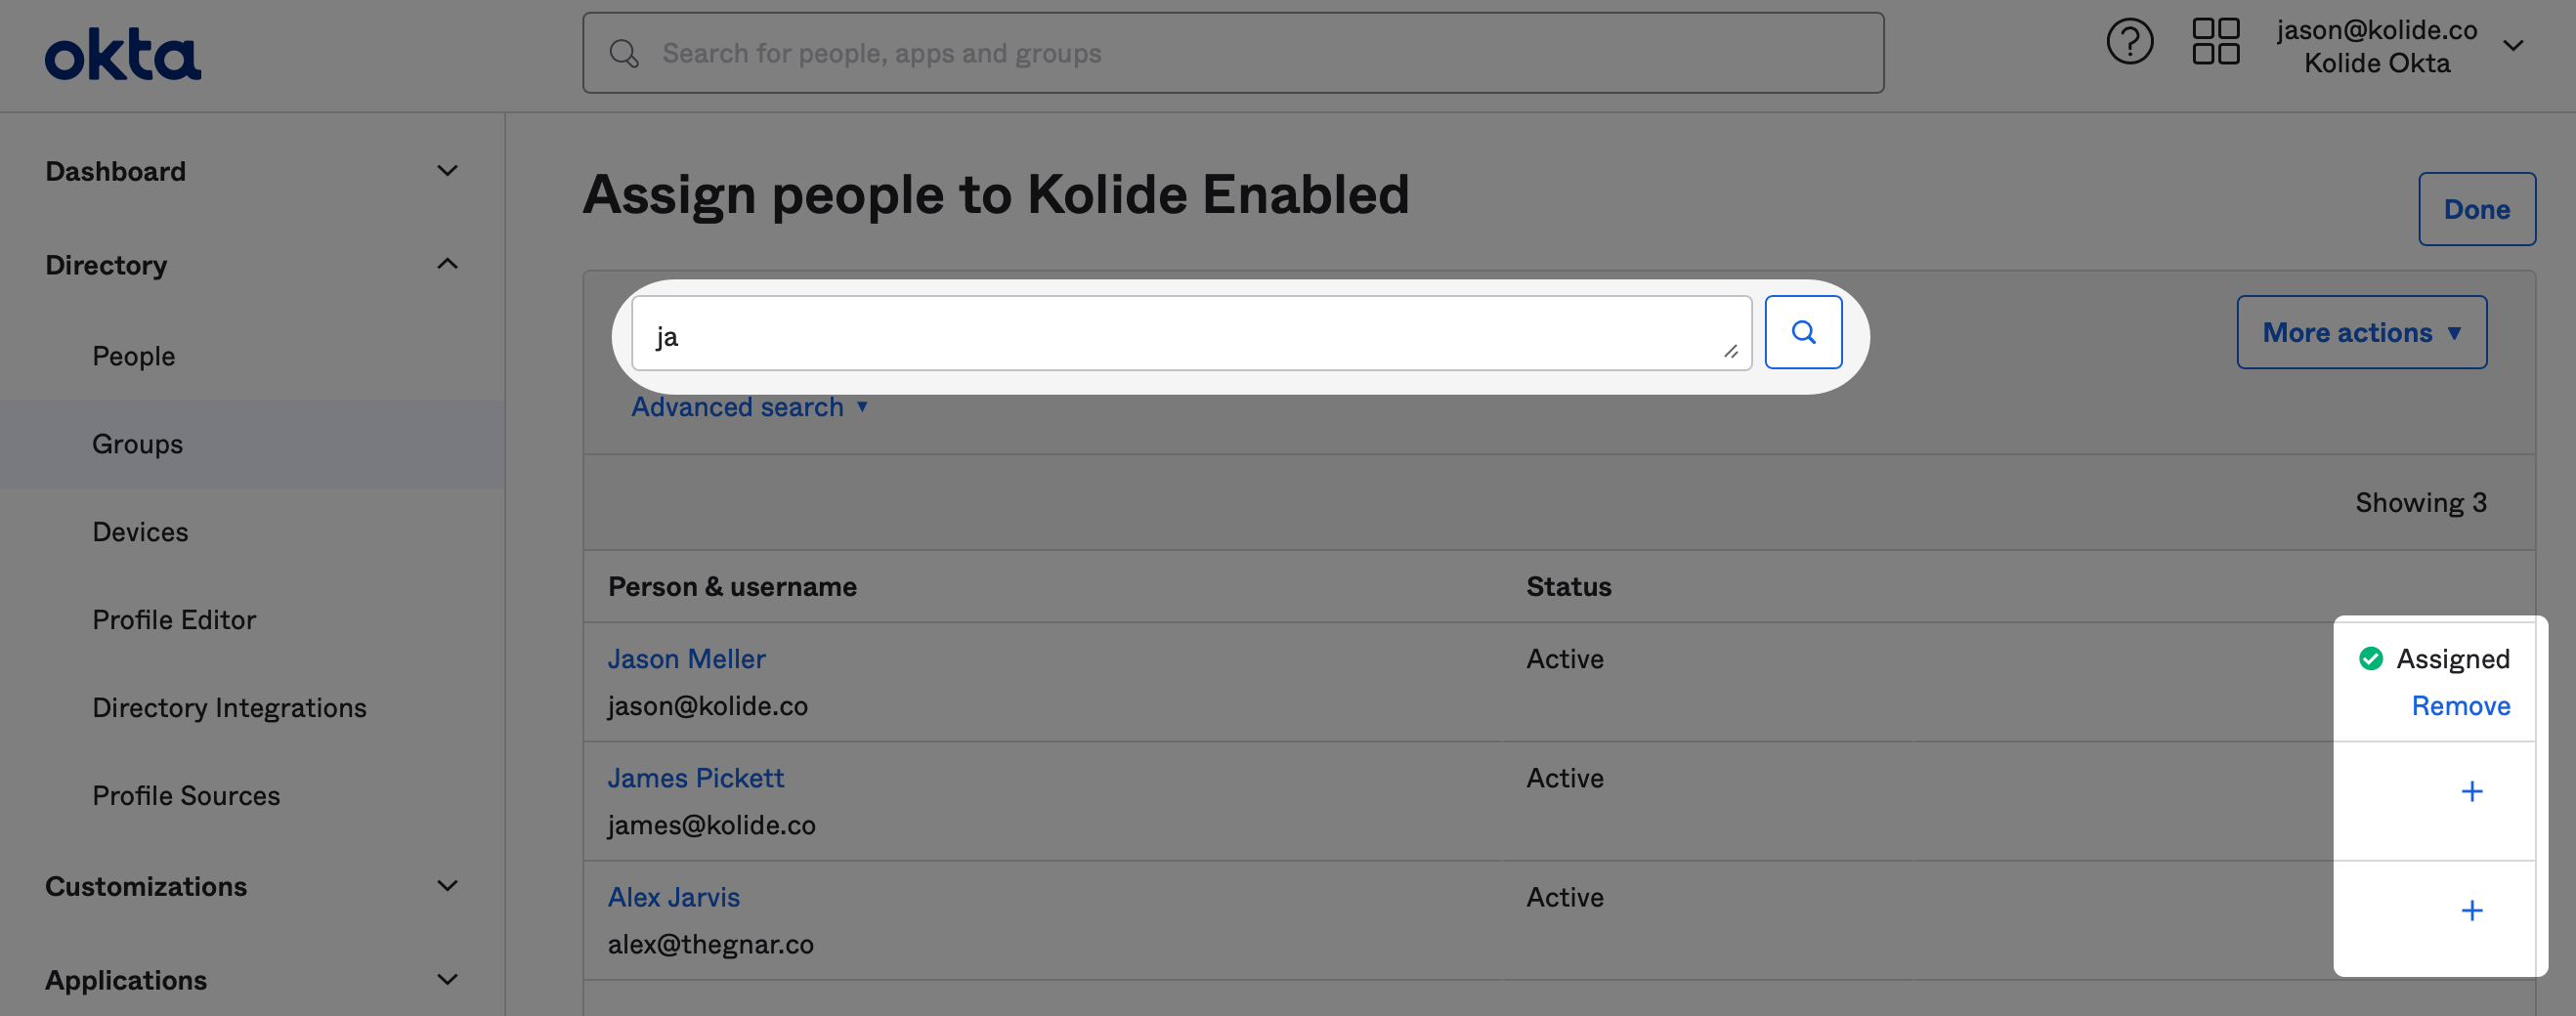
When you’ve finished adding everyone, click Done in the upper-right corner. With that, you’re ready to proceed to the next step.
Step 2: Configure SSO with Okta (SAML 2.0)
In this step, we will add Kolide as an Application to your Okta instance and configure single sign-on with SAML.
Supported Features
- SP-initiated SSO (Single Sign-On)
- IdP-initiated SSO (through Third-party Initiated Login)
Configuration Steps
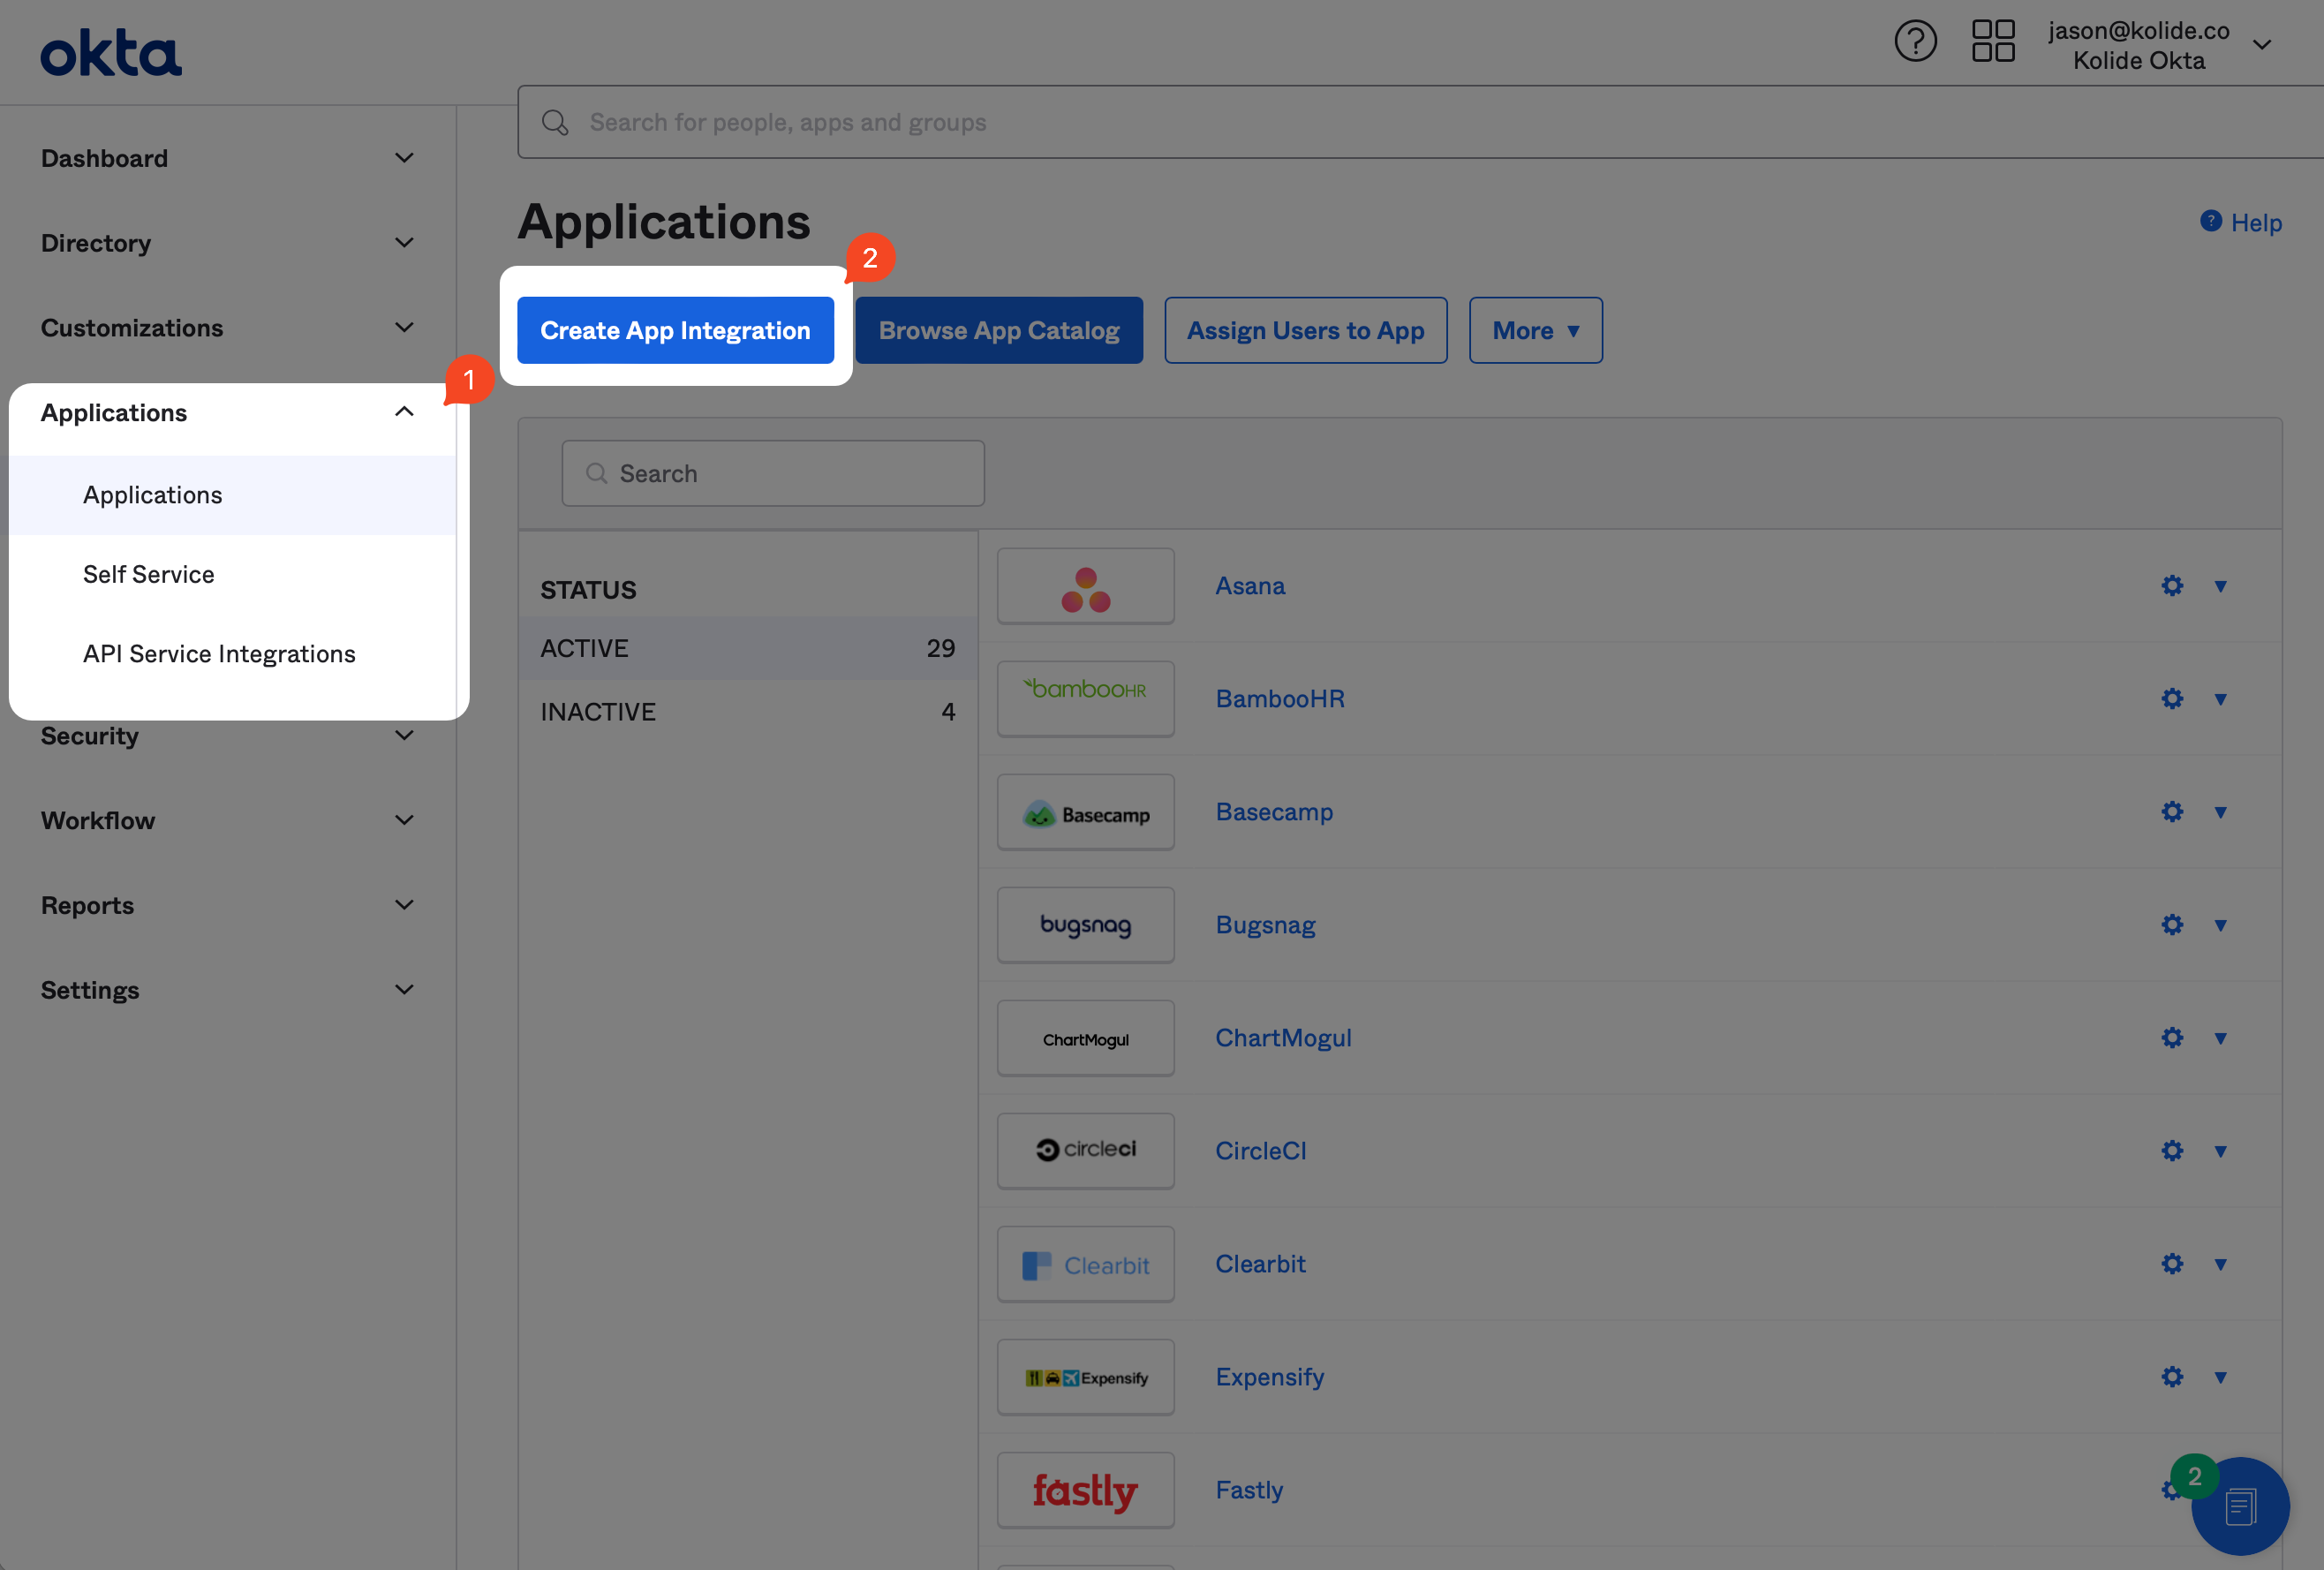
If you haven’t already, sign into your Okta Administrative portal
https://${yourOktaDomain}-admin.okta.com. Once signed in, click
Applications in the left-hand sidebar, and then Create App Integration
near the top of the resulting page.
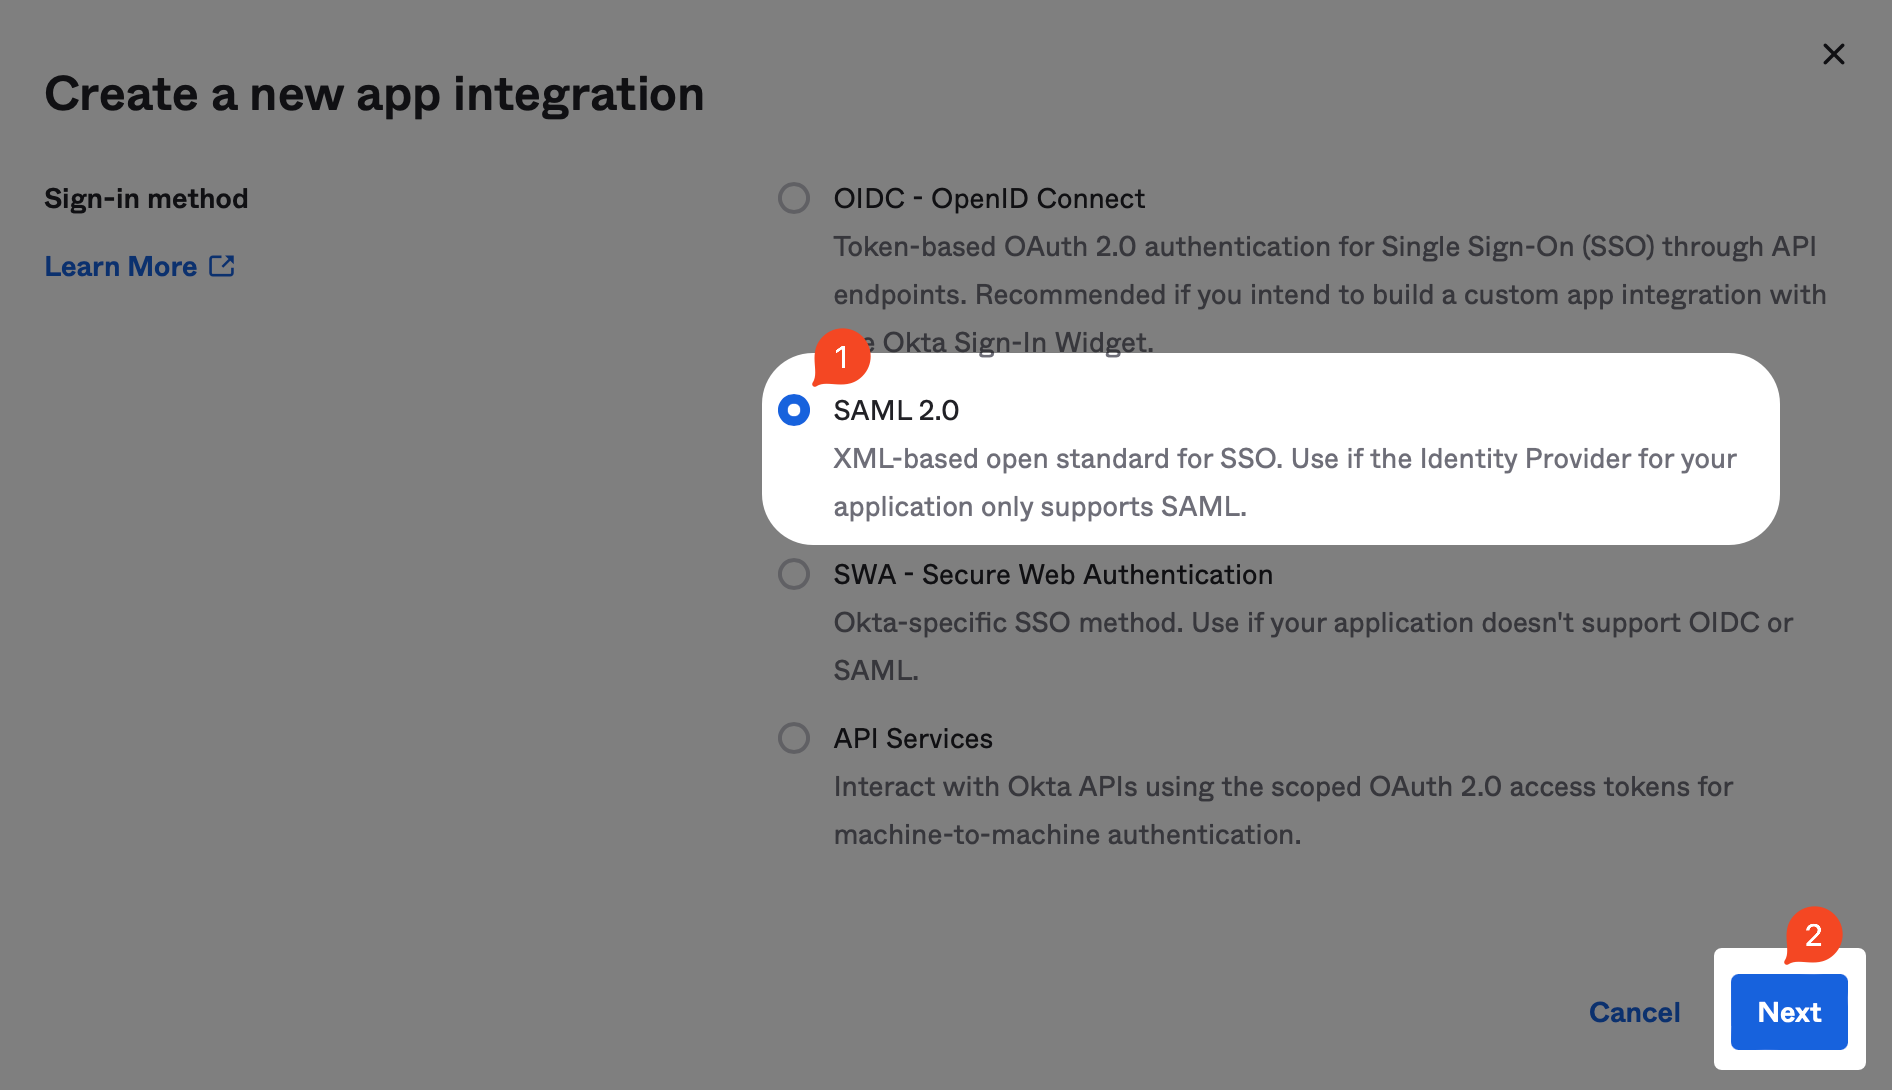
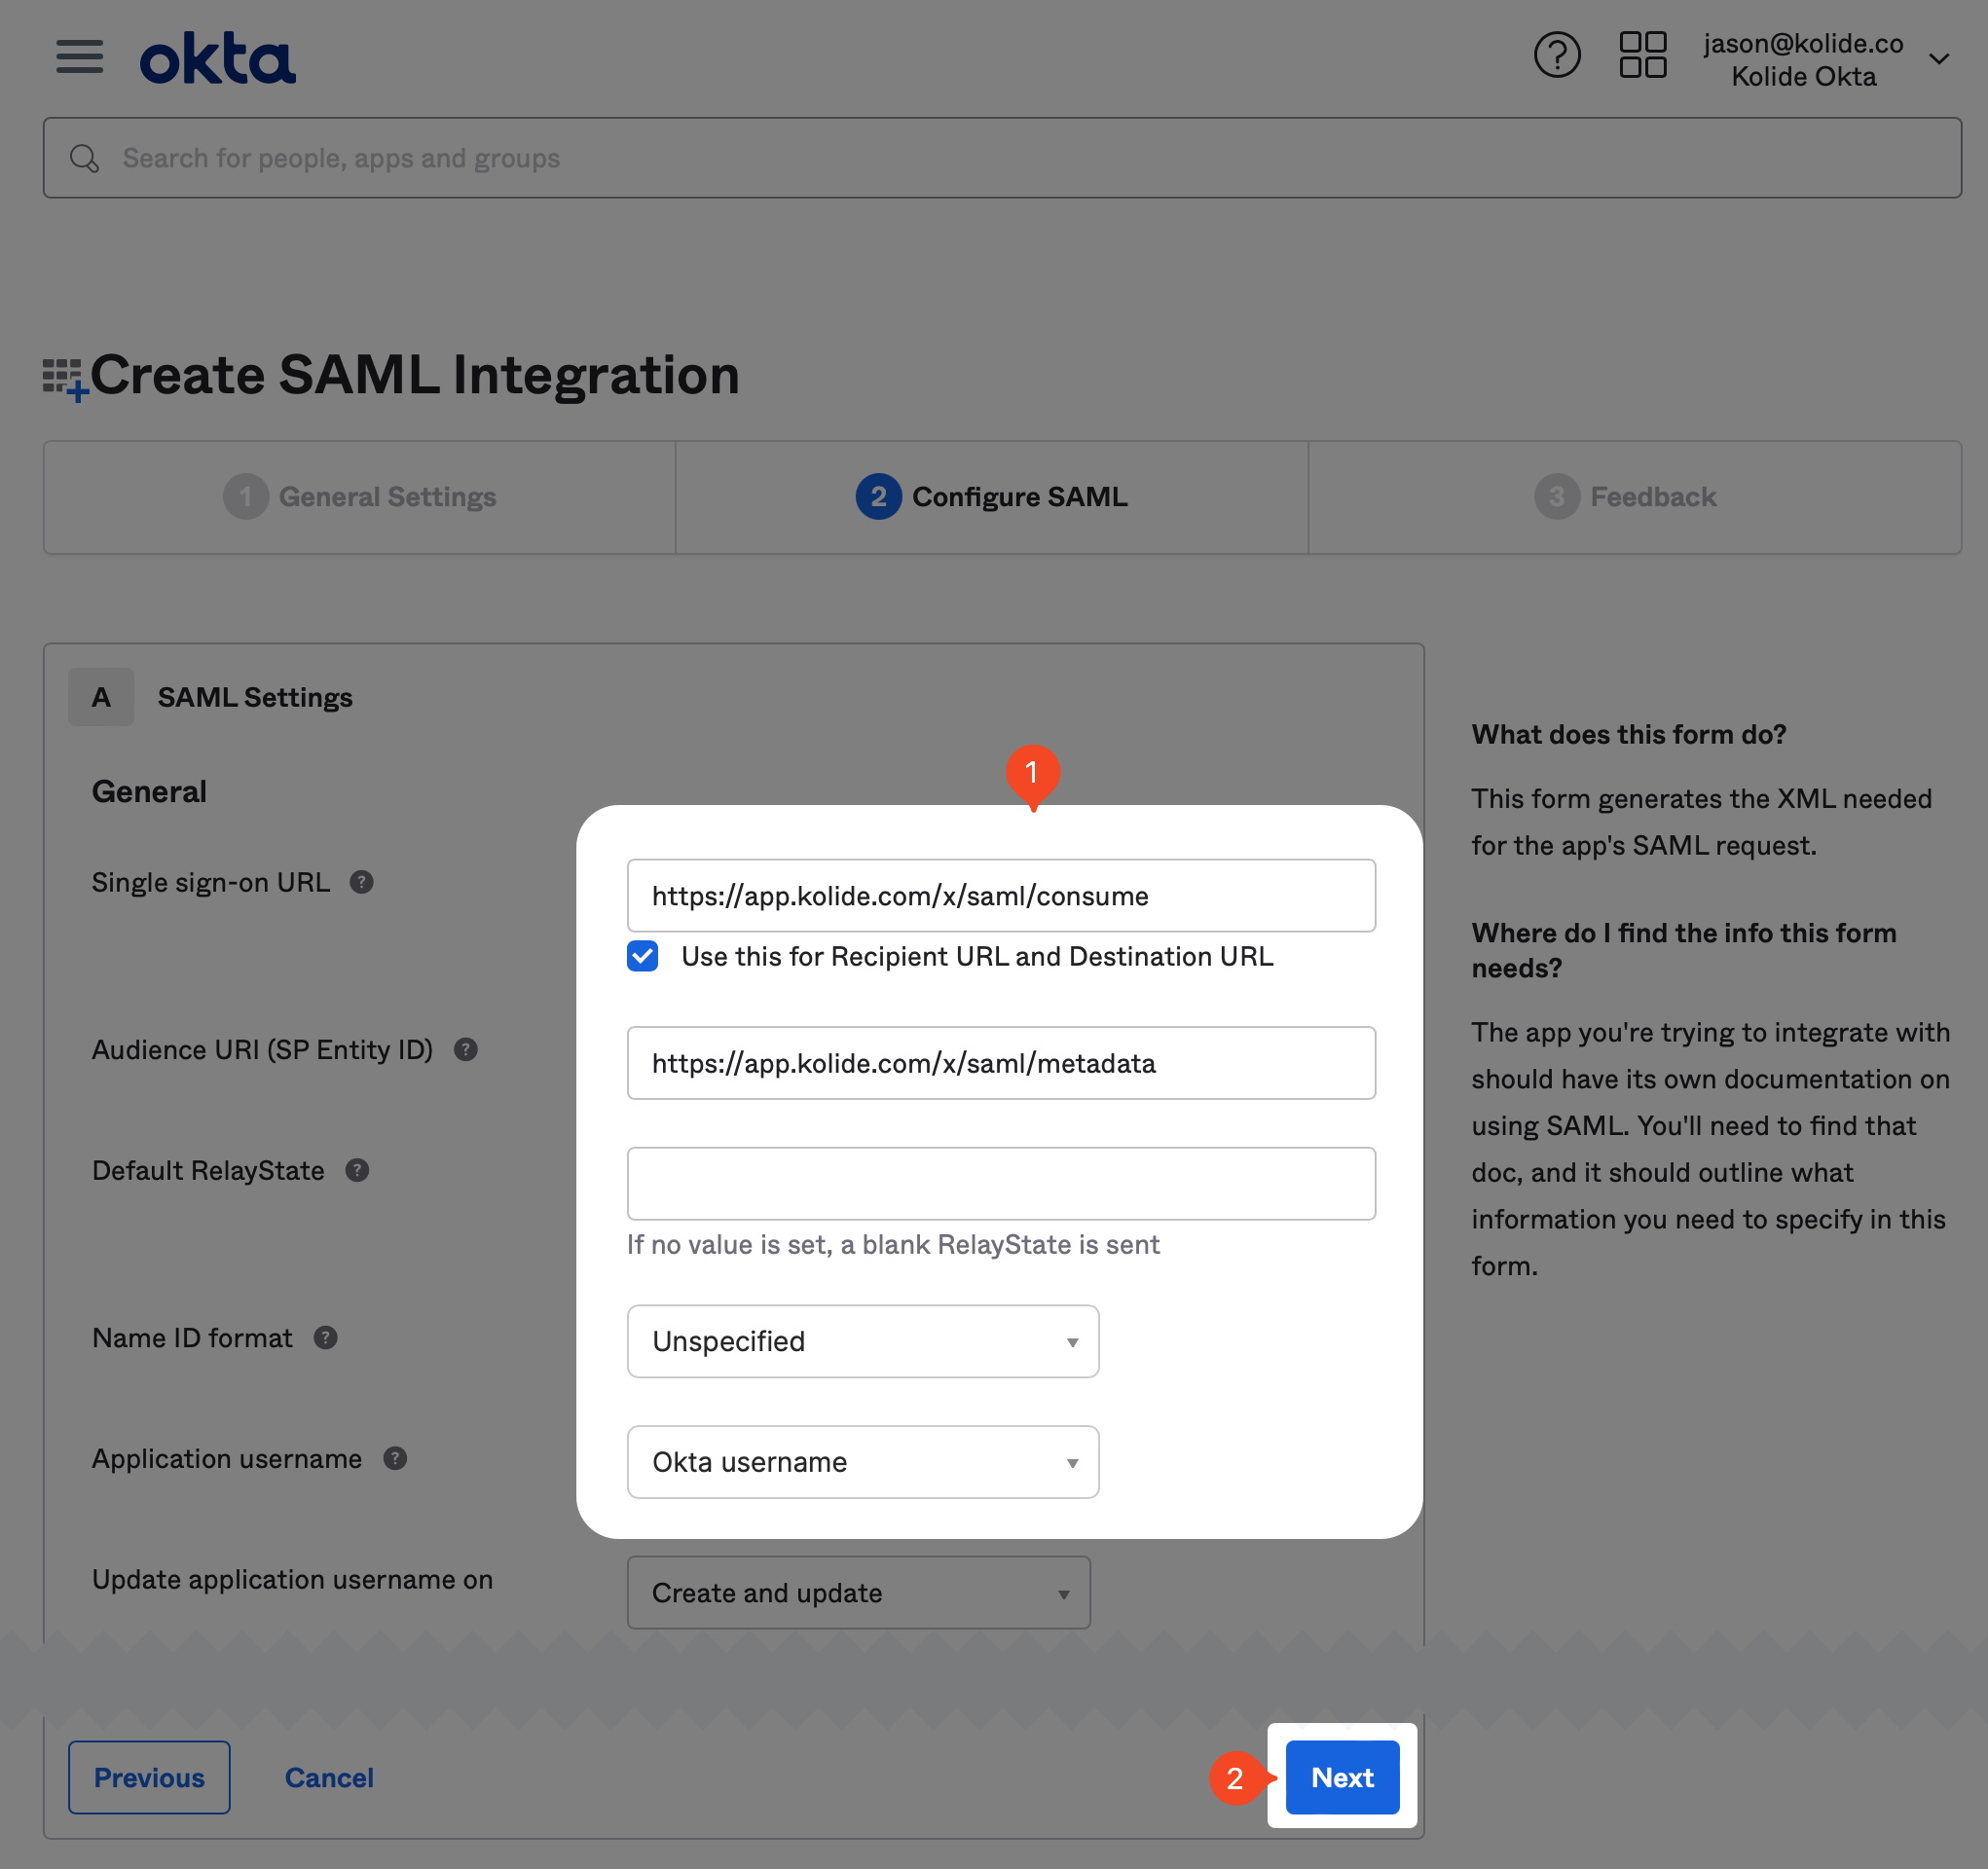
In the modal that opens up, select the SAML 2.0 radio button and click Next.
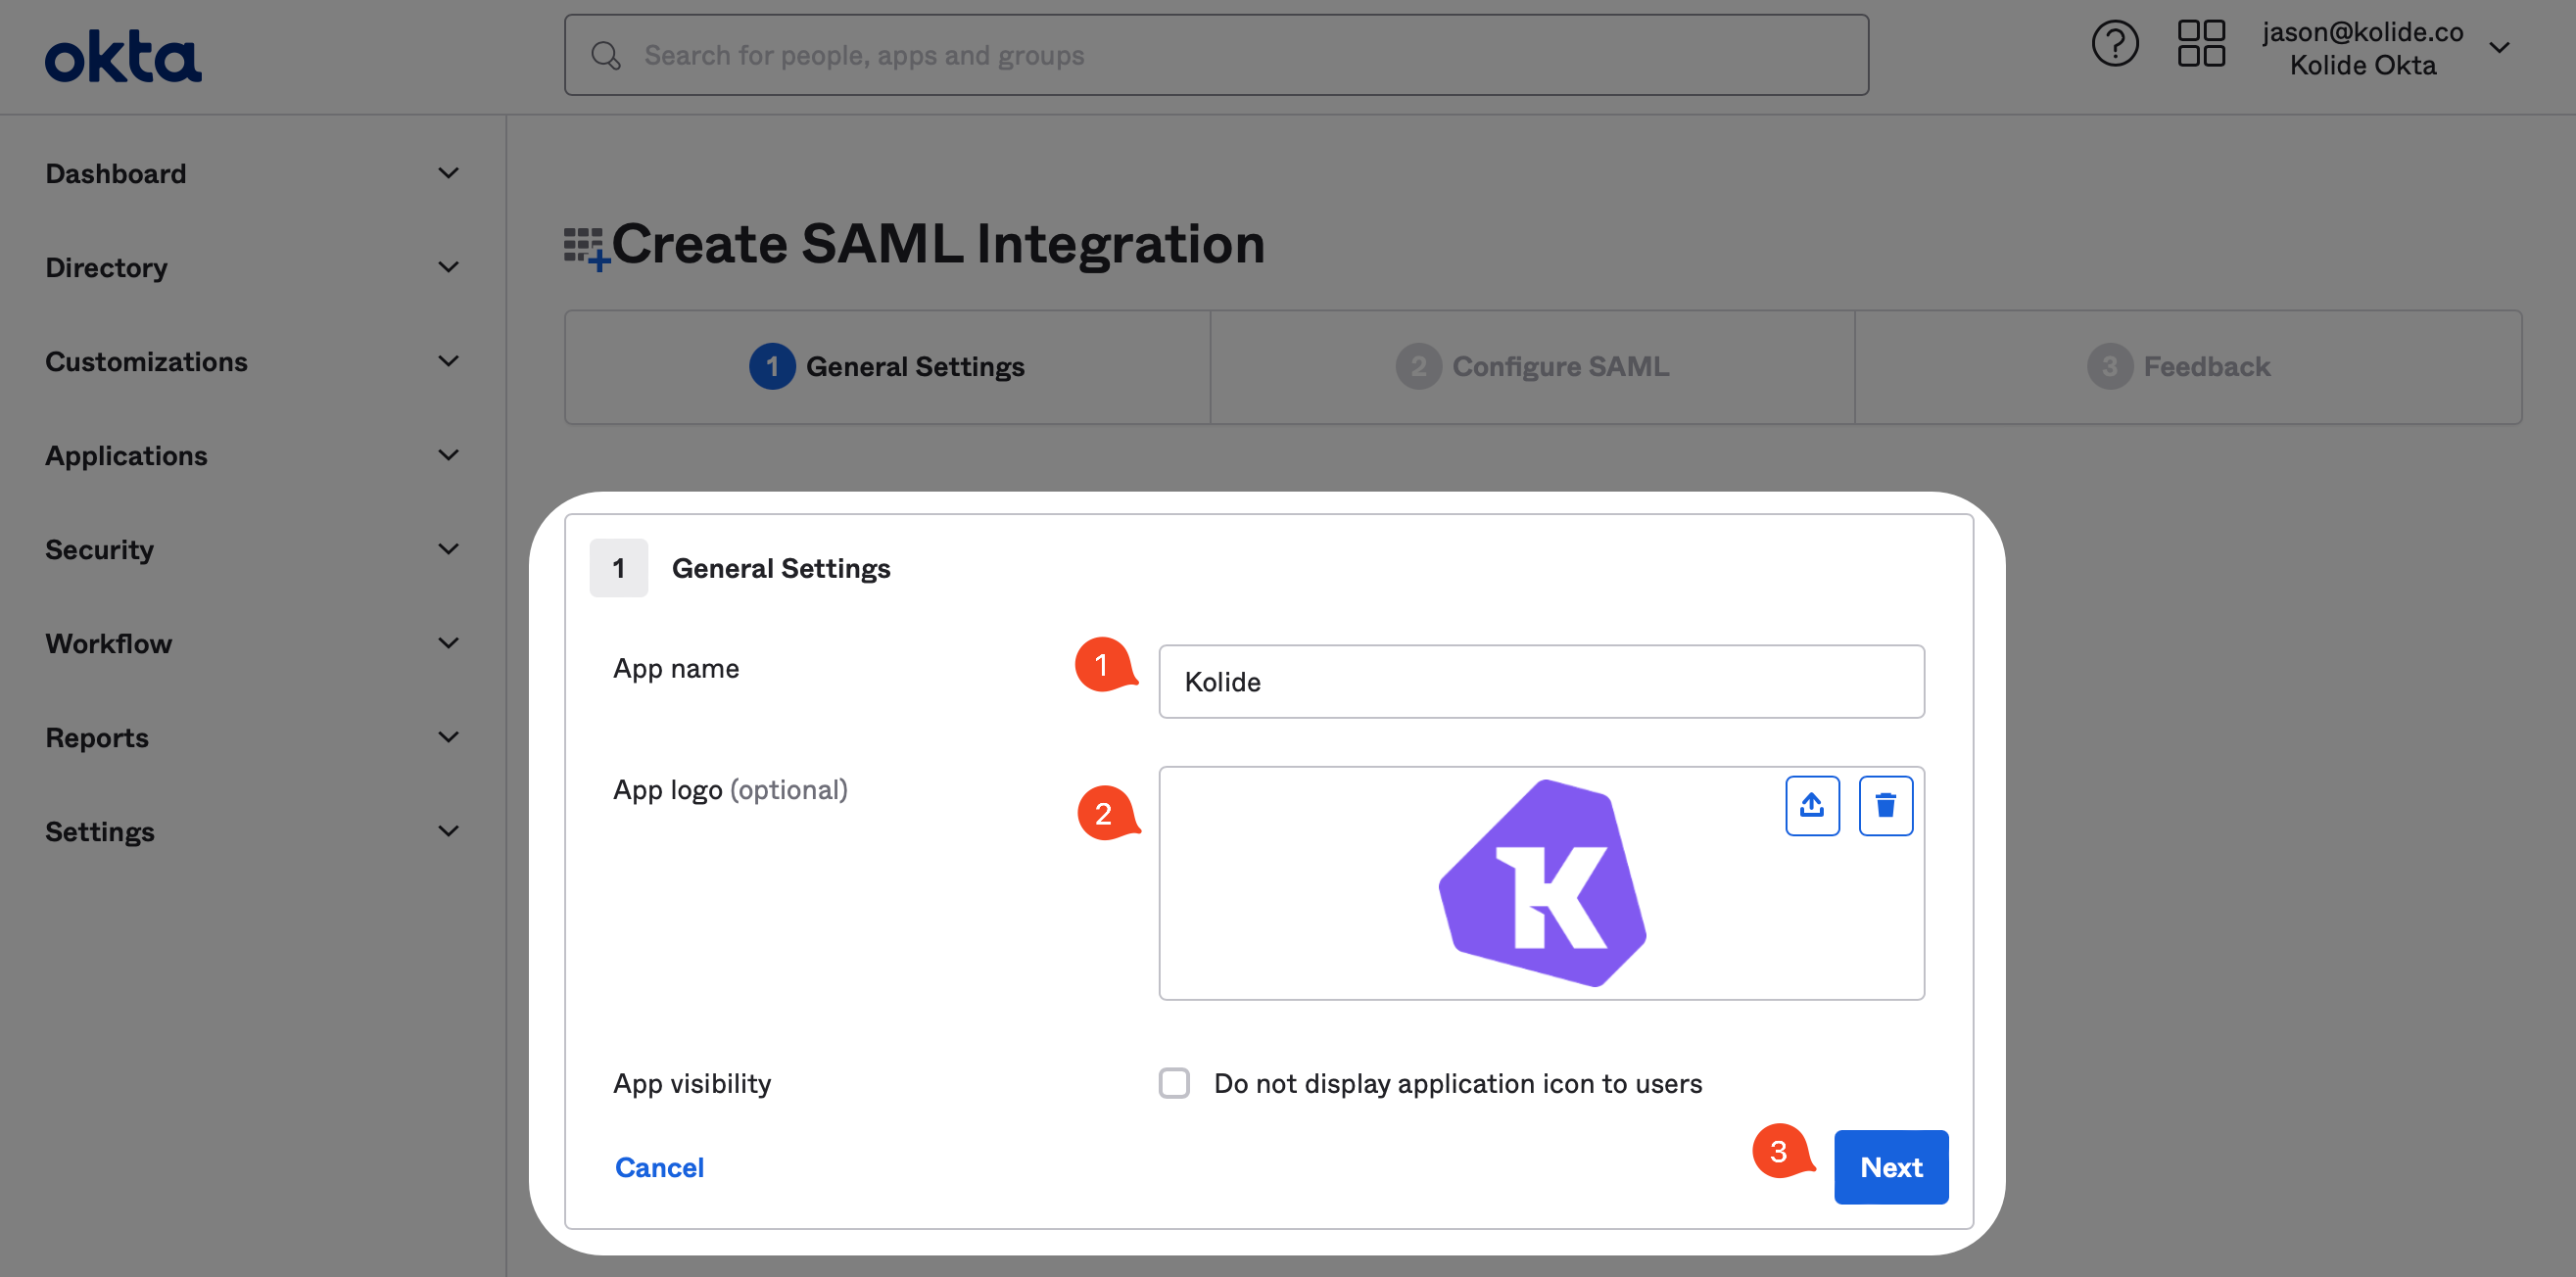
Now, in the General Settings form, fill it out as shown below. For a nice looking Kolide logo, you can download it here.
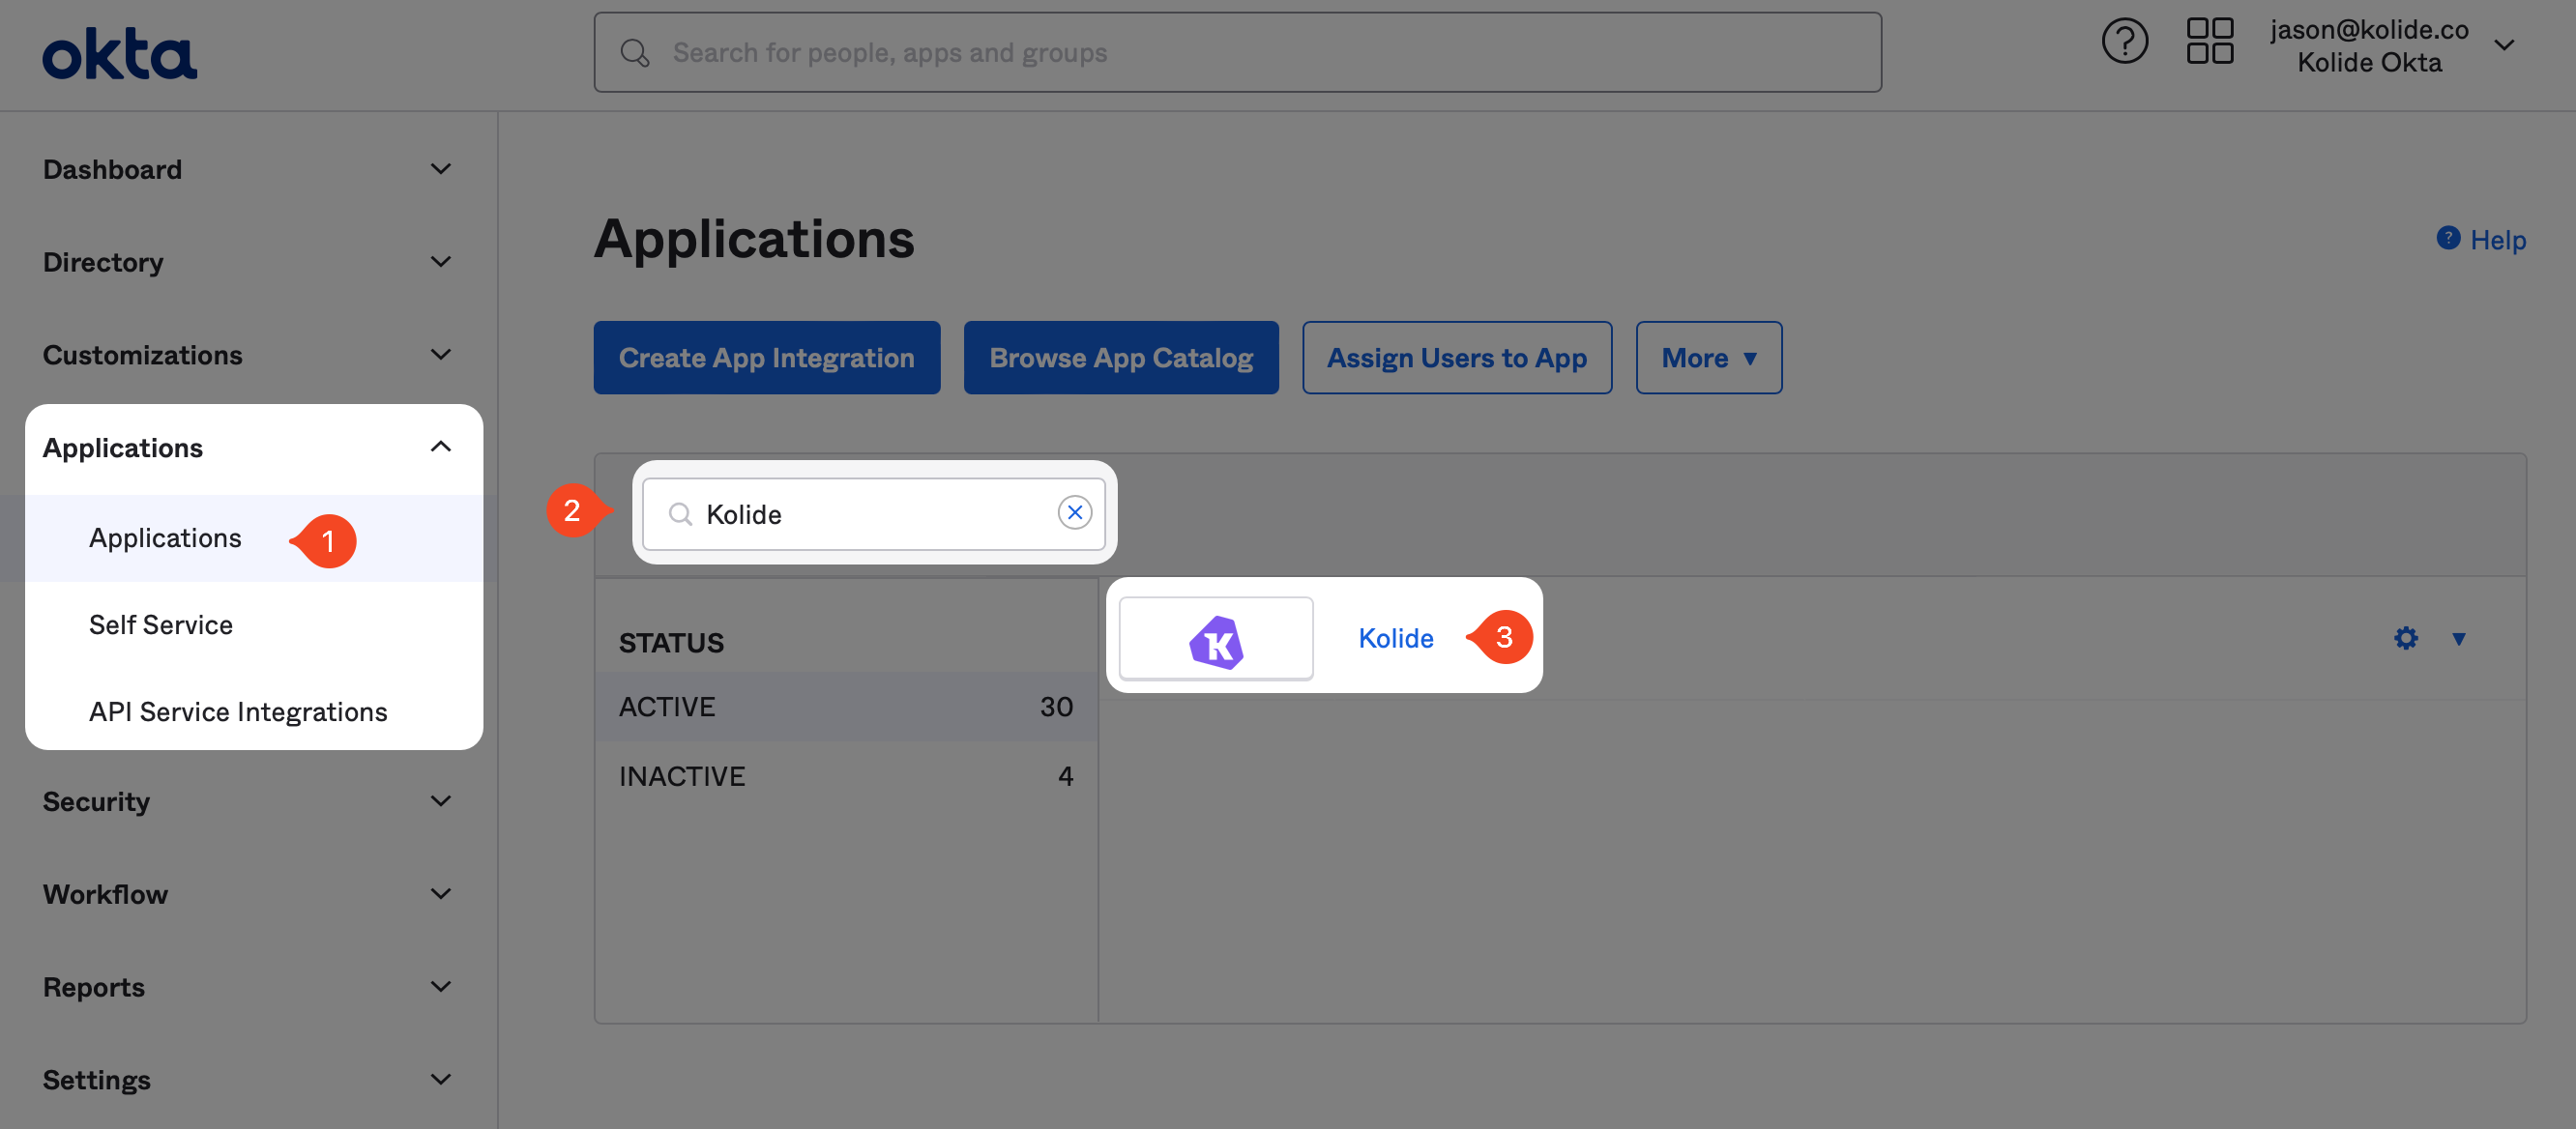
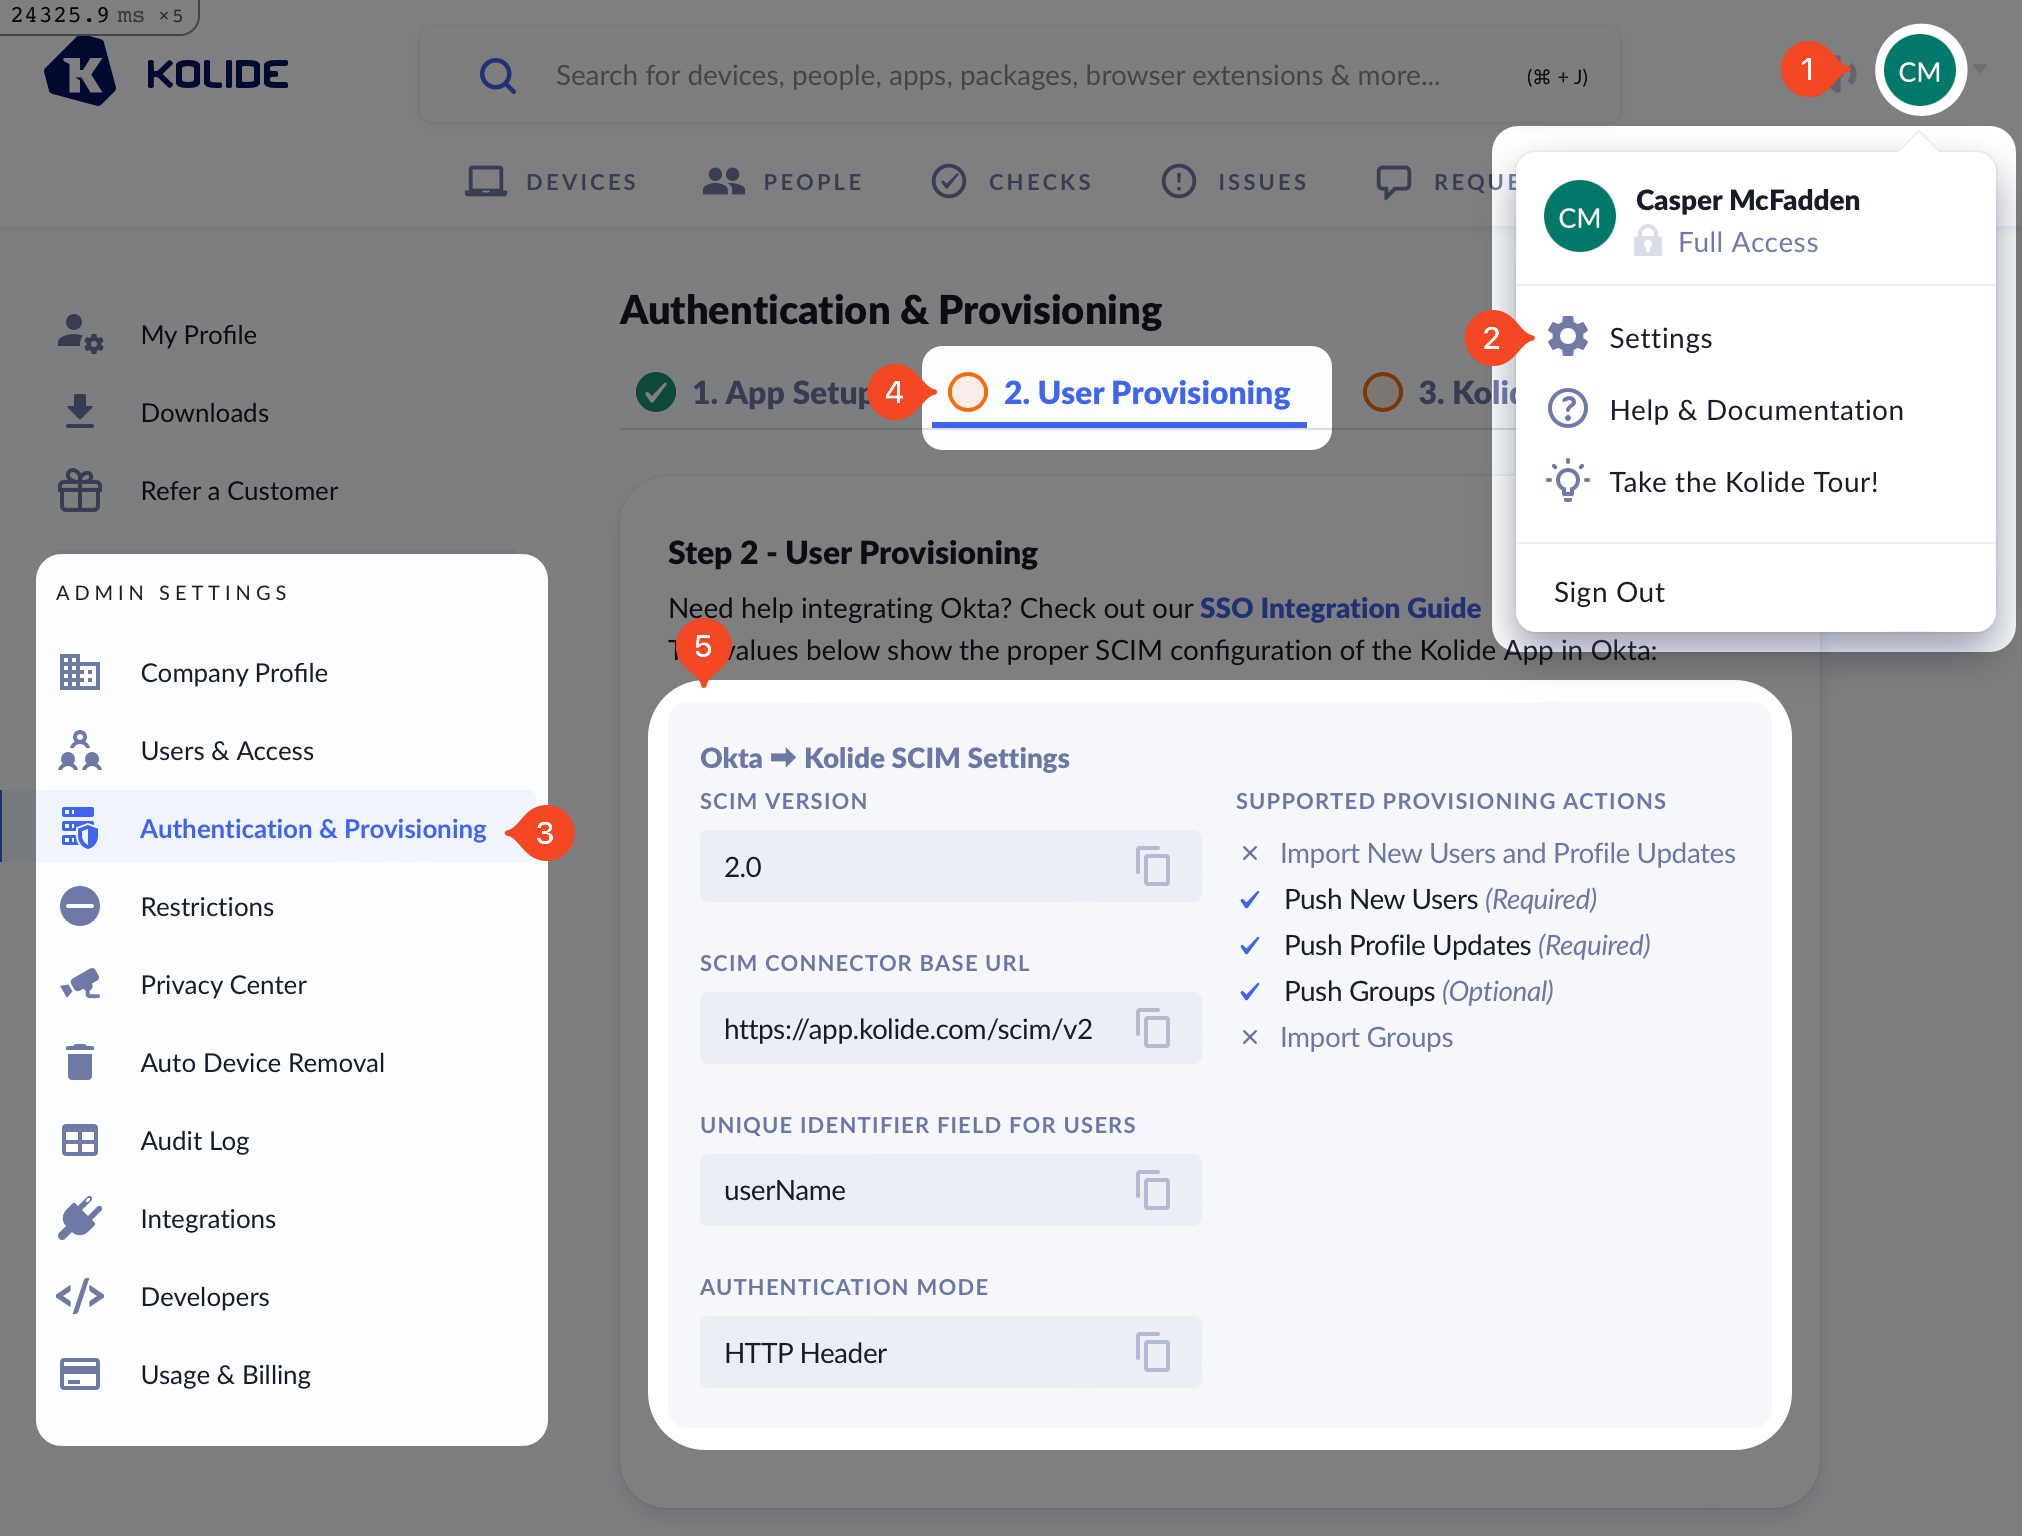
Next, in another tab, sign into https://app.kolide.com, click the avatar in the upper-right, then click Settings, and finally, in the left-hand navigation menu, click Authentication & Provisioning.
You will be copying values from the highlighted area below into Okta.
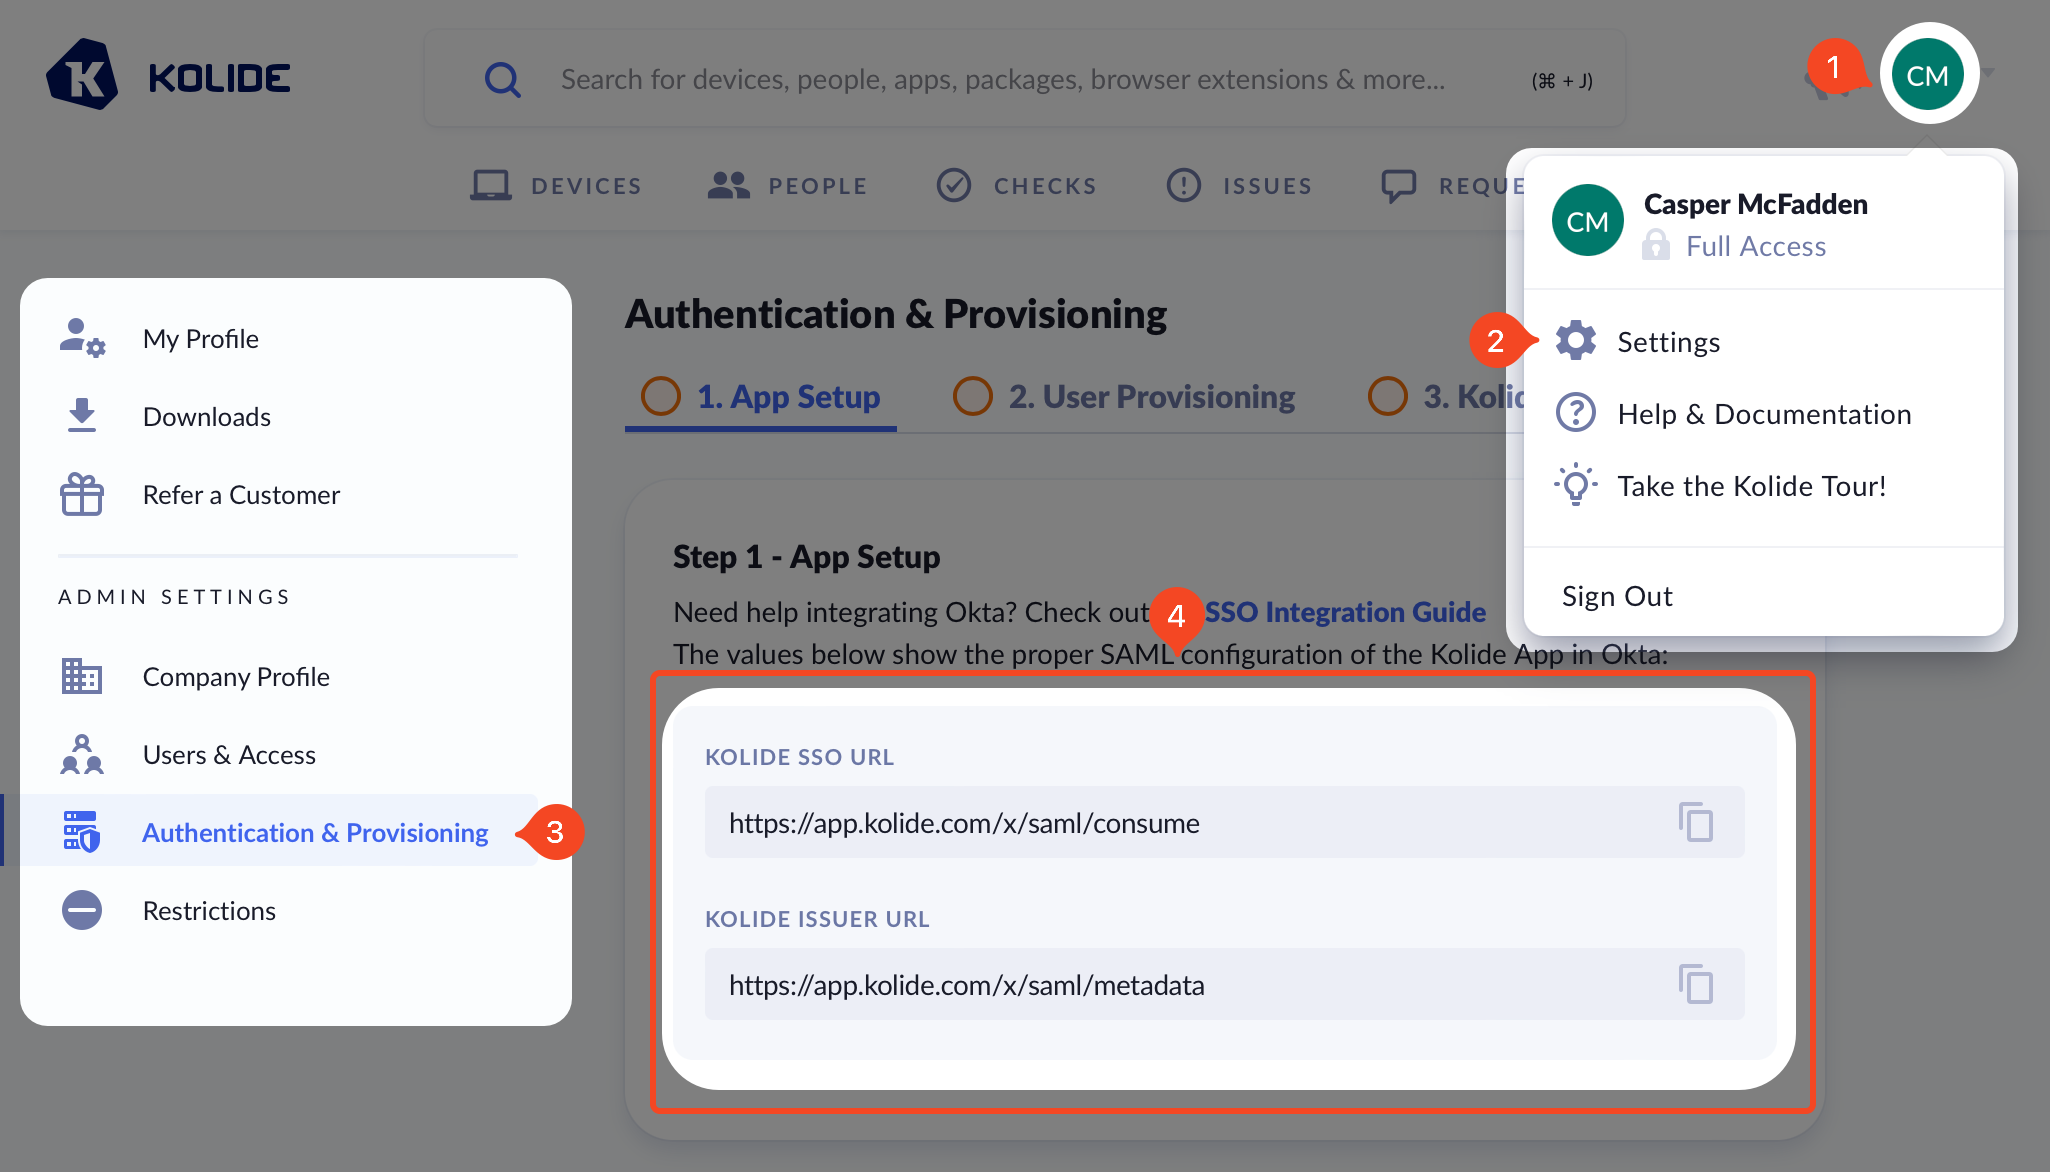
Now in your original tab, you should see the following form:
Make sure you copy the values from your Kolide app directly and do not use the example values shown as an example in the screenshot.
You will want to copy the values from Kolide as follows:
| Okta Field | Kolide Field |
|---|---|
| Single sign-on URL | Kolide SSO URL |
| Audience URI | Kolide Issuer URL |
In addition, you should set the following values:
-
Name ID Format -
Unspecified -
Application Username -
Okta username -
Update application username on -
Create and update
You can skip all the other fields in the form and click Next at the bottom of the page to proceed.
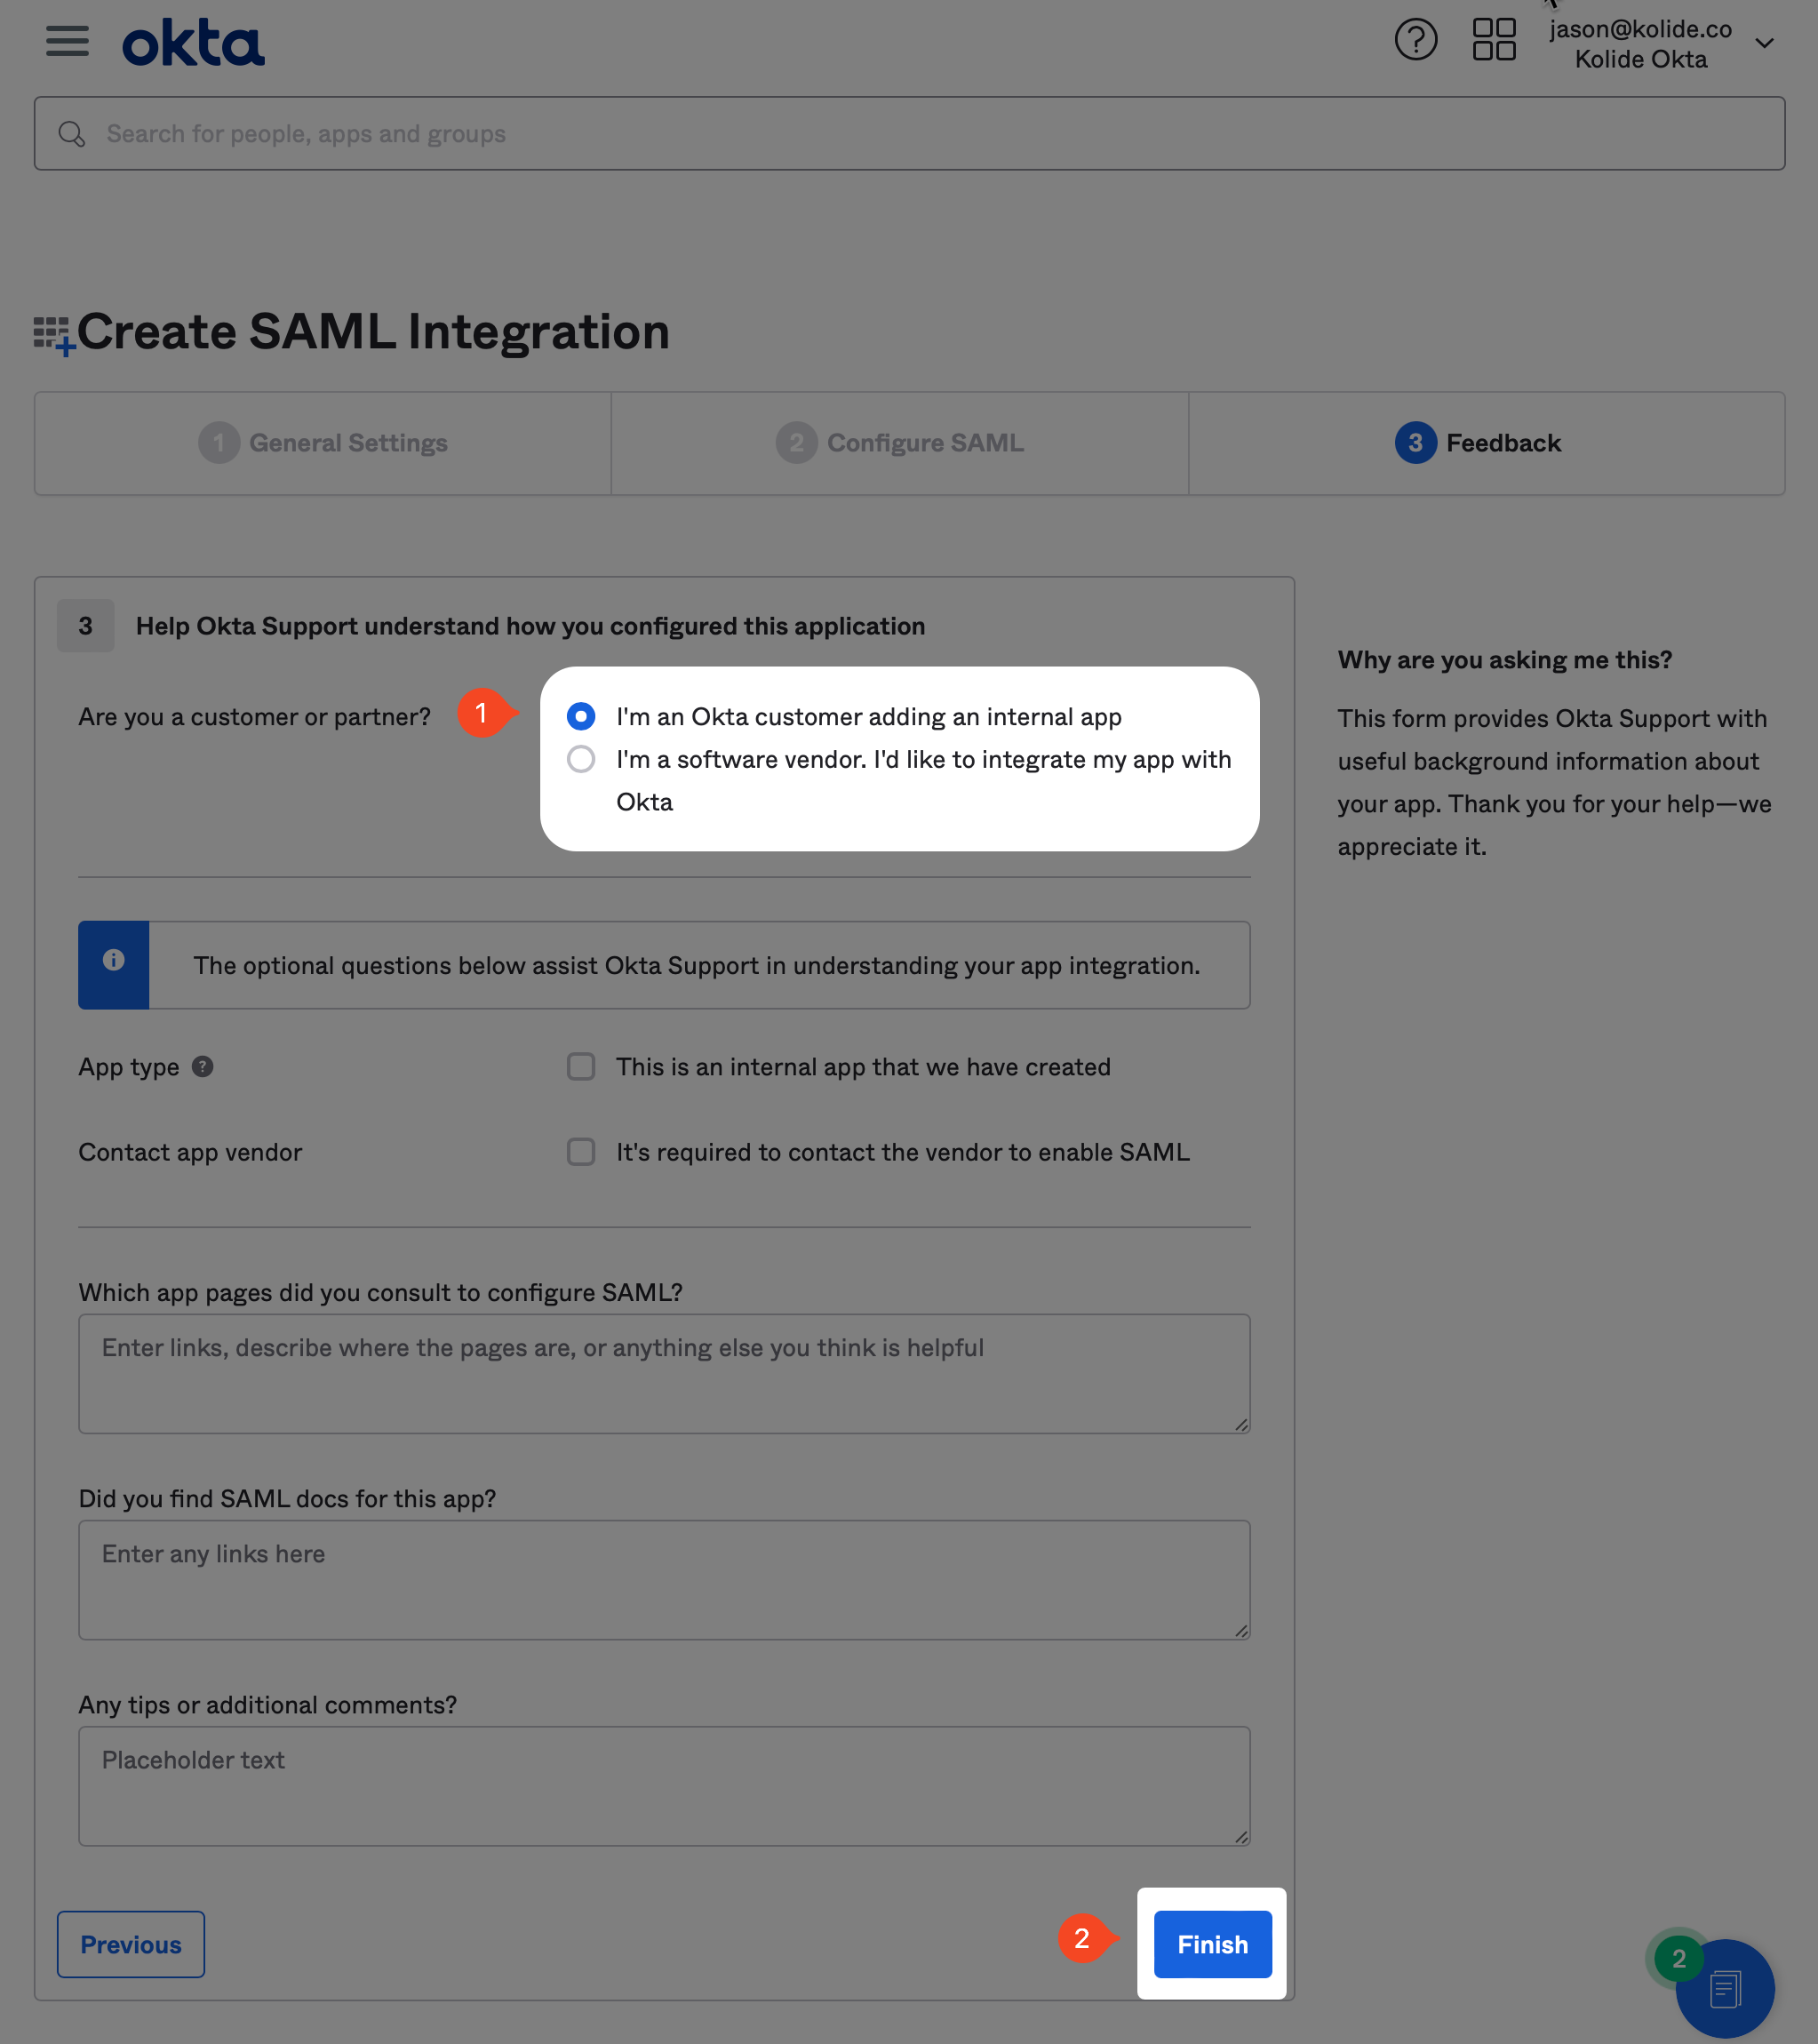
On the next screen, you are asked to fill out an optional form which gives Okta insight into applications they should add integrations for. At the time of this writing, we are already in the process of submitting our app for approval, so you can just mark it as an internal app and click Finish.
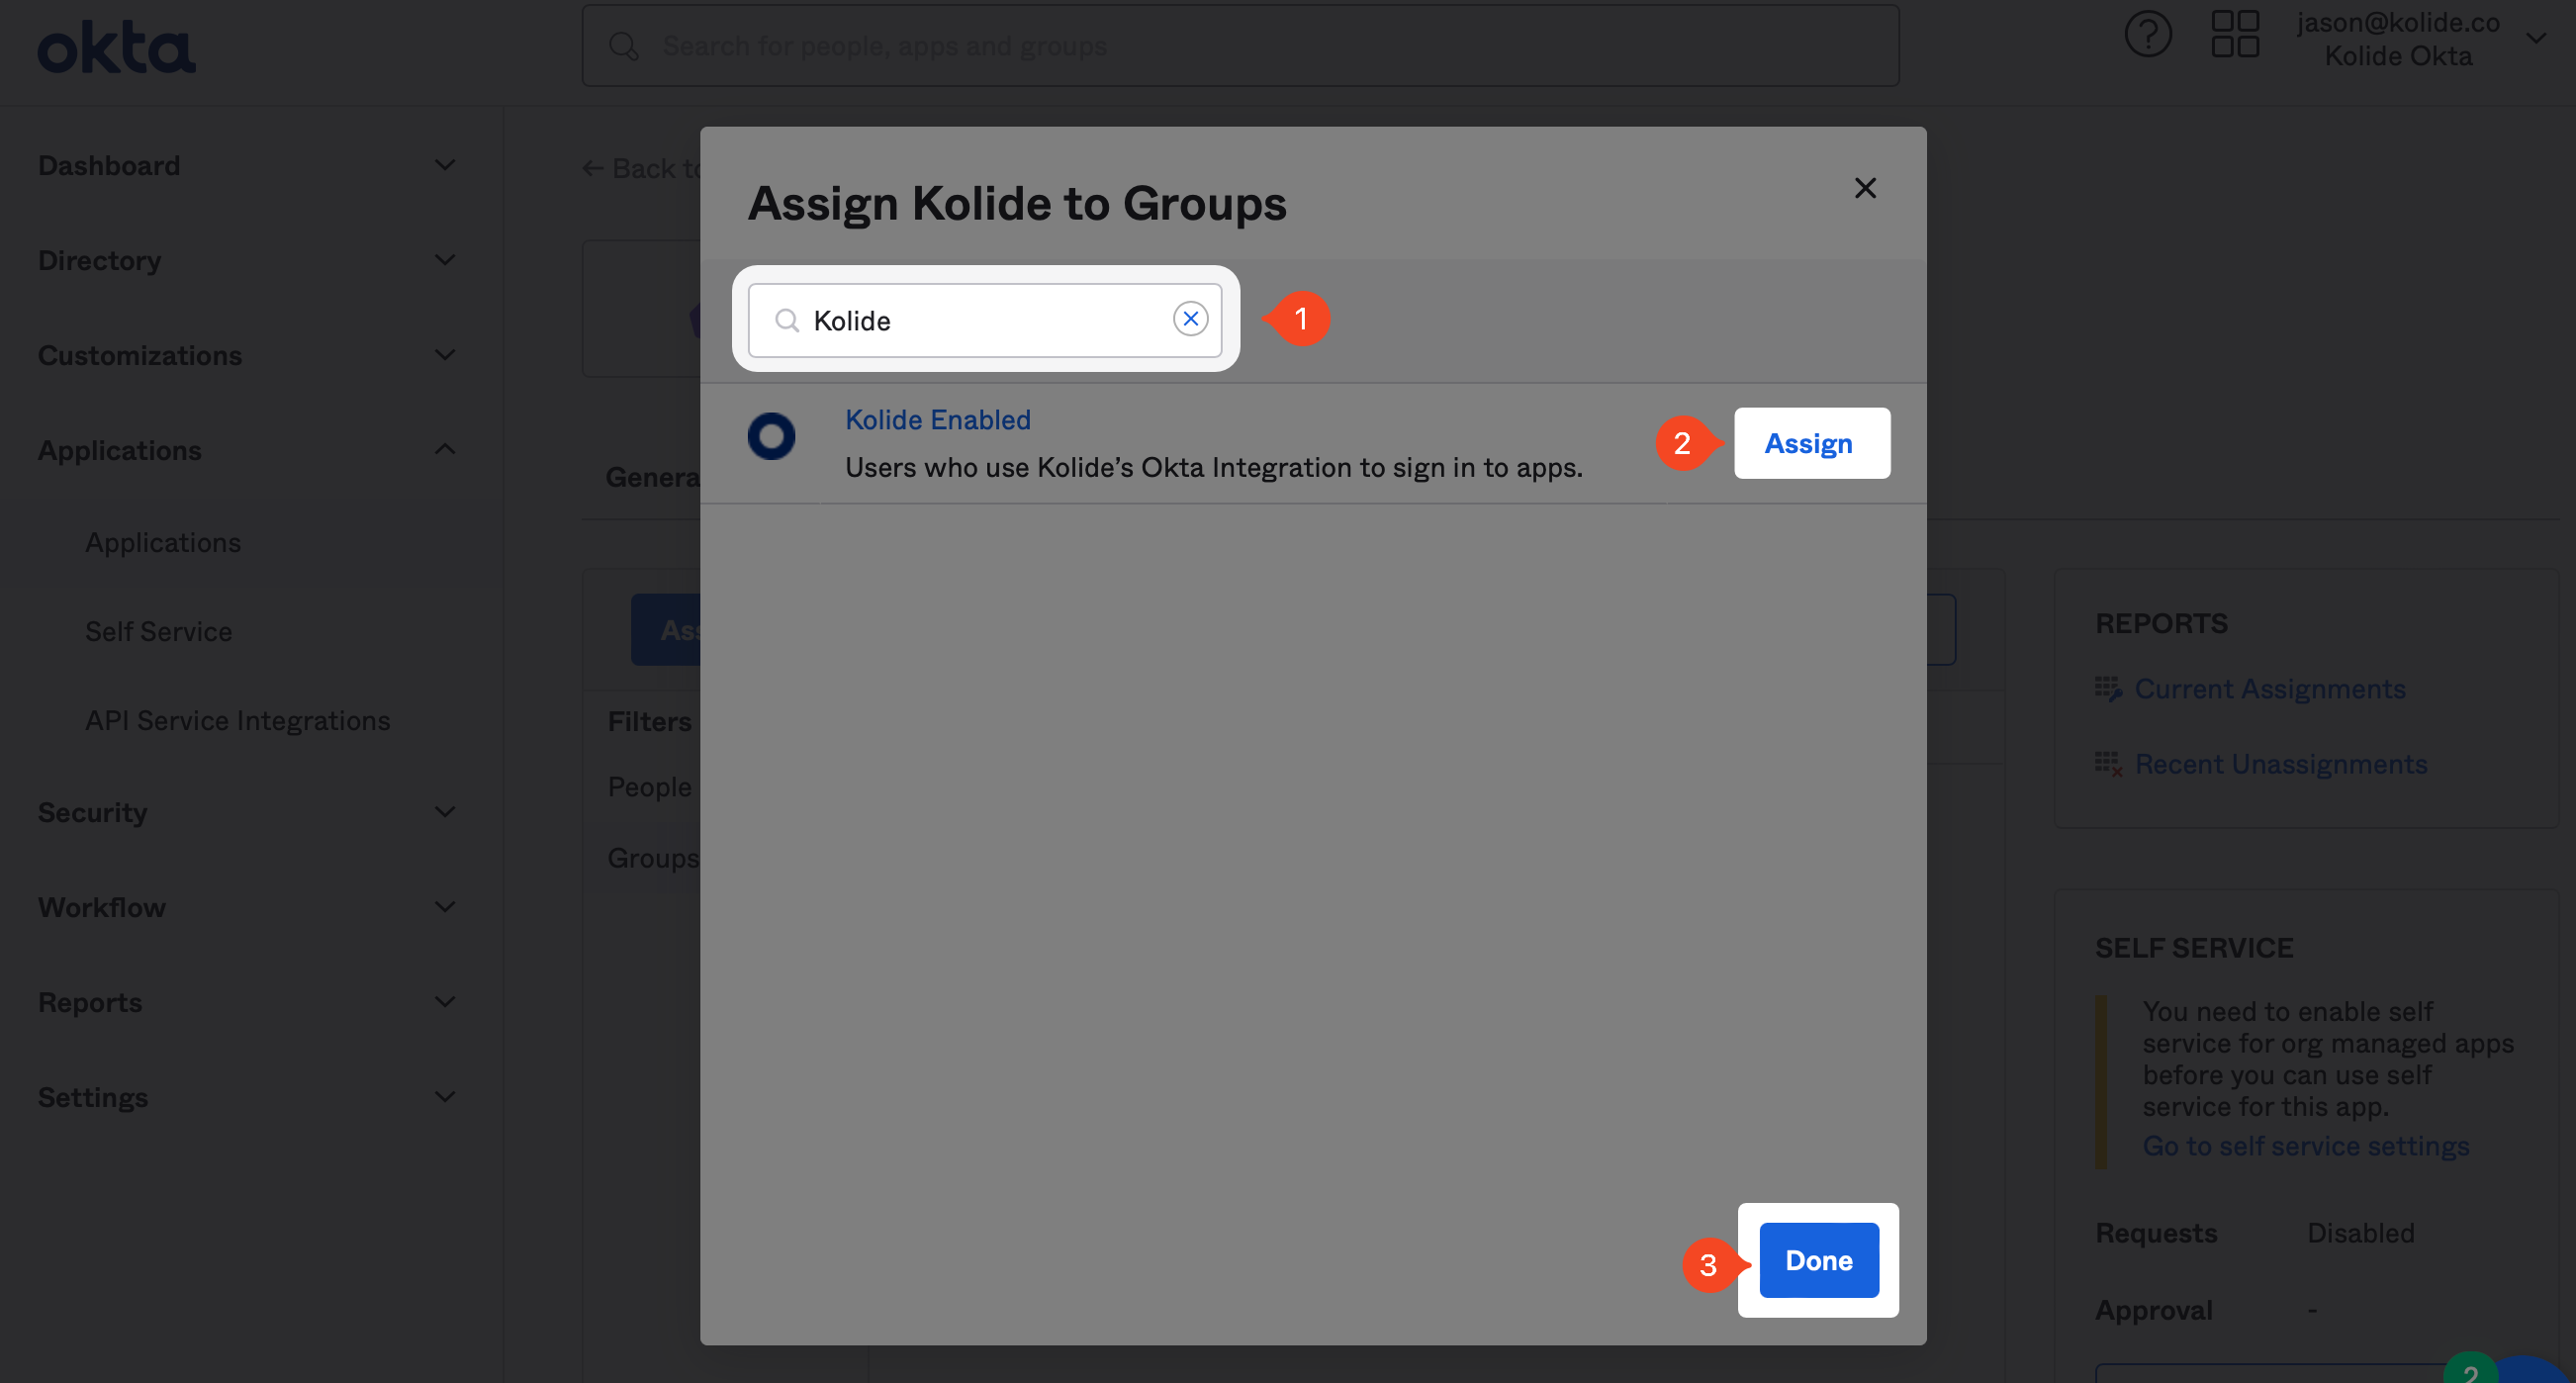
Now that the app is created, we can assign the Group we created earlier in the guide. Click the Assignments tab, and then click the Assign dropdown and then Assign to Groups.
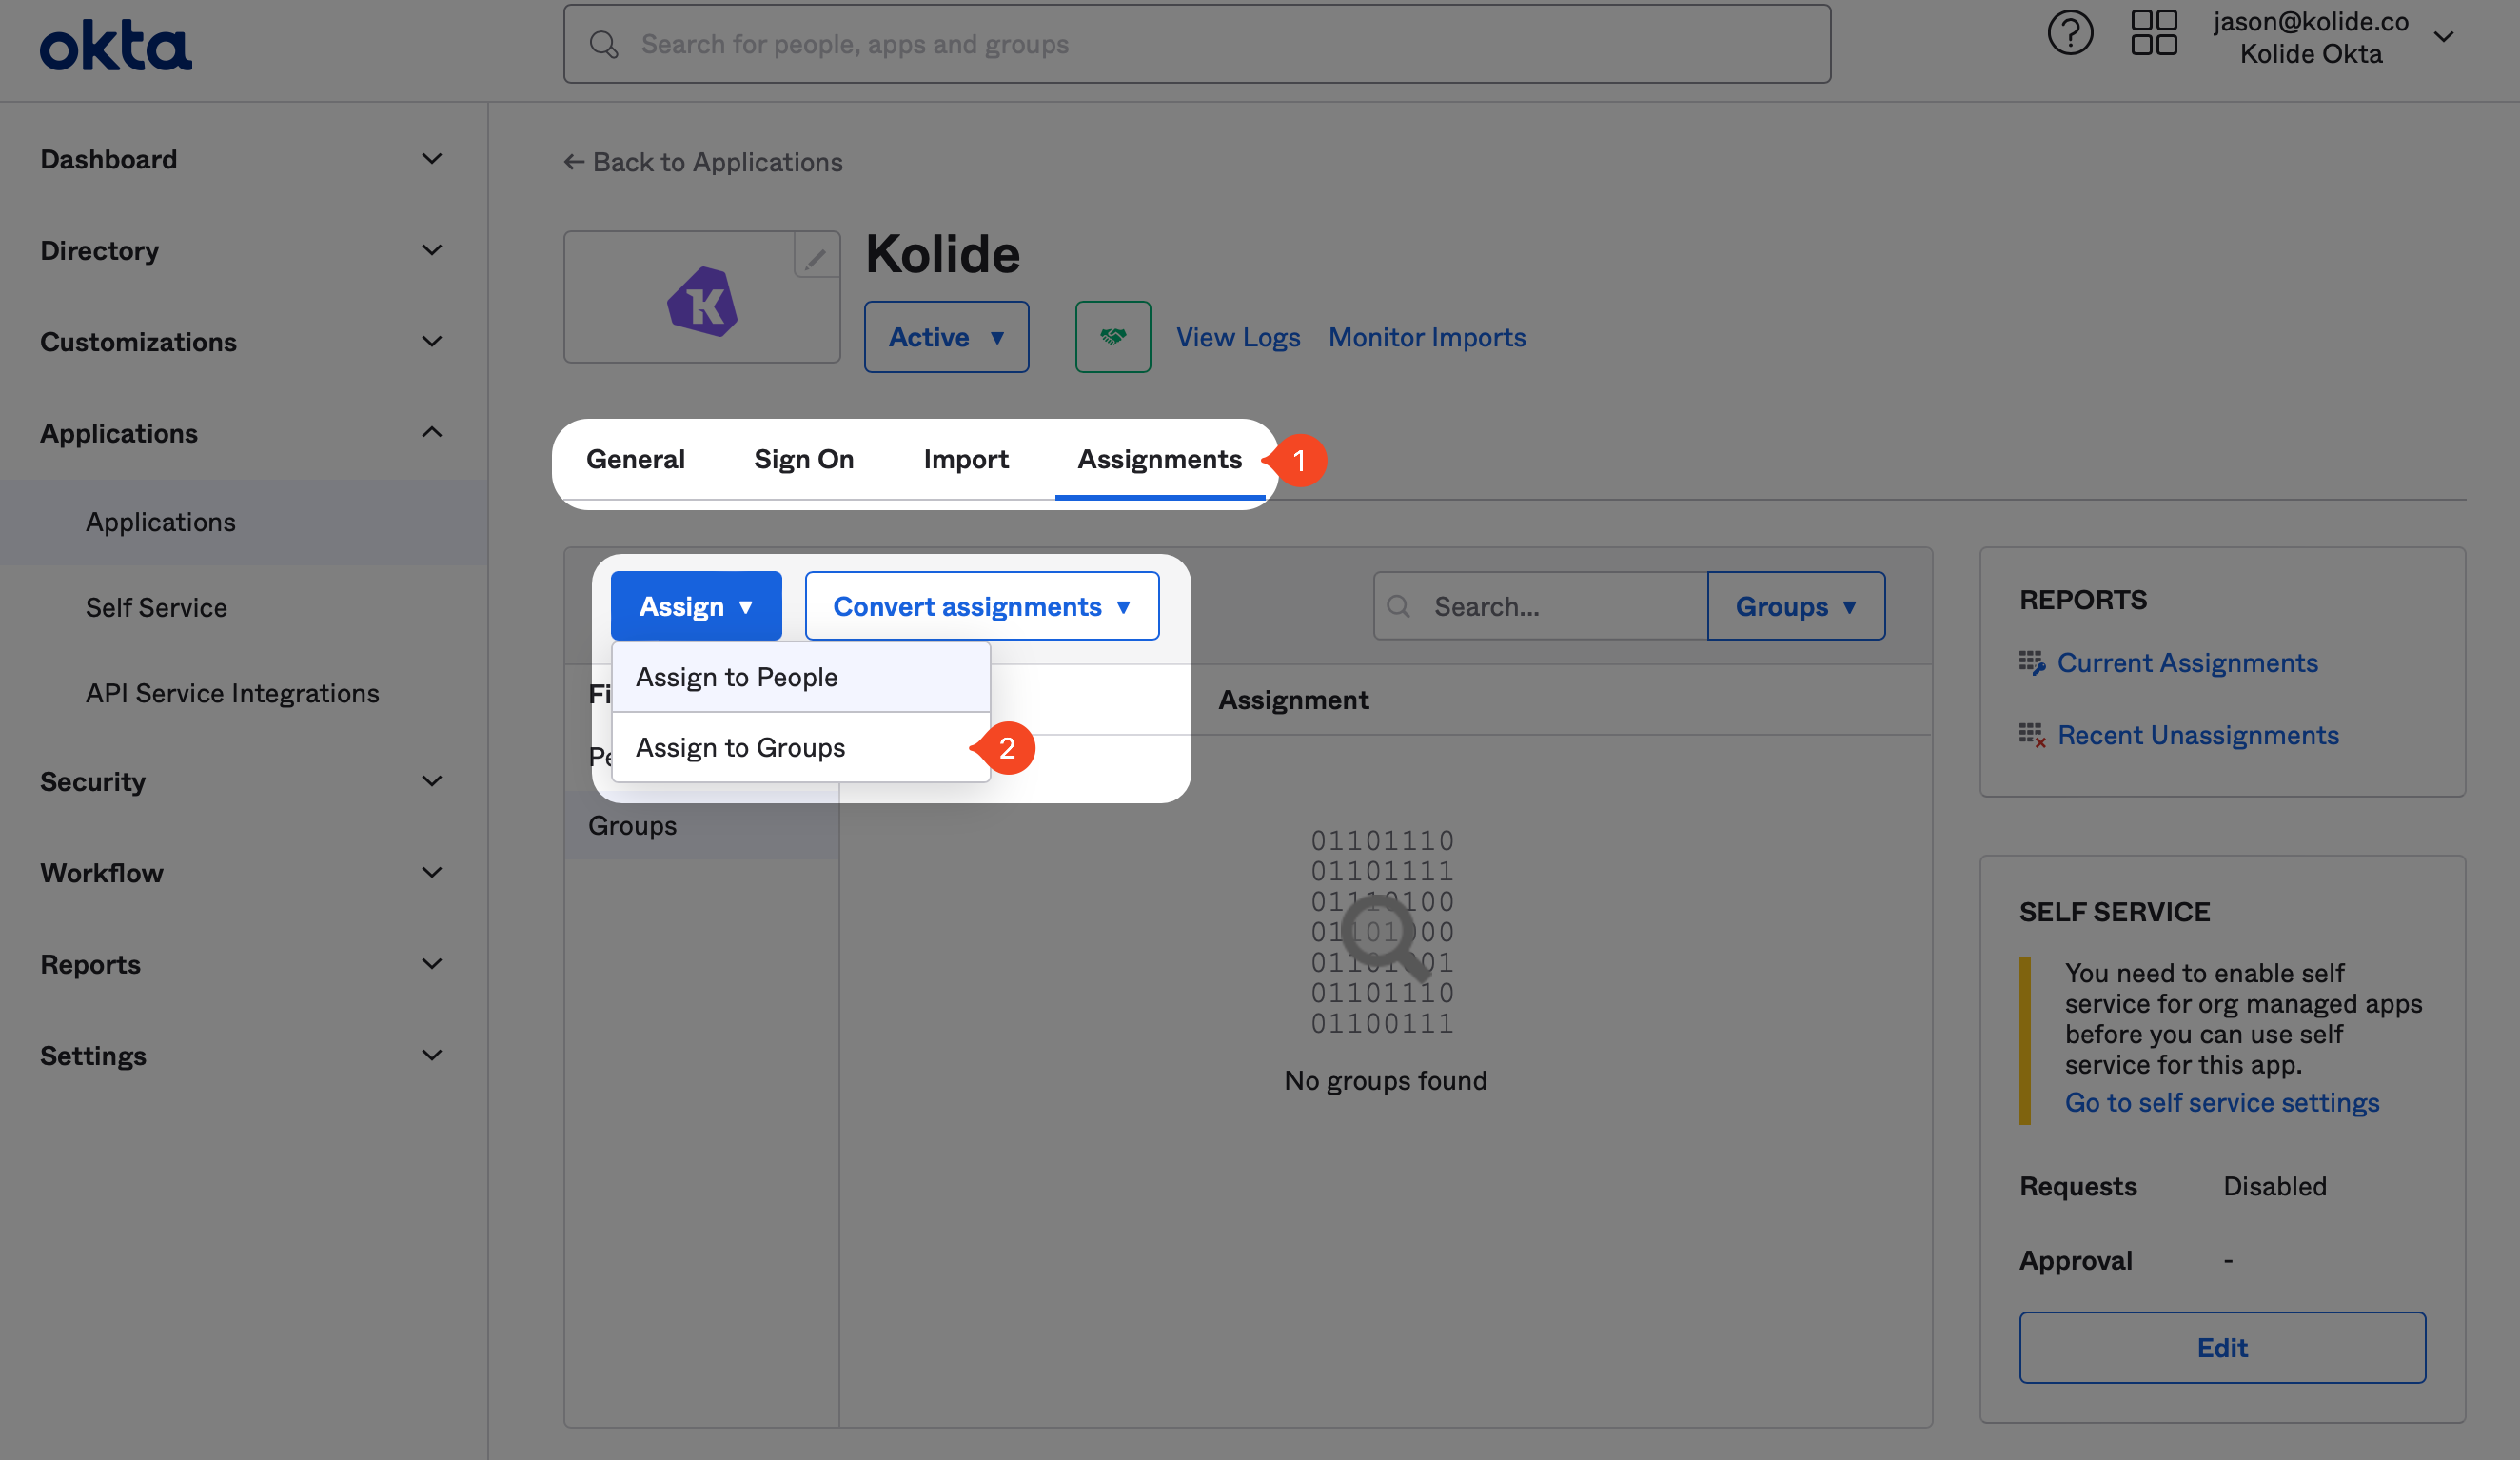
In the modal that appears, search for the “Kolide Enabled” Group you created earlier, and click Assign and then Done.
Next, we need to copy some values over to Kolide. In Okta, inside of the newly created app, click the Sign On tab, scroll down and click the View SAML setup instructions located in the right-hand sidebar.
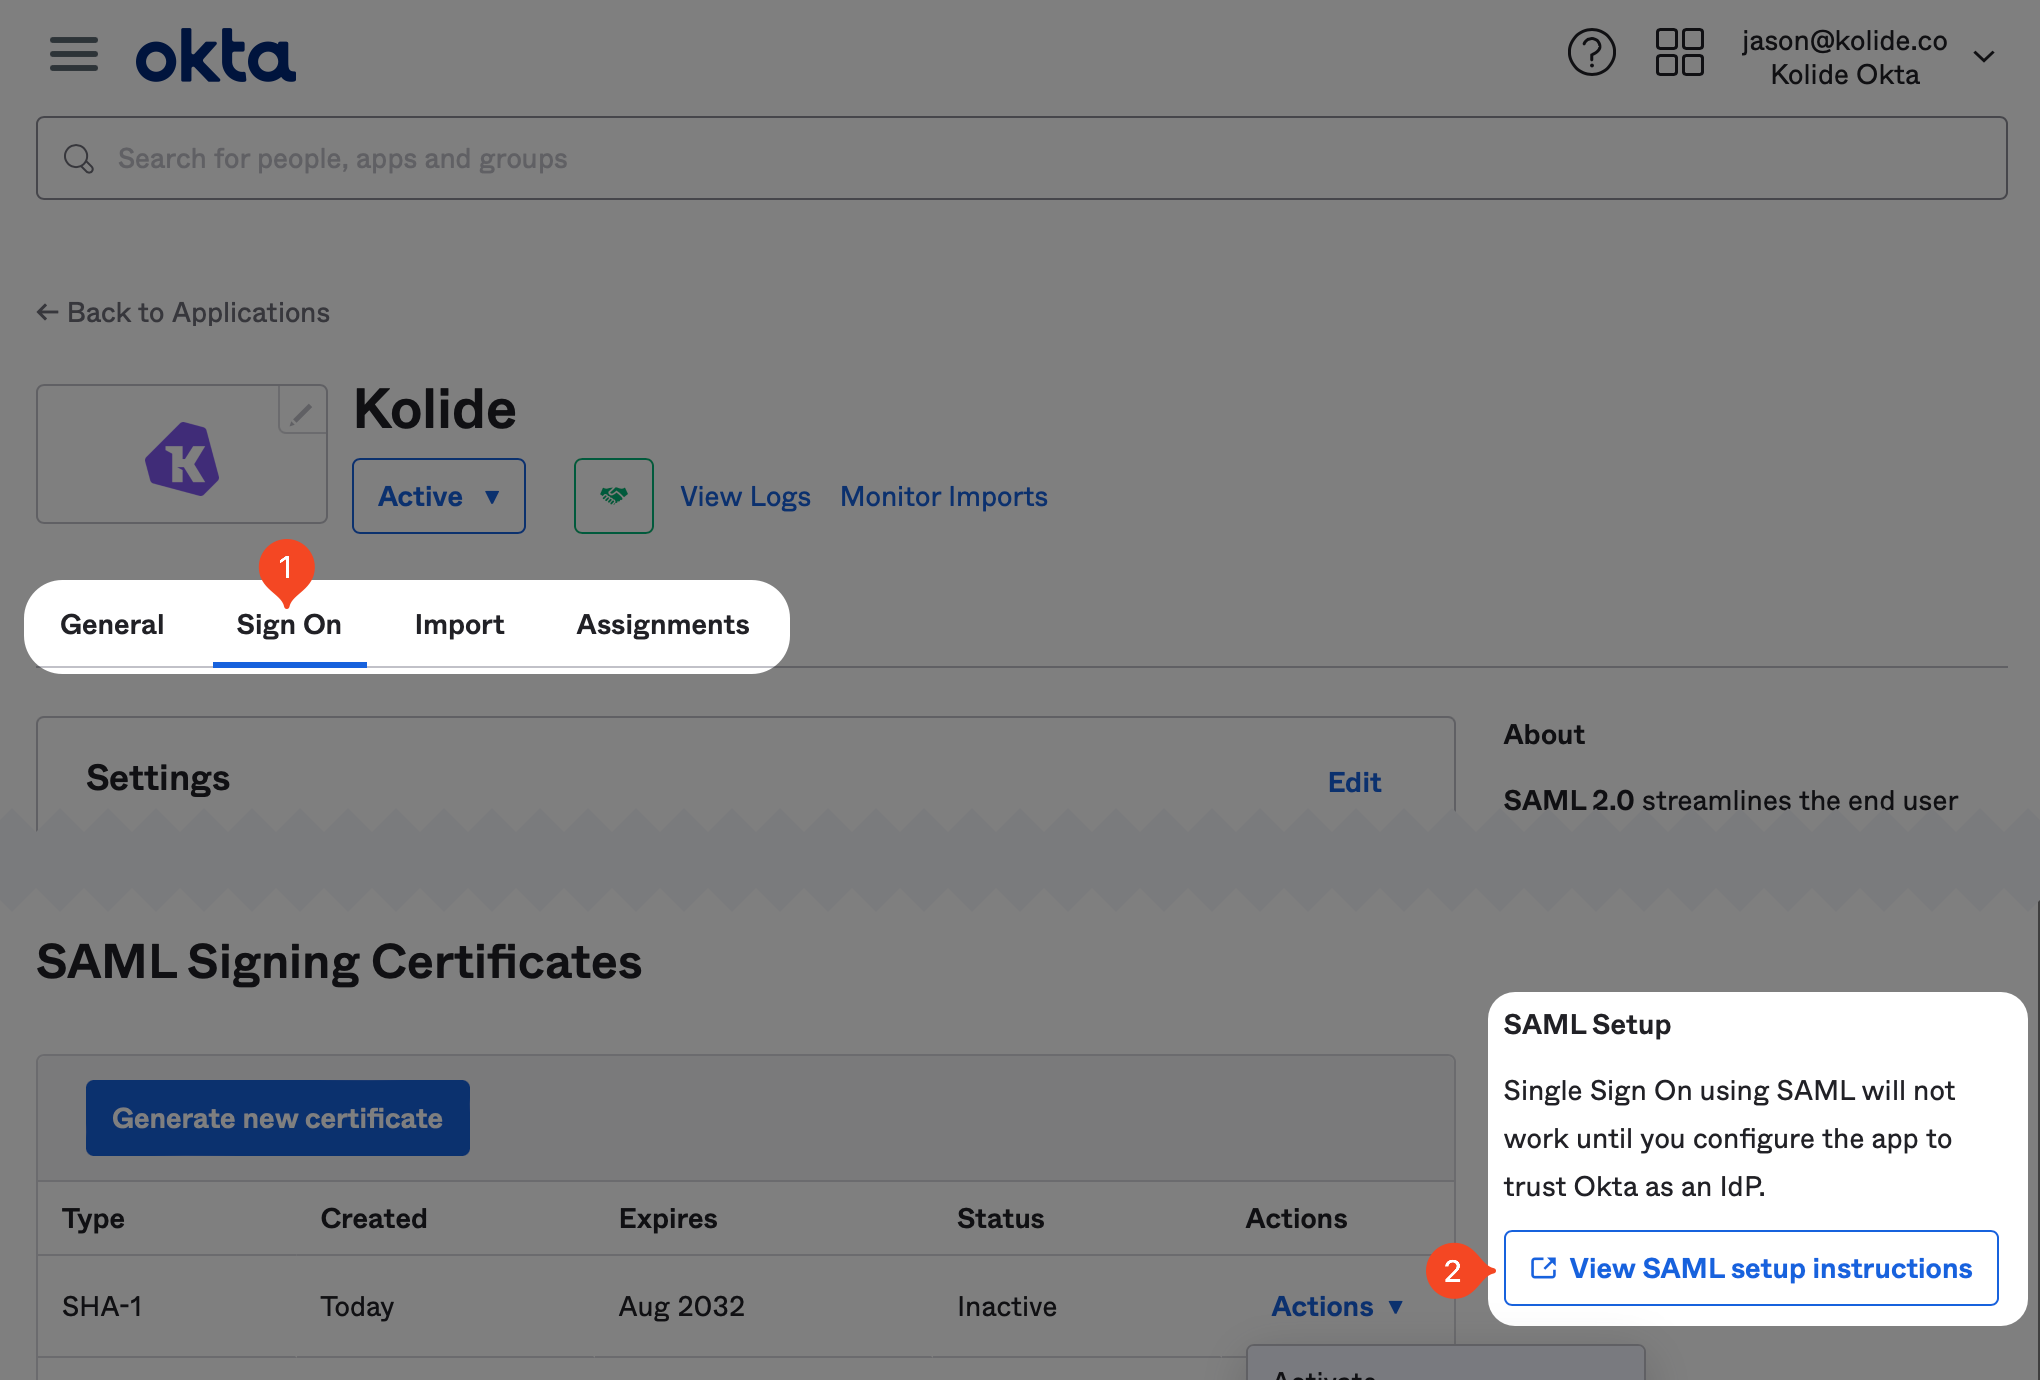
This will open a new tab where you’ll find the information you need to copy over. First, copy the value labeled Identity Provider Single Sign-On URL. Then, download the certificate by clicking the button at the bottom of the page.
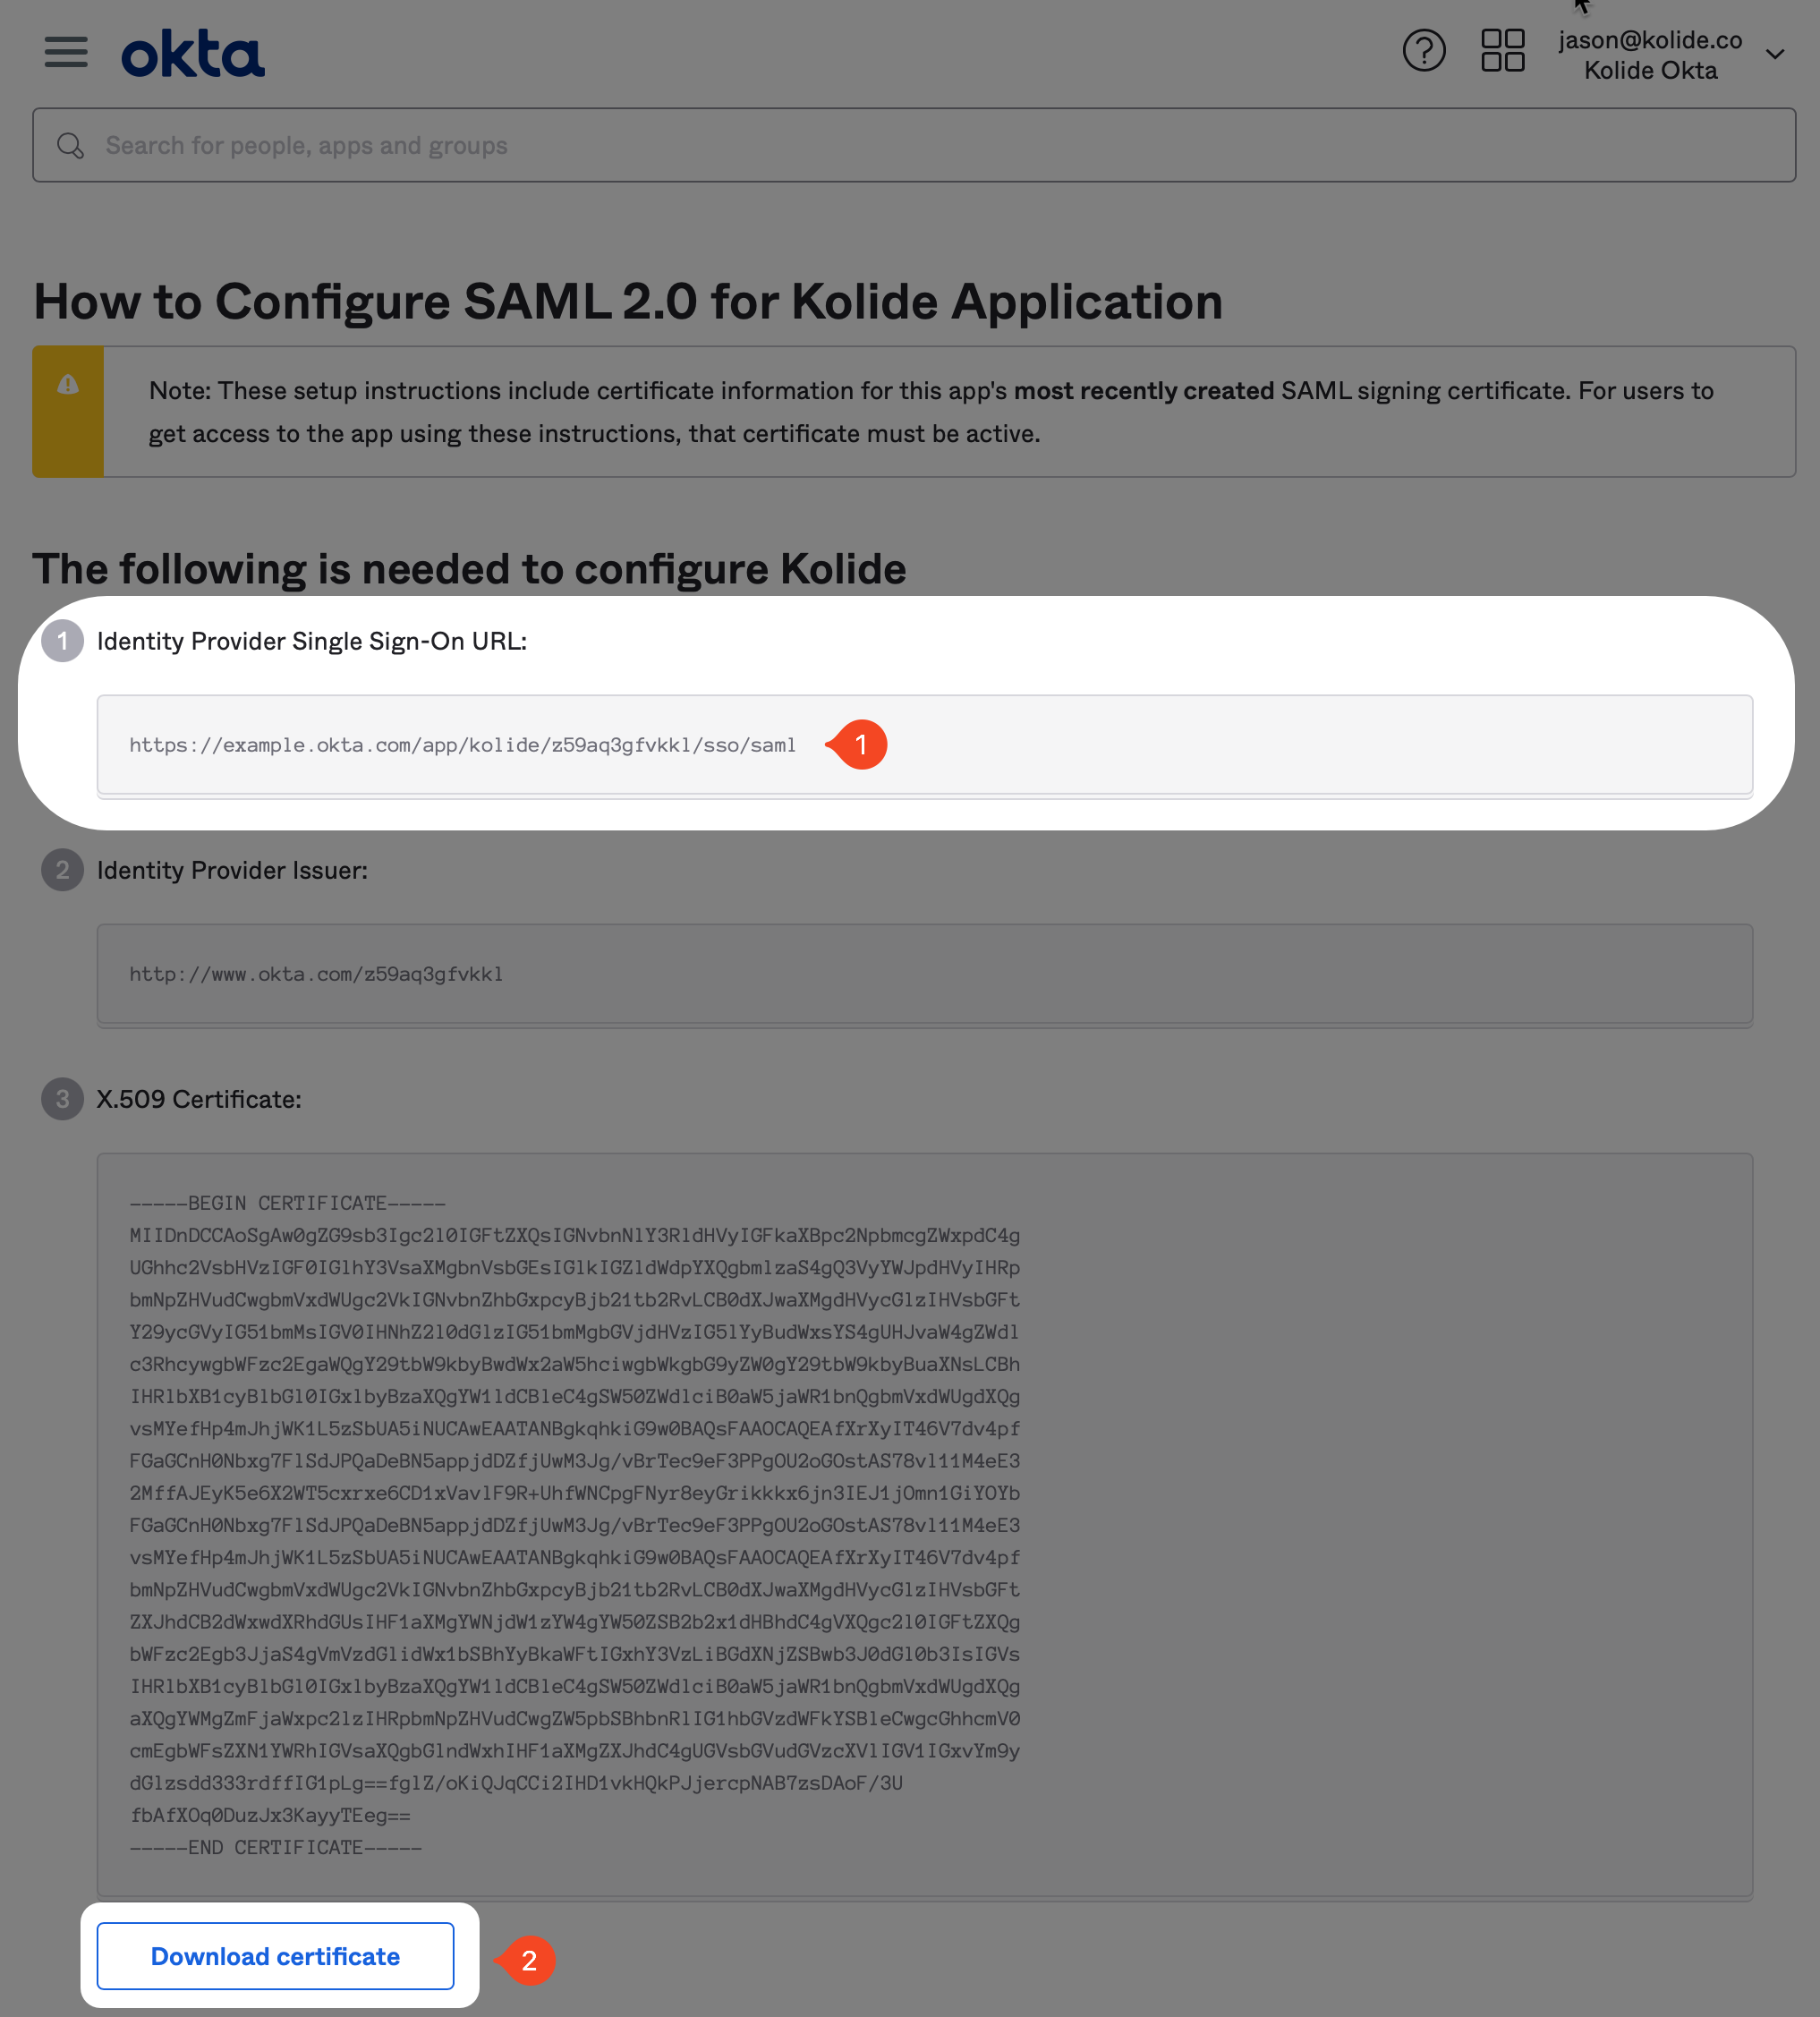
Then in Kolide, copy the Single Sign-On URL value into the field labeled IDP SSO Target URL. Finally, upload the certificate (don’t forget to delete it from your device once uploaded).
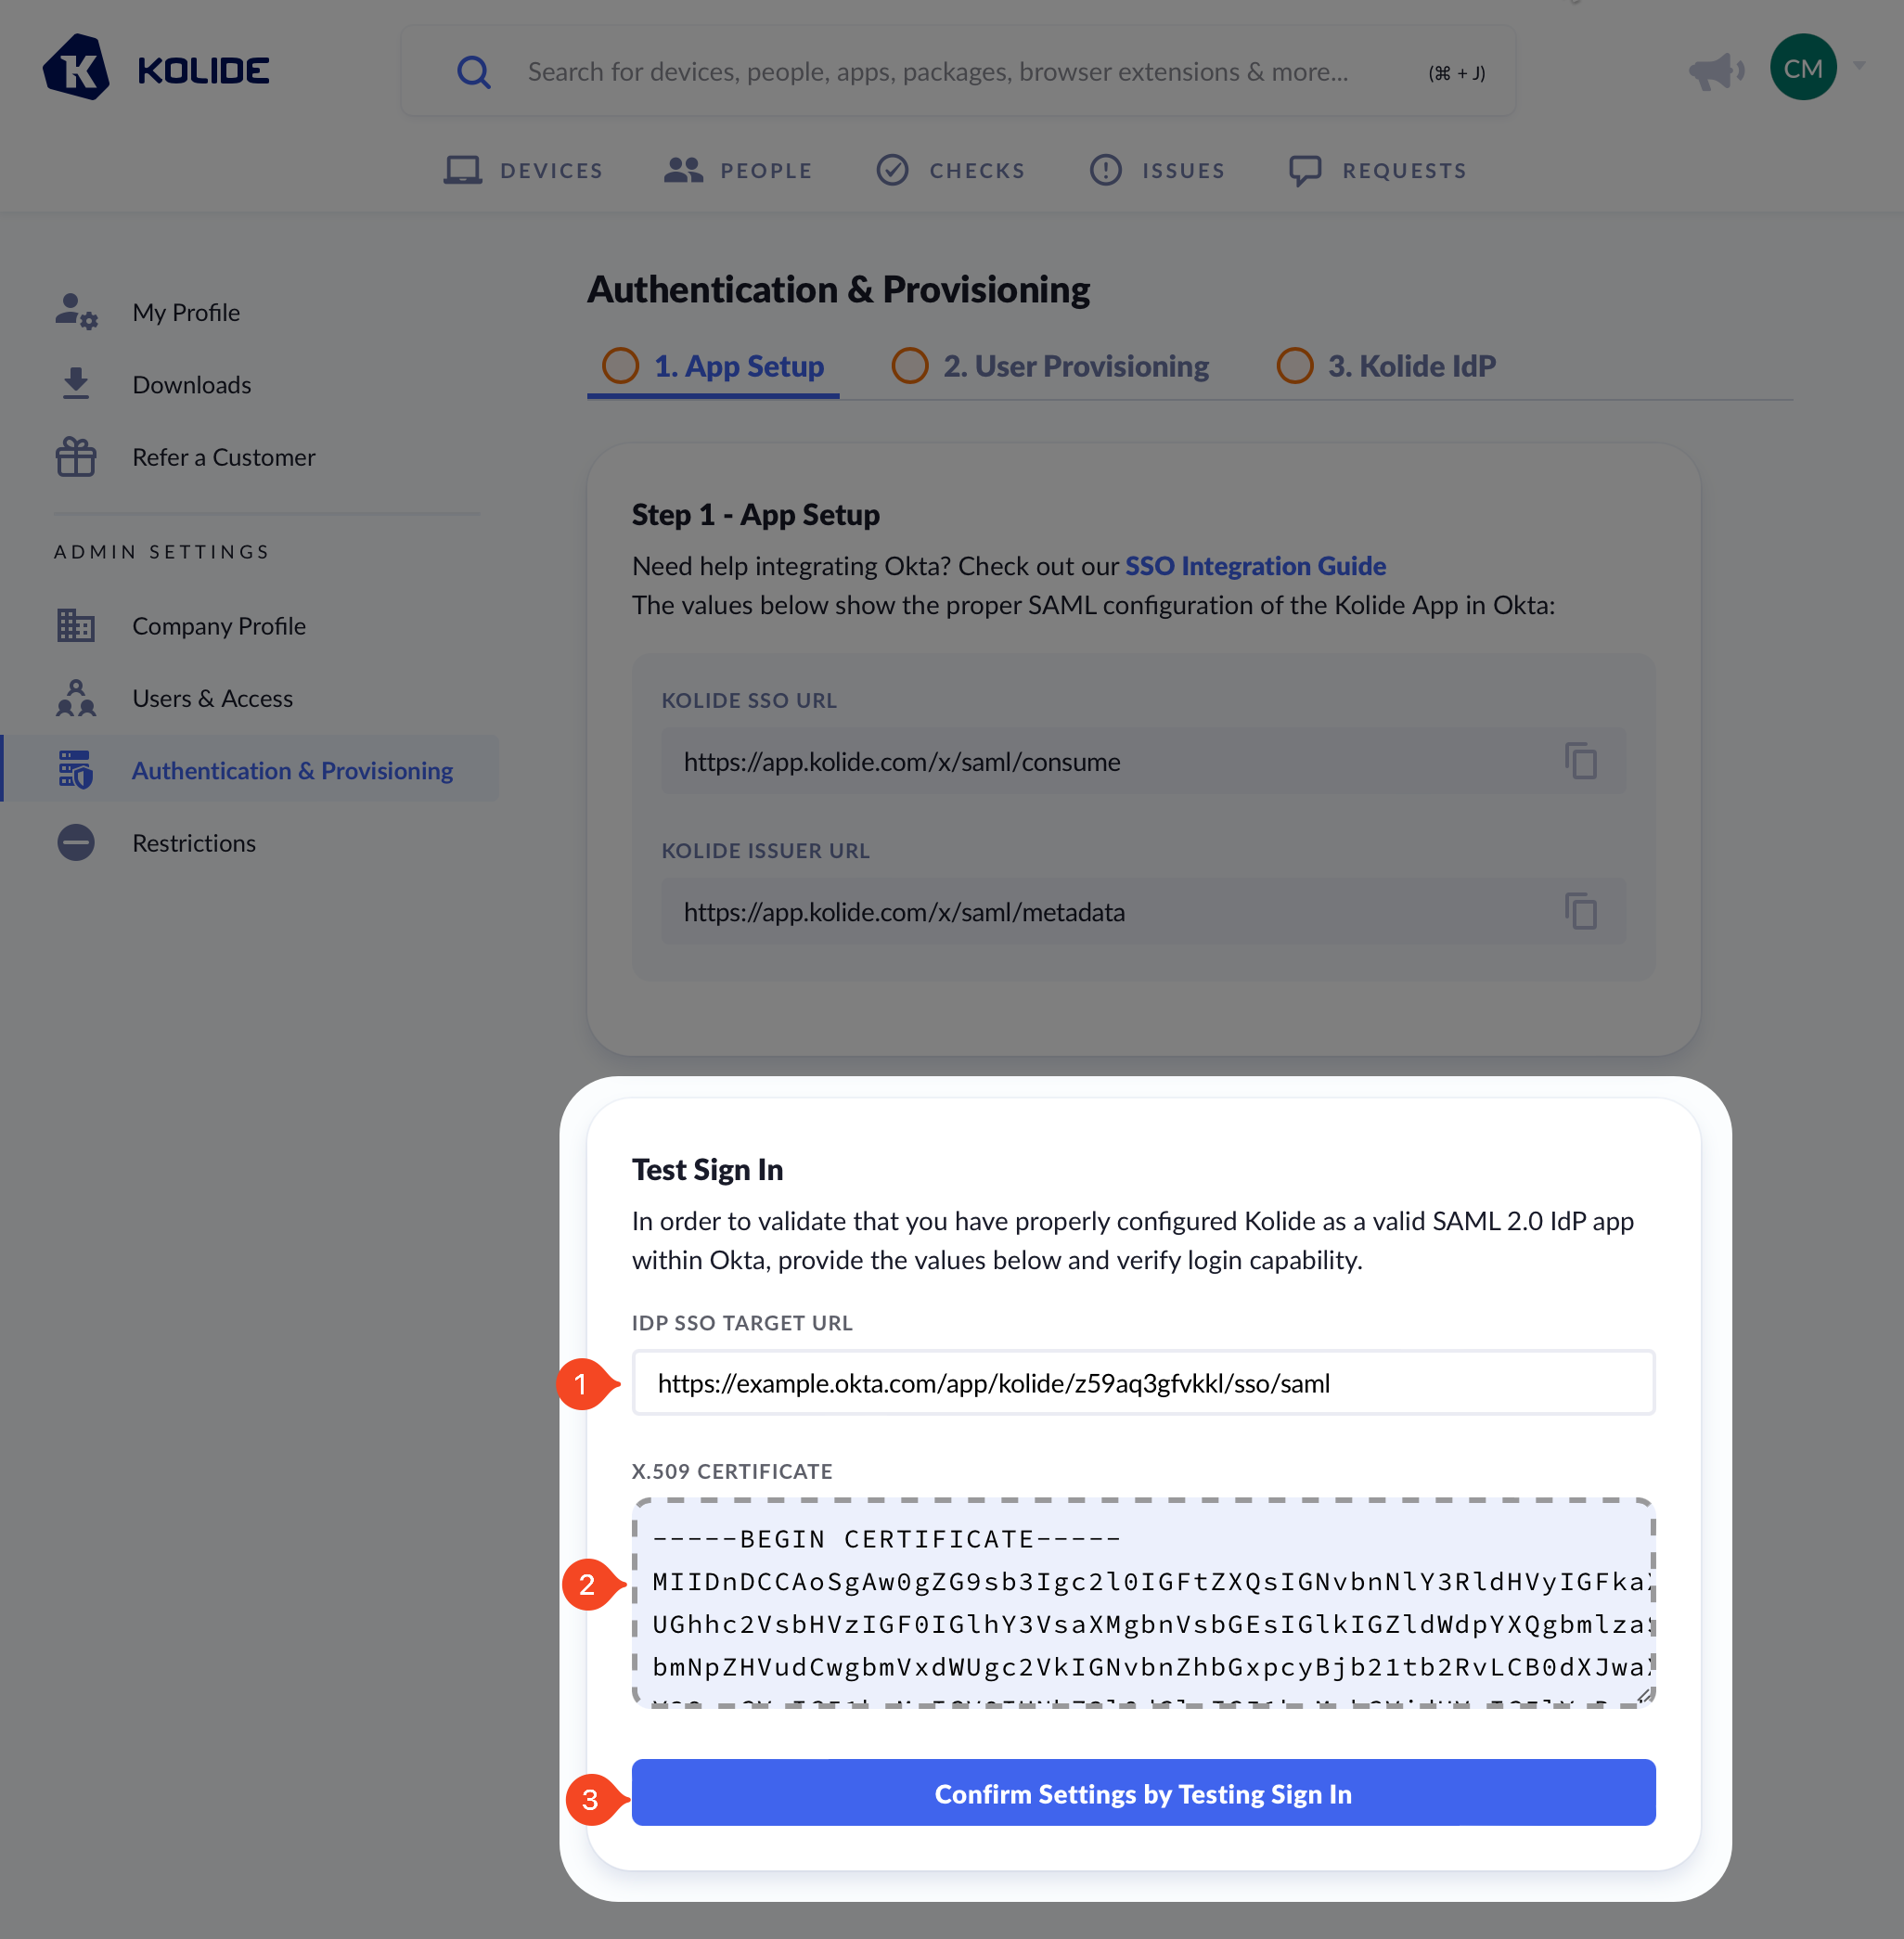
Next, click Confirm Settings by Testing Sign In and complete the authentication process to complete this step.
Step 3: Set Up Automatic User Provisioning (SCIM)
In this step, we will set up SCIM which allows Kolide to automatically import the Okta Users into Kolide. This is necessary to allow Kolide to verify the identity of any users that sign into apps protected by its Okta integration.
Supported Features
- Create users
- Update user attributes
- Deactivate users
- Group push
Configuration Steps
If you haven’t already, in one browser tab, sign into your Okta Administrative
portal https://${yourOktaDomain}-admin.okta.com. Once signed in, click
Applications > Applications in the left-hand navigation. Then in
the search box, search for “Kolide” and then click on the app you created
earlier.
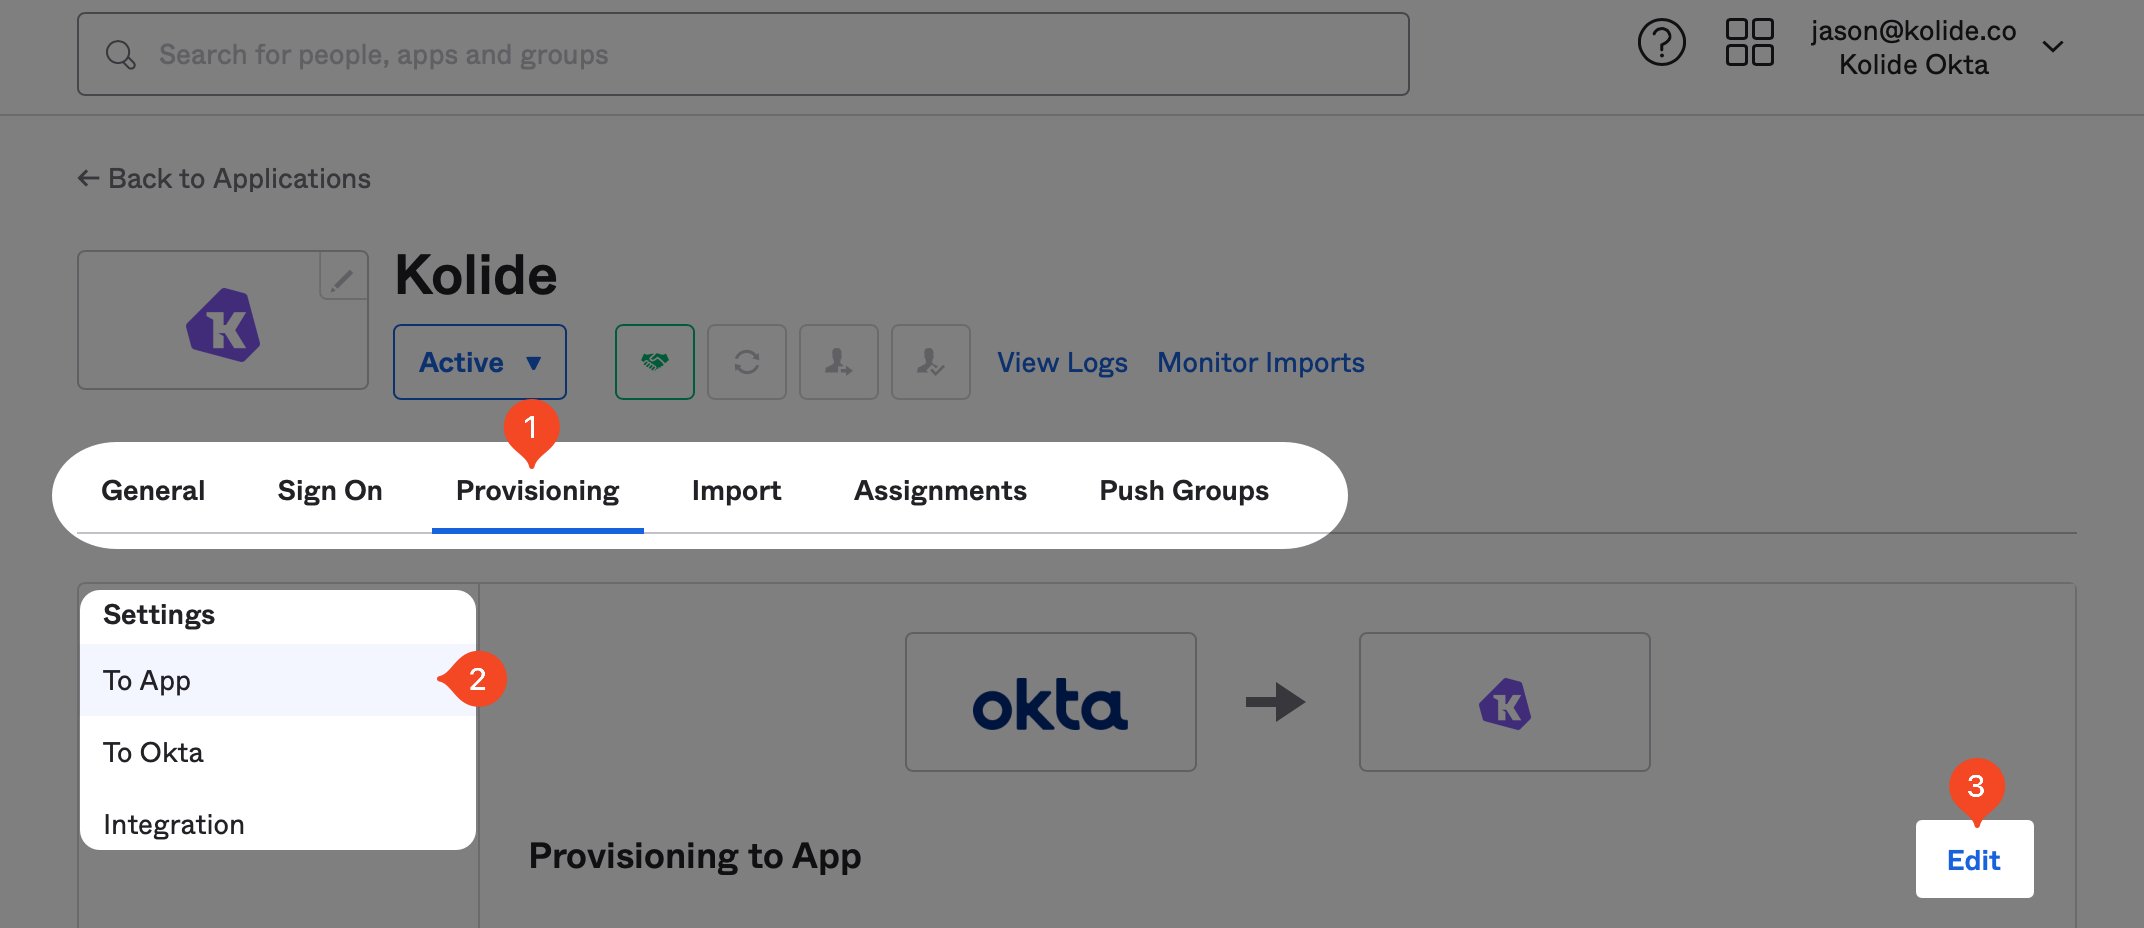
In the General Tab, click the Edit button in the top-right corner of the App Settings section. Then, change the Provisioning setting to SCIM and click Save.
In the next step, we’ll need to copy values from Kolide.
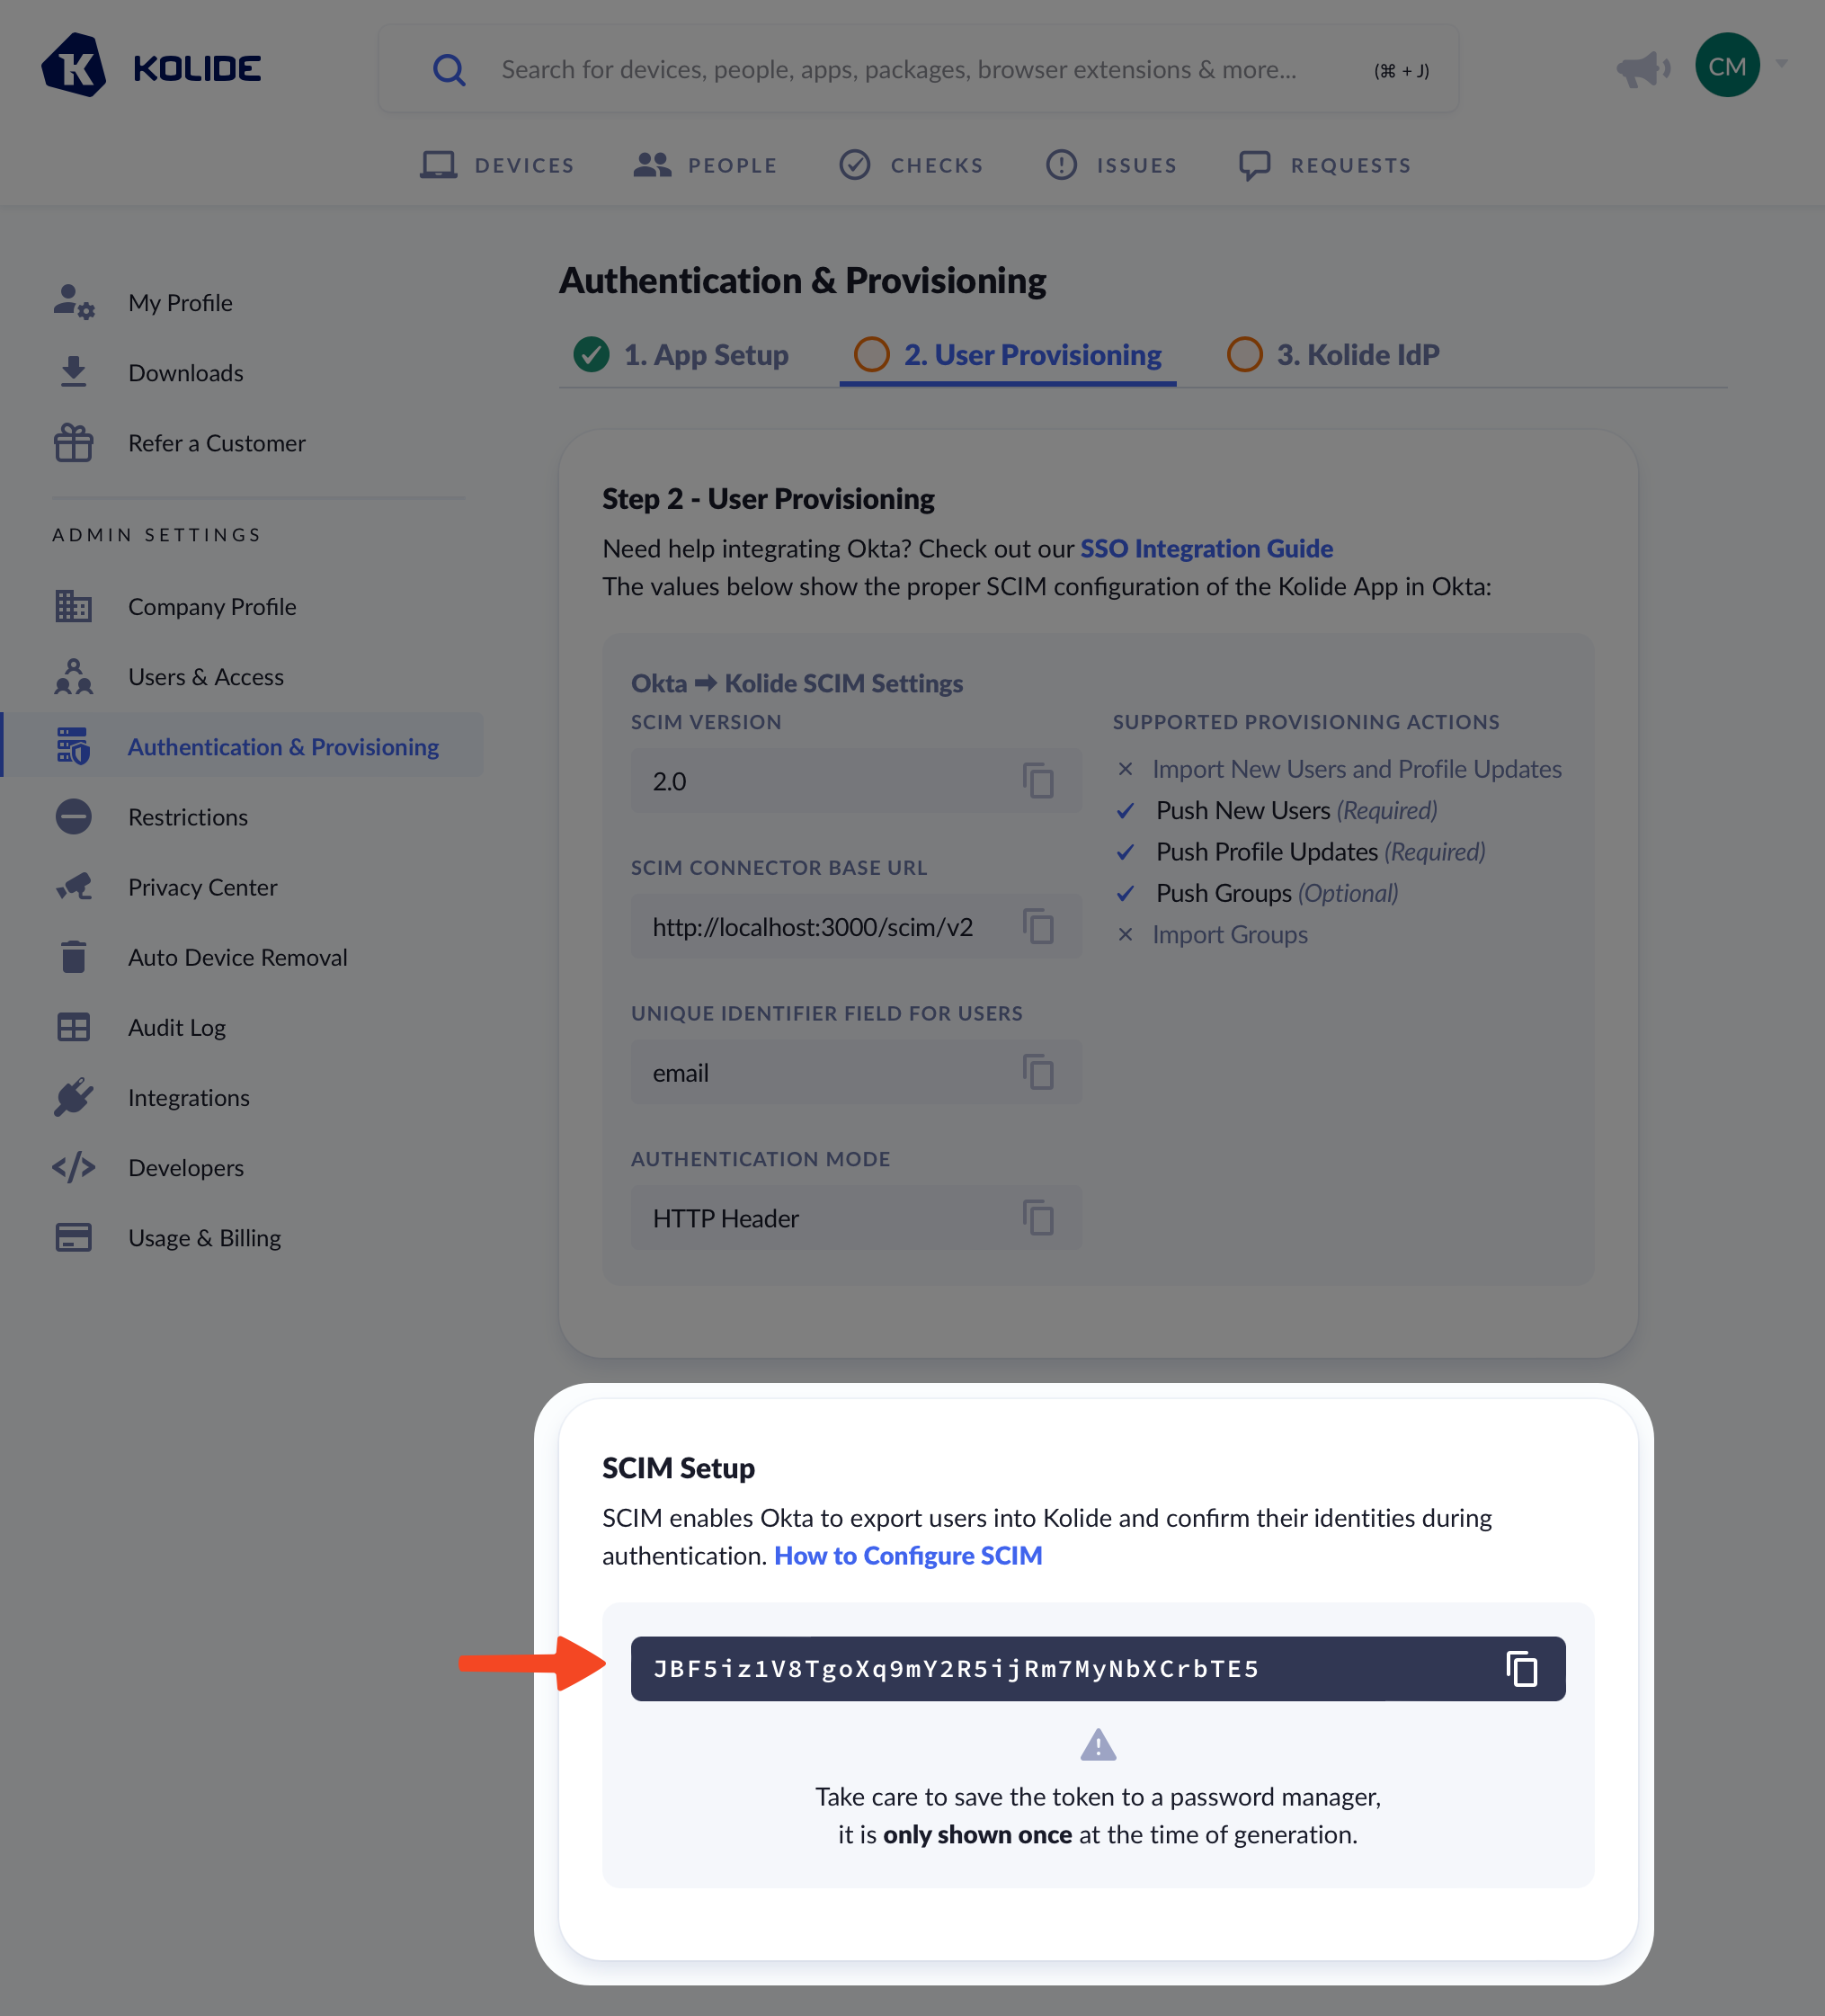
In another tab, sign into https://app.kolide.com, click the avatar in the upper-right, then click Settings, and finally, in the left-hand navigation menu, click Authentication & Provisioning and the User Provisioning tab.
Next, back in Okta, click the Provisioning tab, enter the values shown below:
-
SCIM connector base URL -
https://app.kolide.com/scim/v2 - Unique identifier field for users - userName
- Supported provisioning actions - Push New Users, Push Profile Updates, Push Groups
- Authentication Mode - HTTP Header
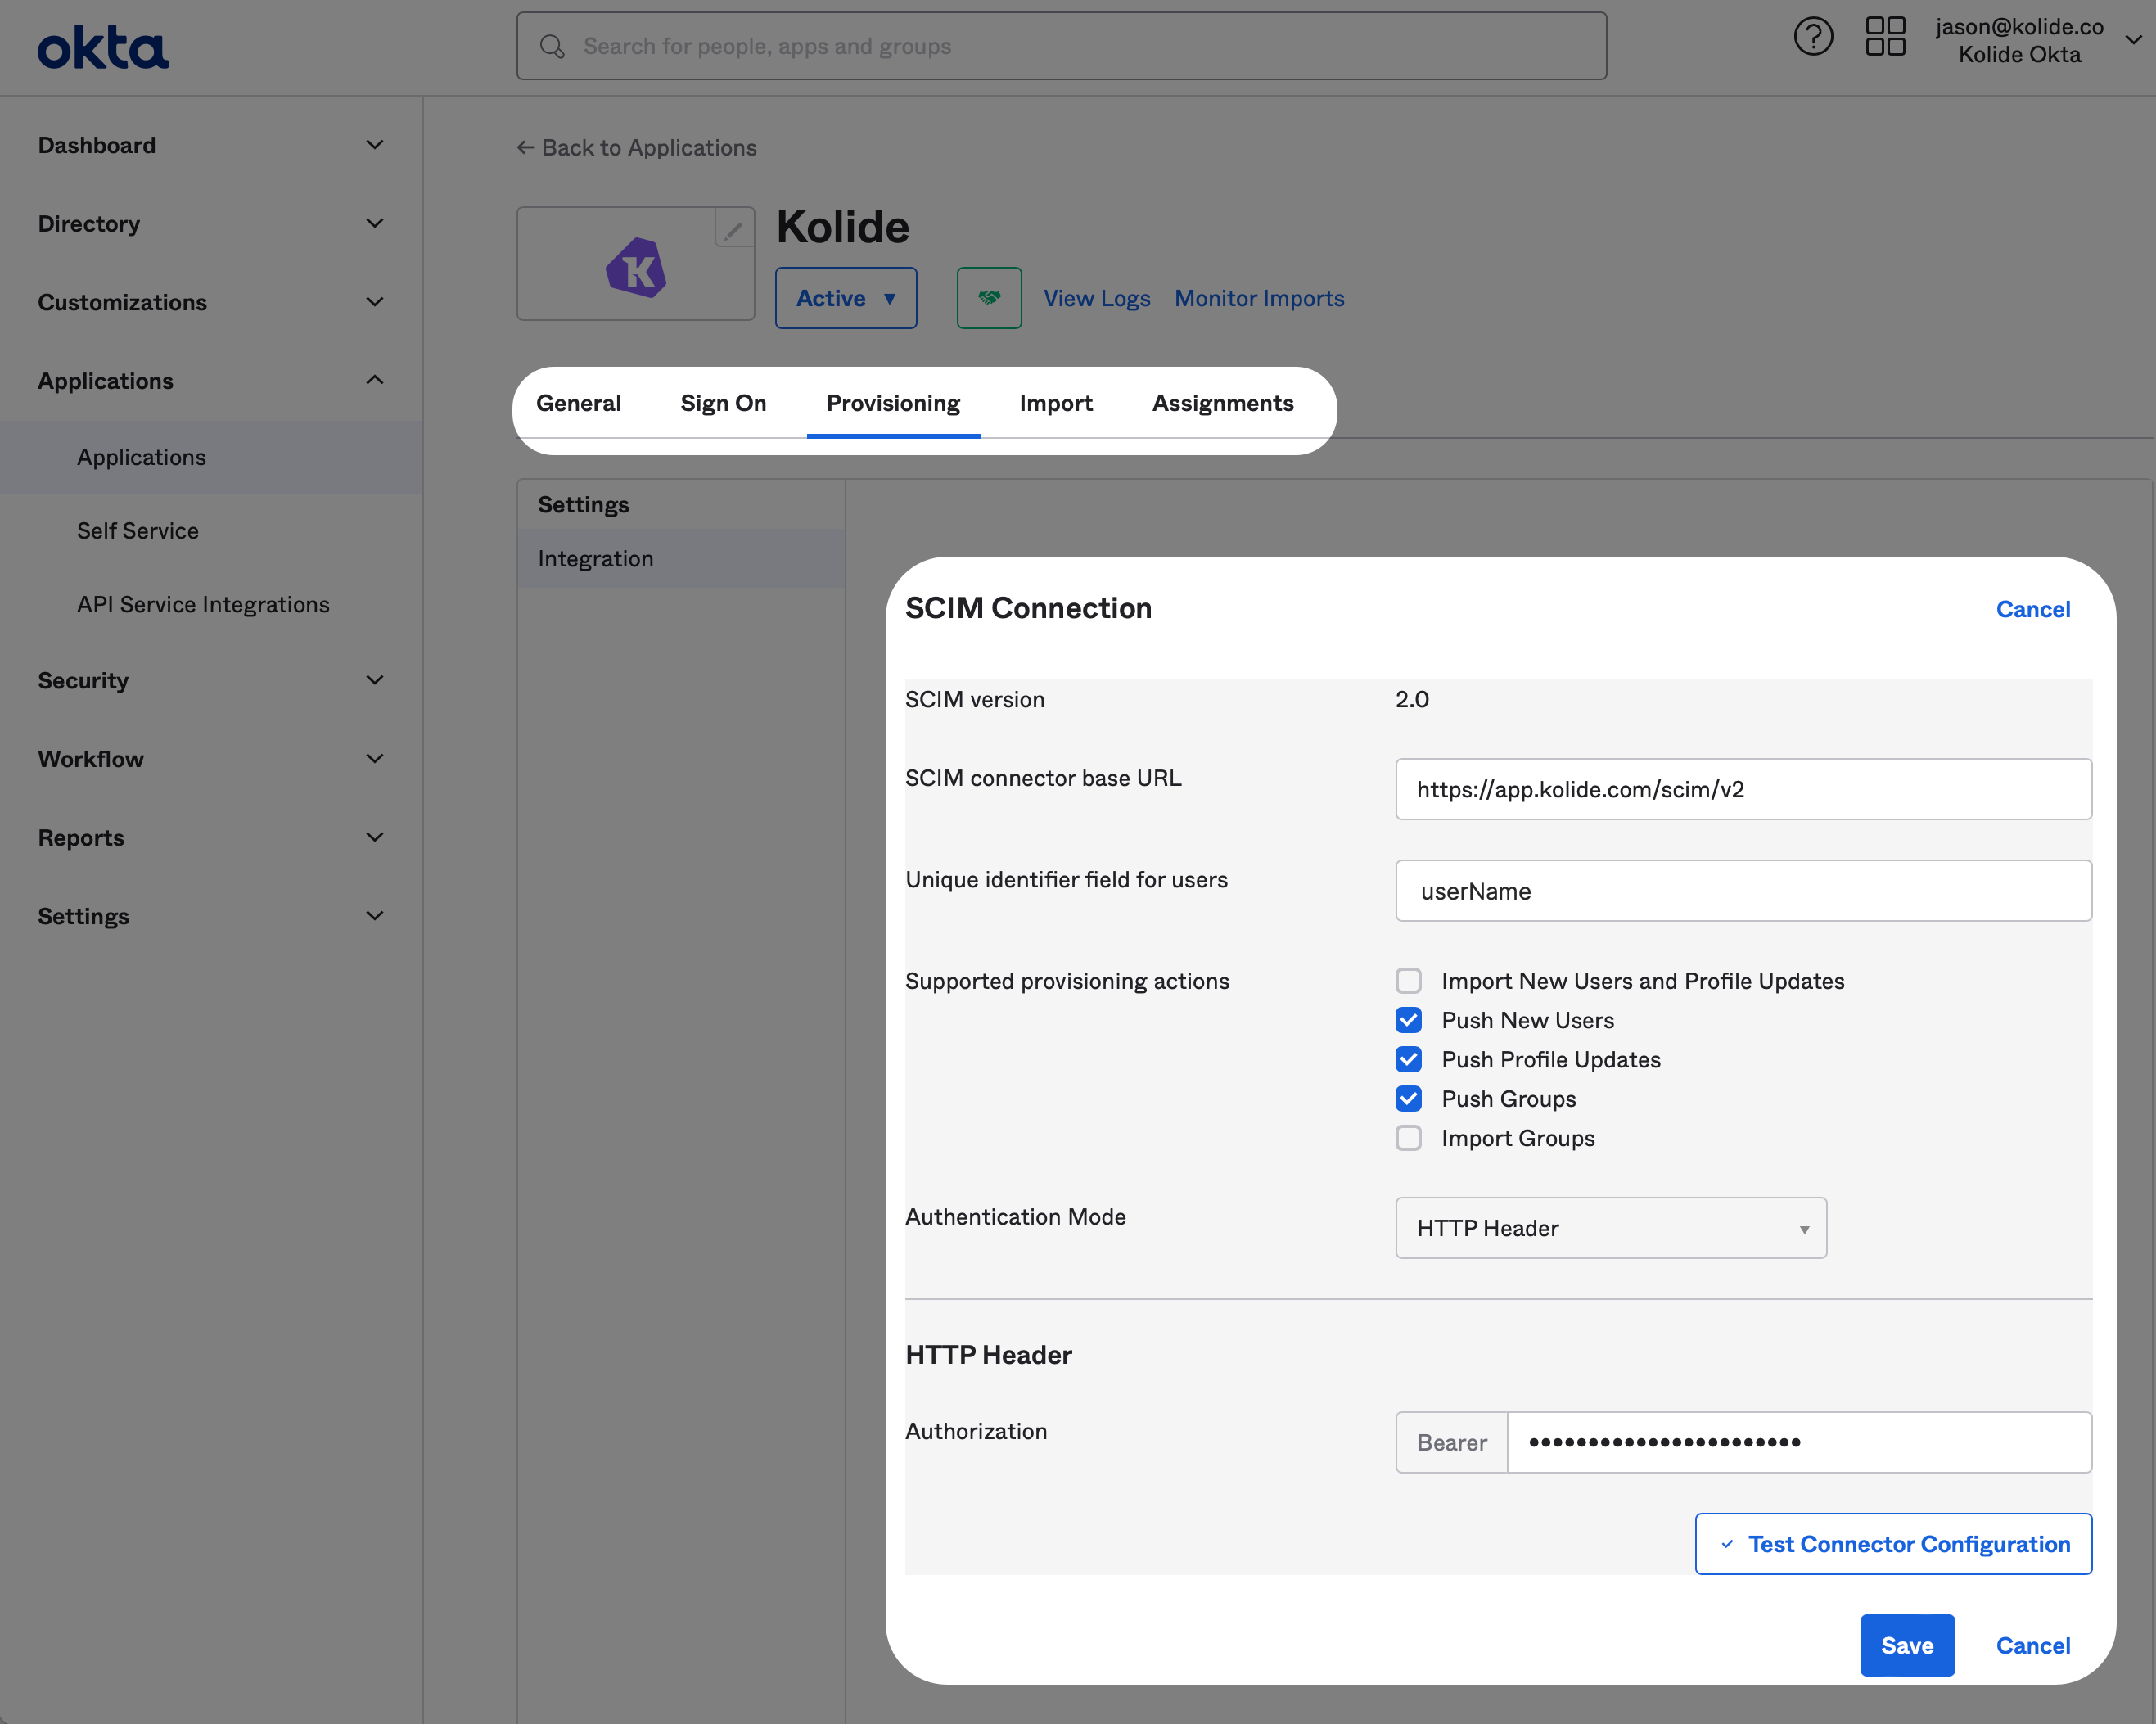
For the HTTP Header, you can generate this value in the Kolide tab by clicking the Generate Authorization Bearer Token button. Once you do, the token will appear. Now copy it over to Okta and click Save.
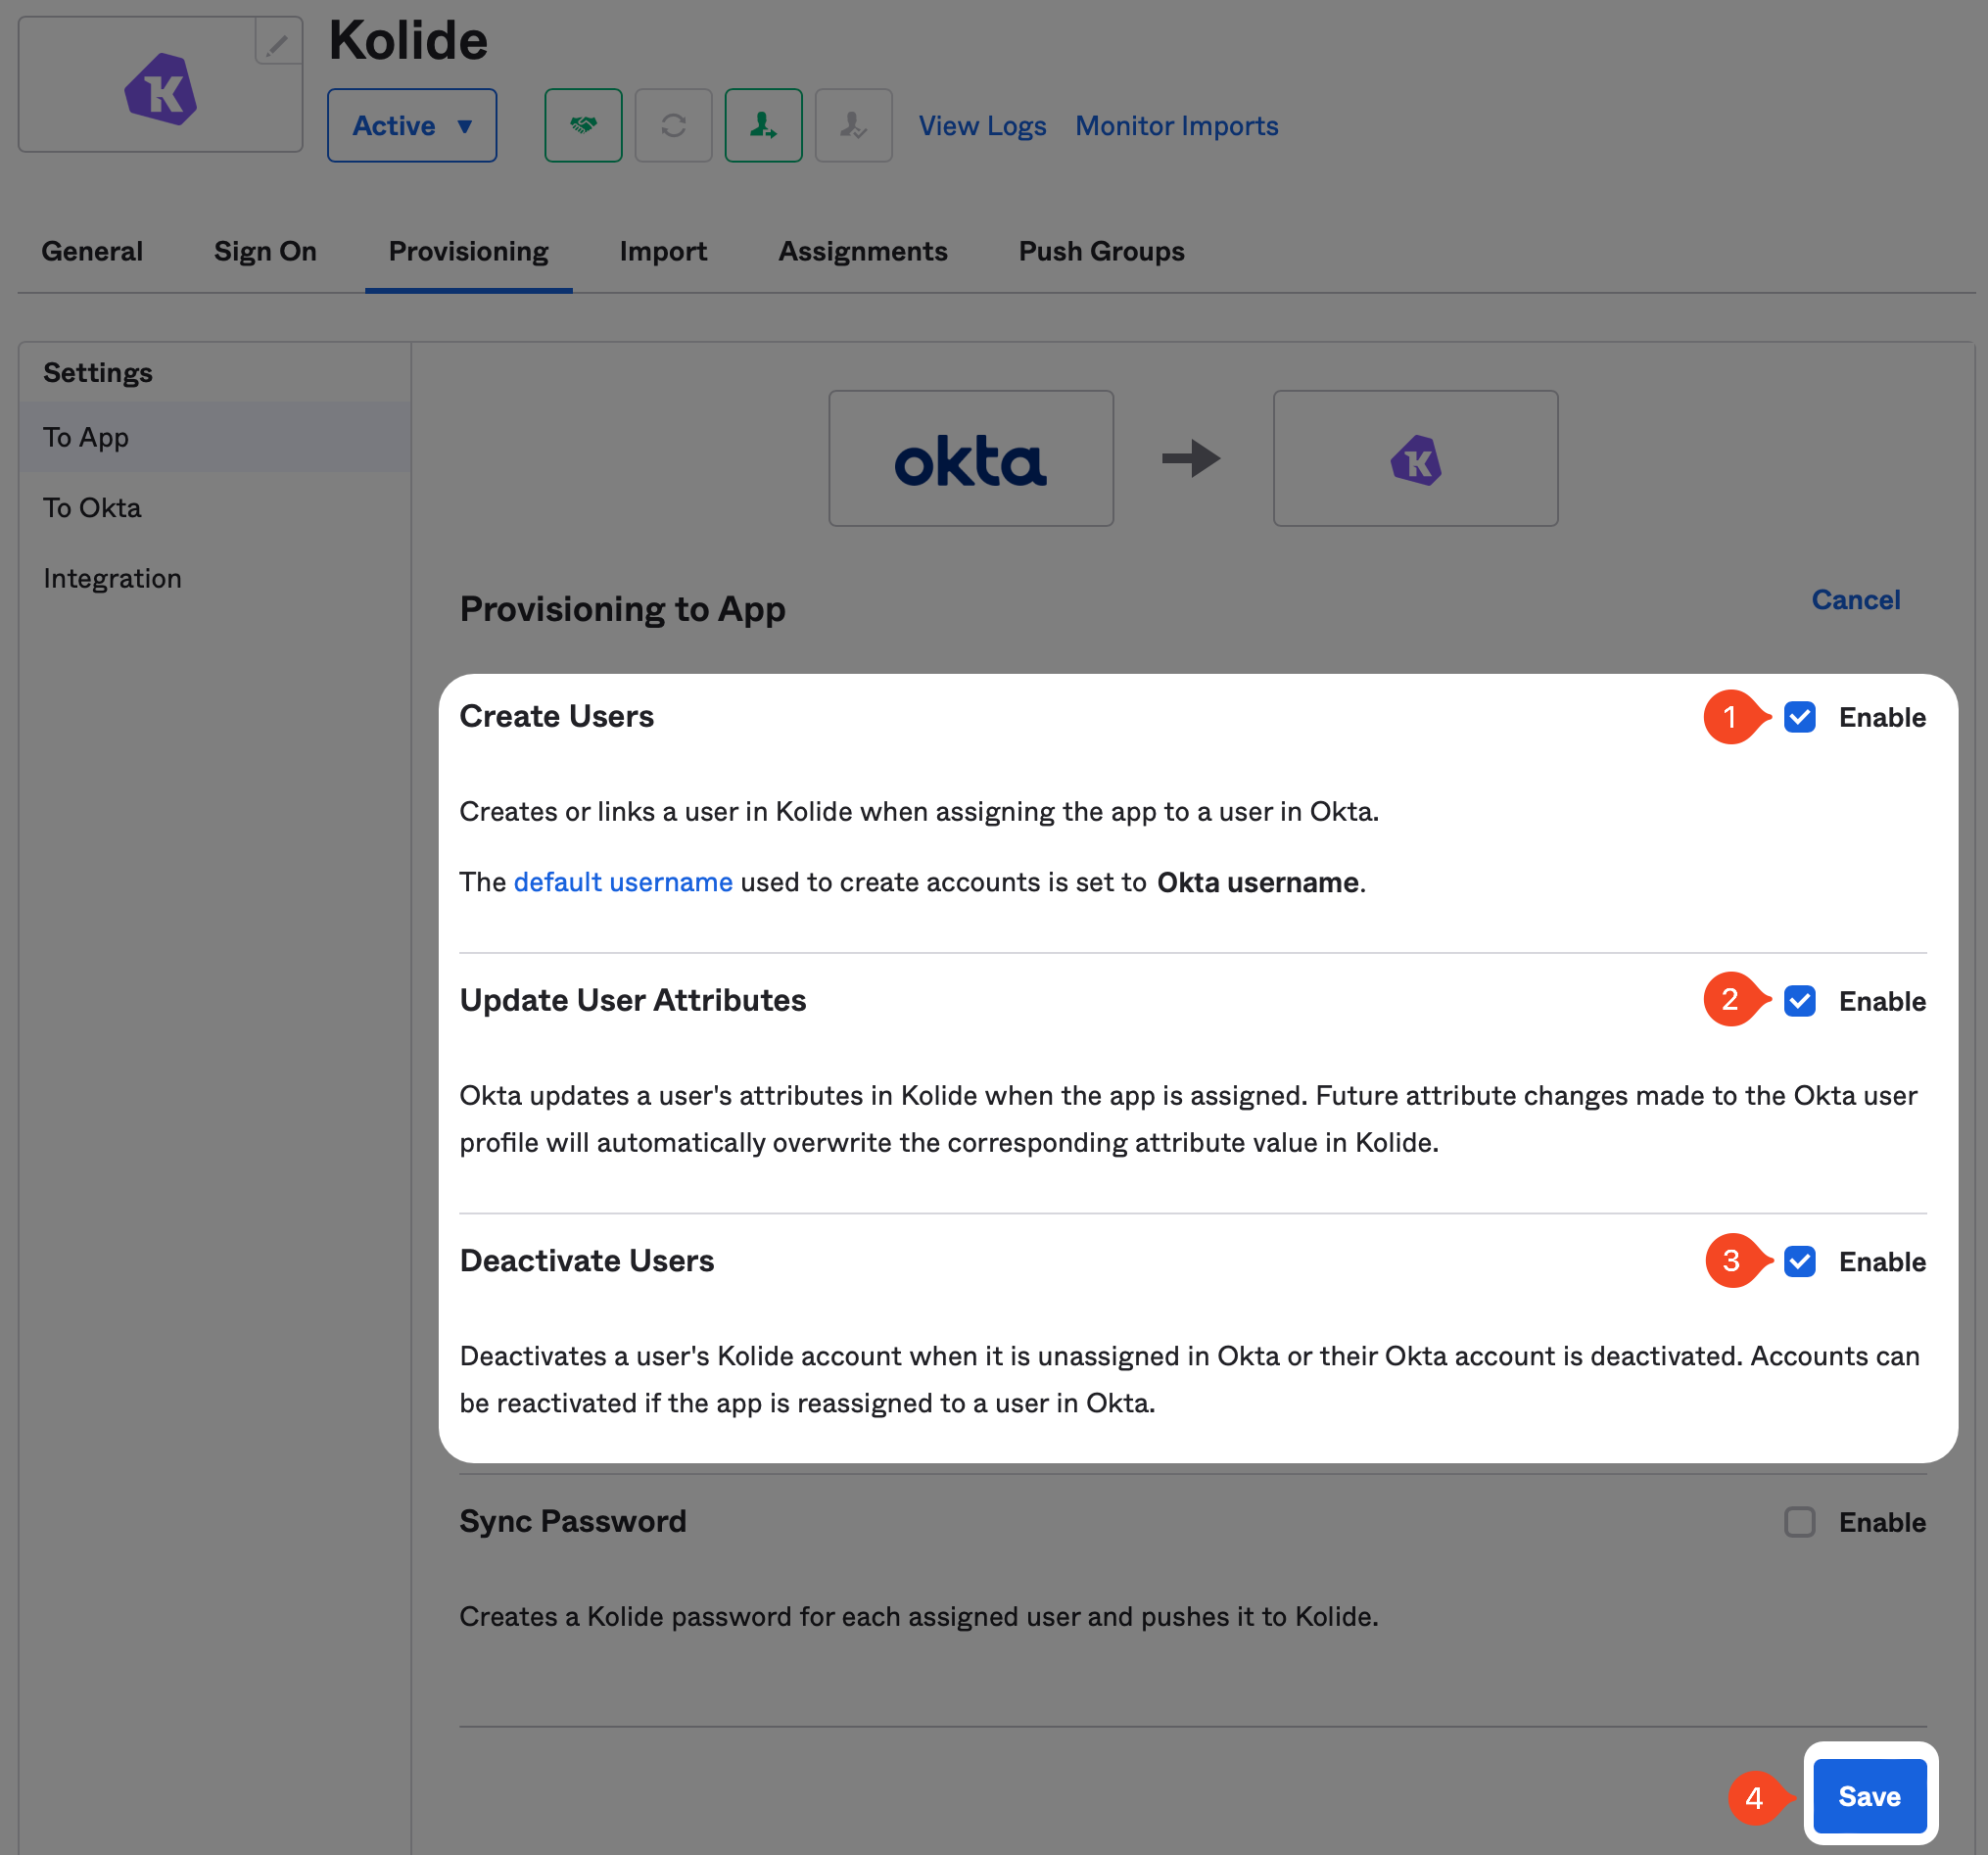
Once you have saved, Okta will test the connection and then reload the provisioning tab to reveal more settings. Once the page has reloaded, click Edit next to the Provisioning to App header.
Now, check the Enable checkboxes for Create Users, Update Users, and Deactivate Users settings. Once all three are checked, click Save at the bottom of the form.
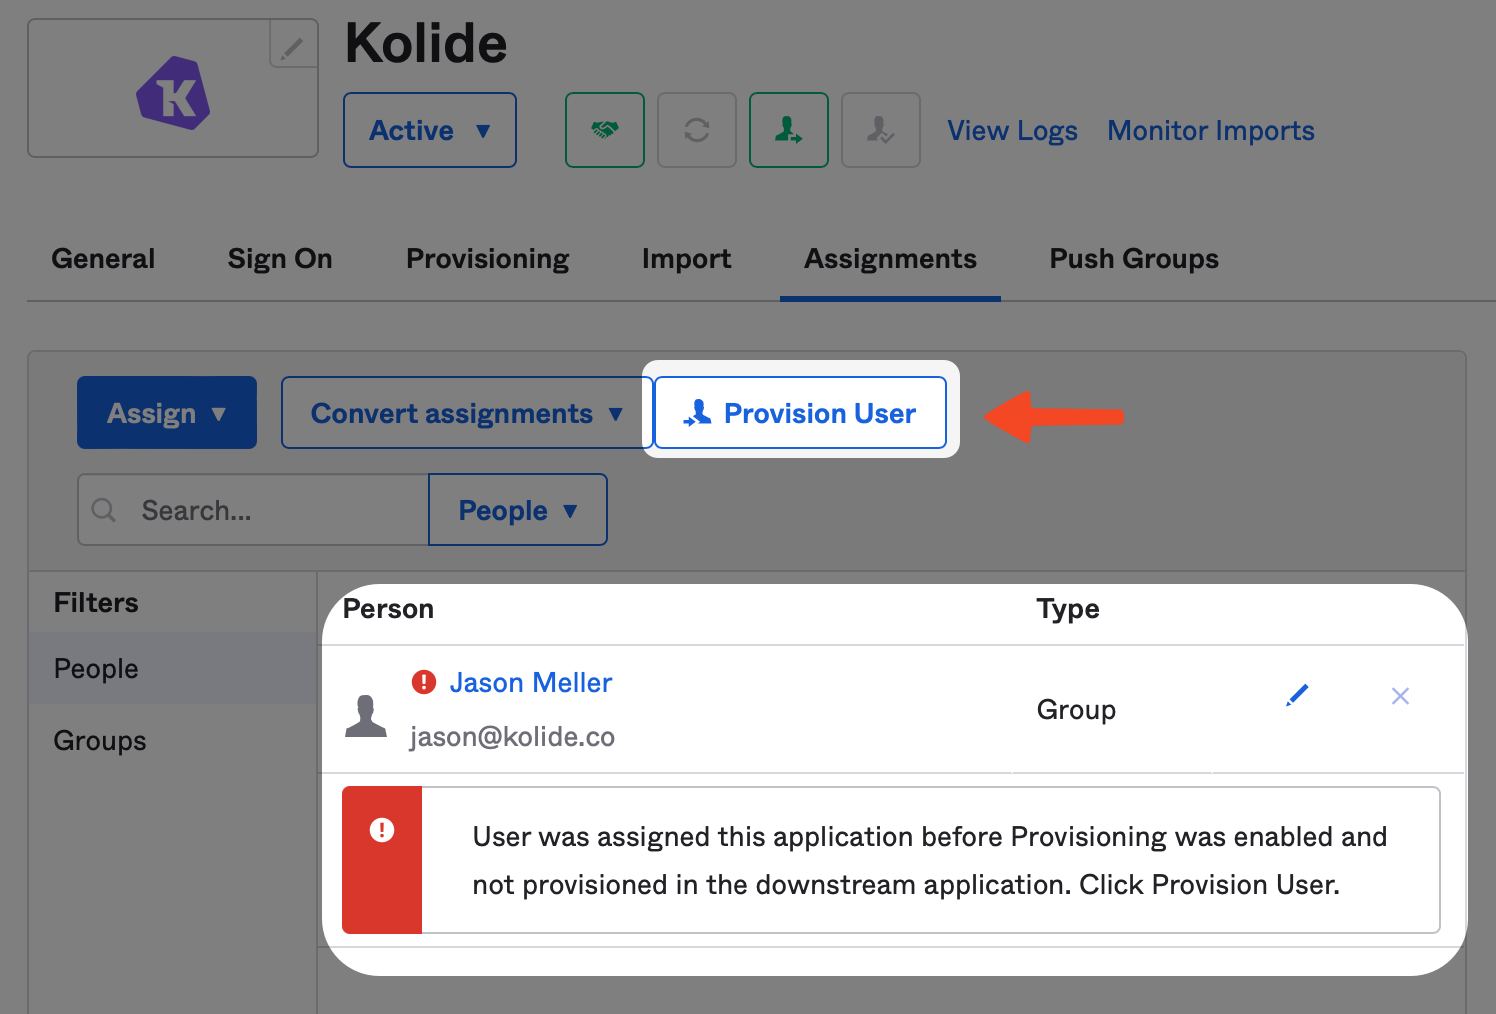
To fix this, simply click the Assignments tab and click the Provision User button and then Ok on the modal to confirm the action.
With that done, it’s now time to move onto the final required step, setting up Kolide as an Okta Identity Provider (IdP).
Step 4: Add Kolide as an IdP Authenticator to Okta
In this step, we will finish setting up the Kolide integration by adding Kolide as an authenticator you can use as part of Okta’s Authentication Policies.
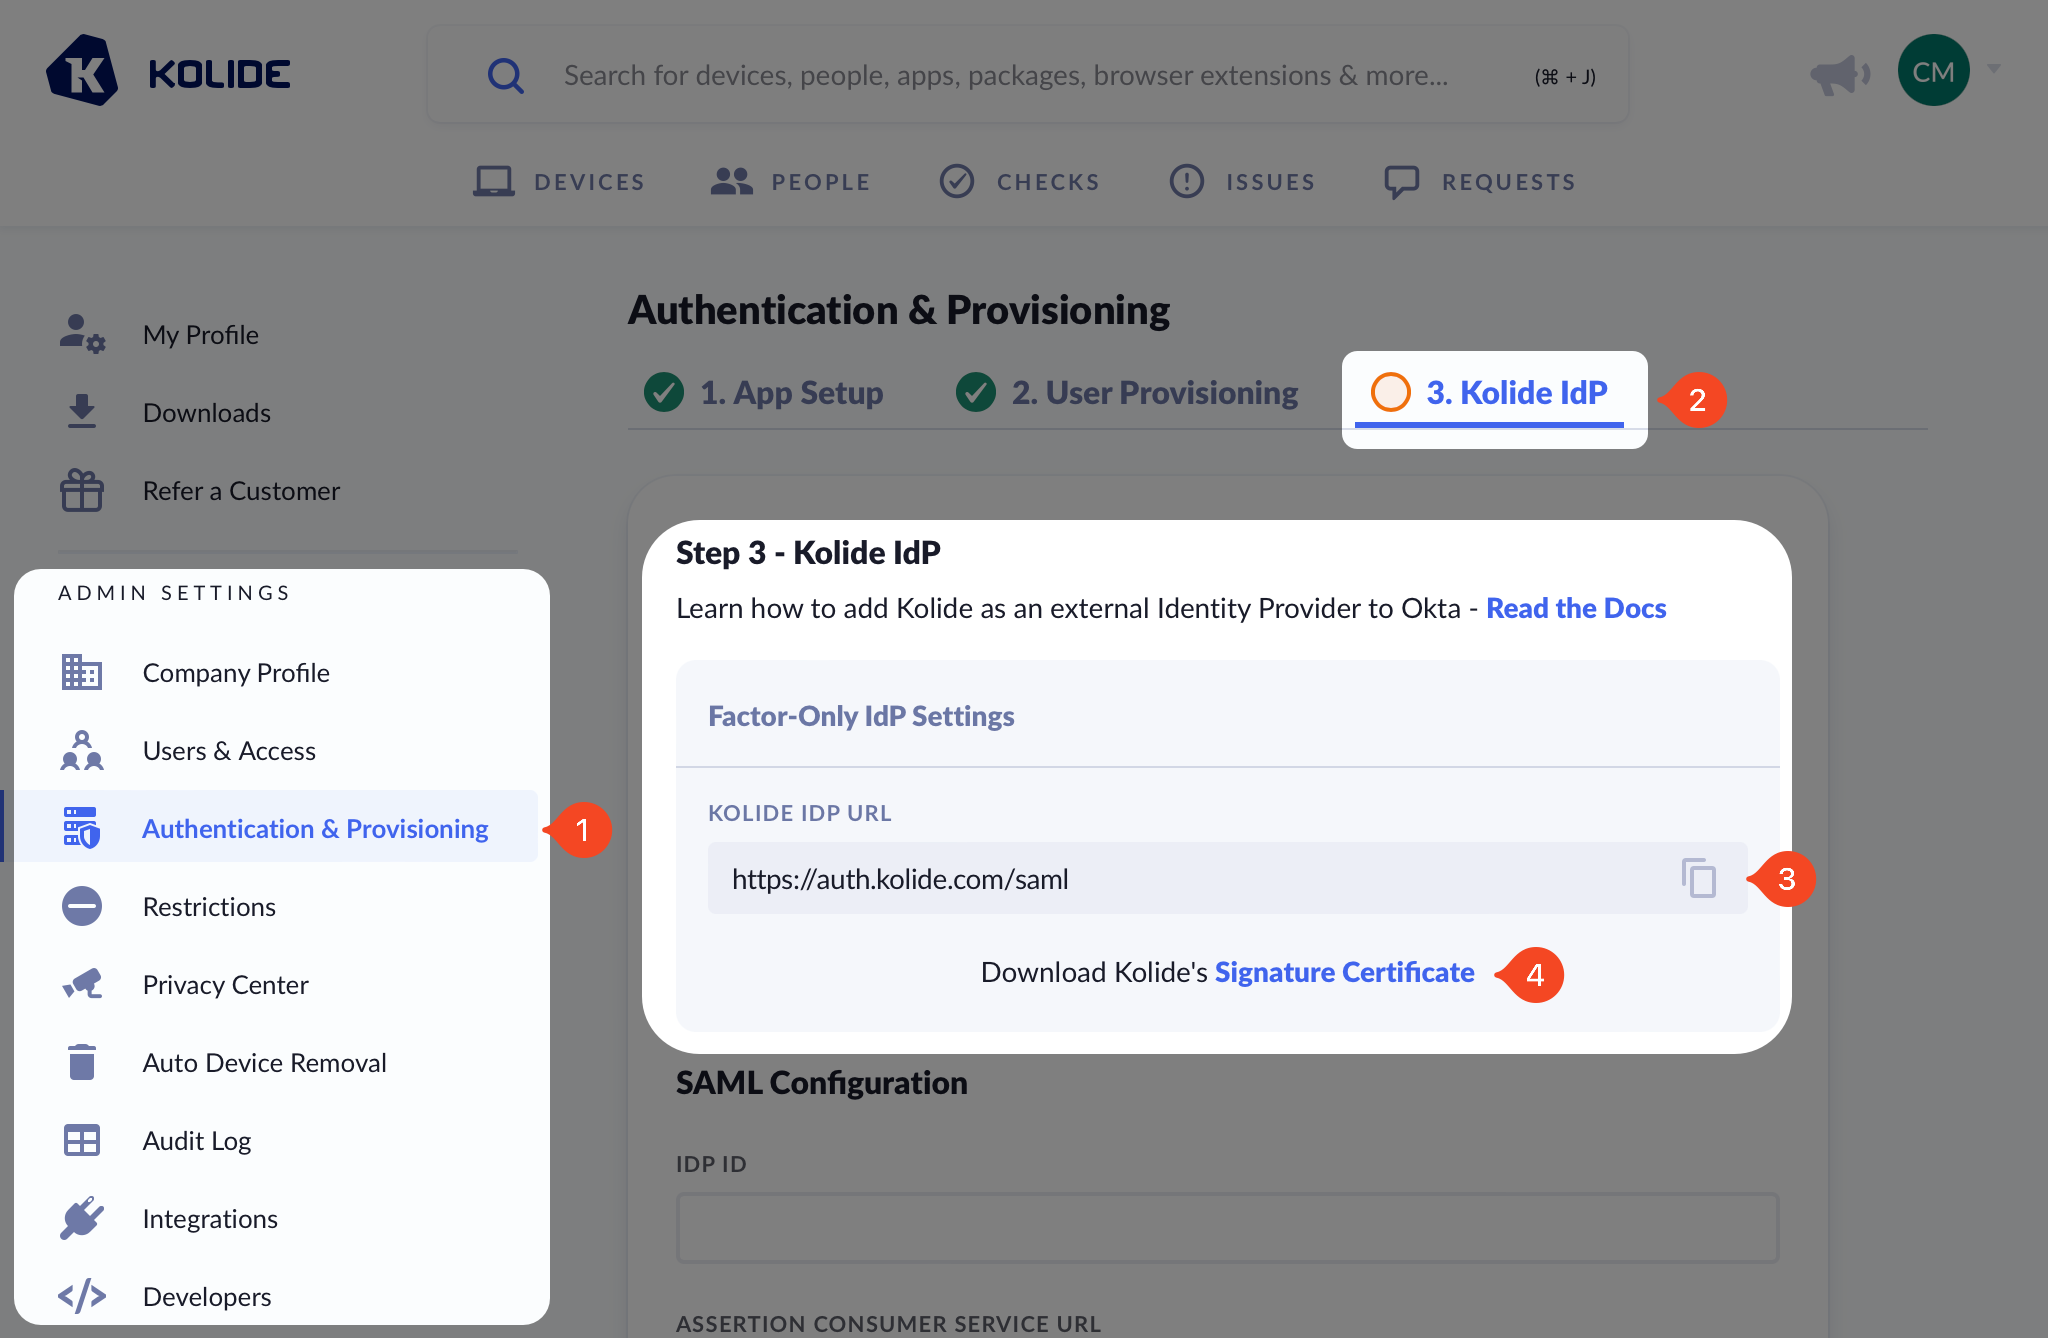
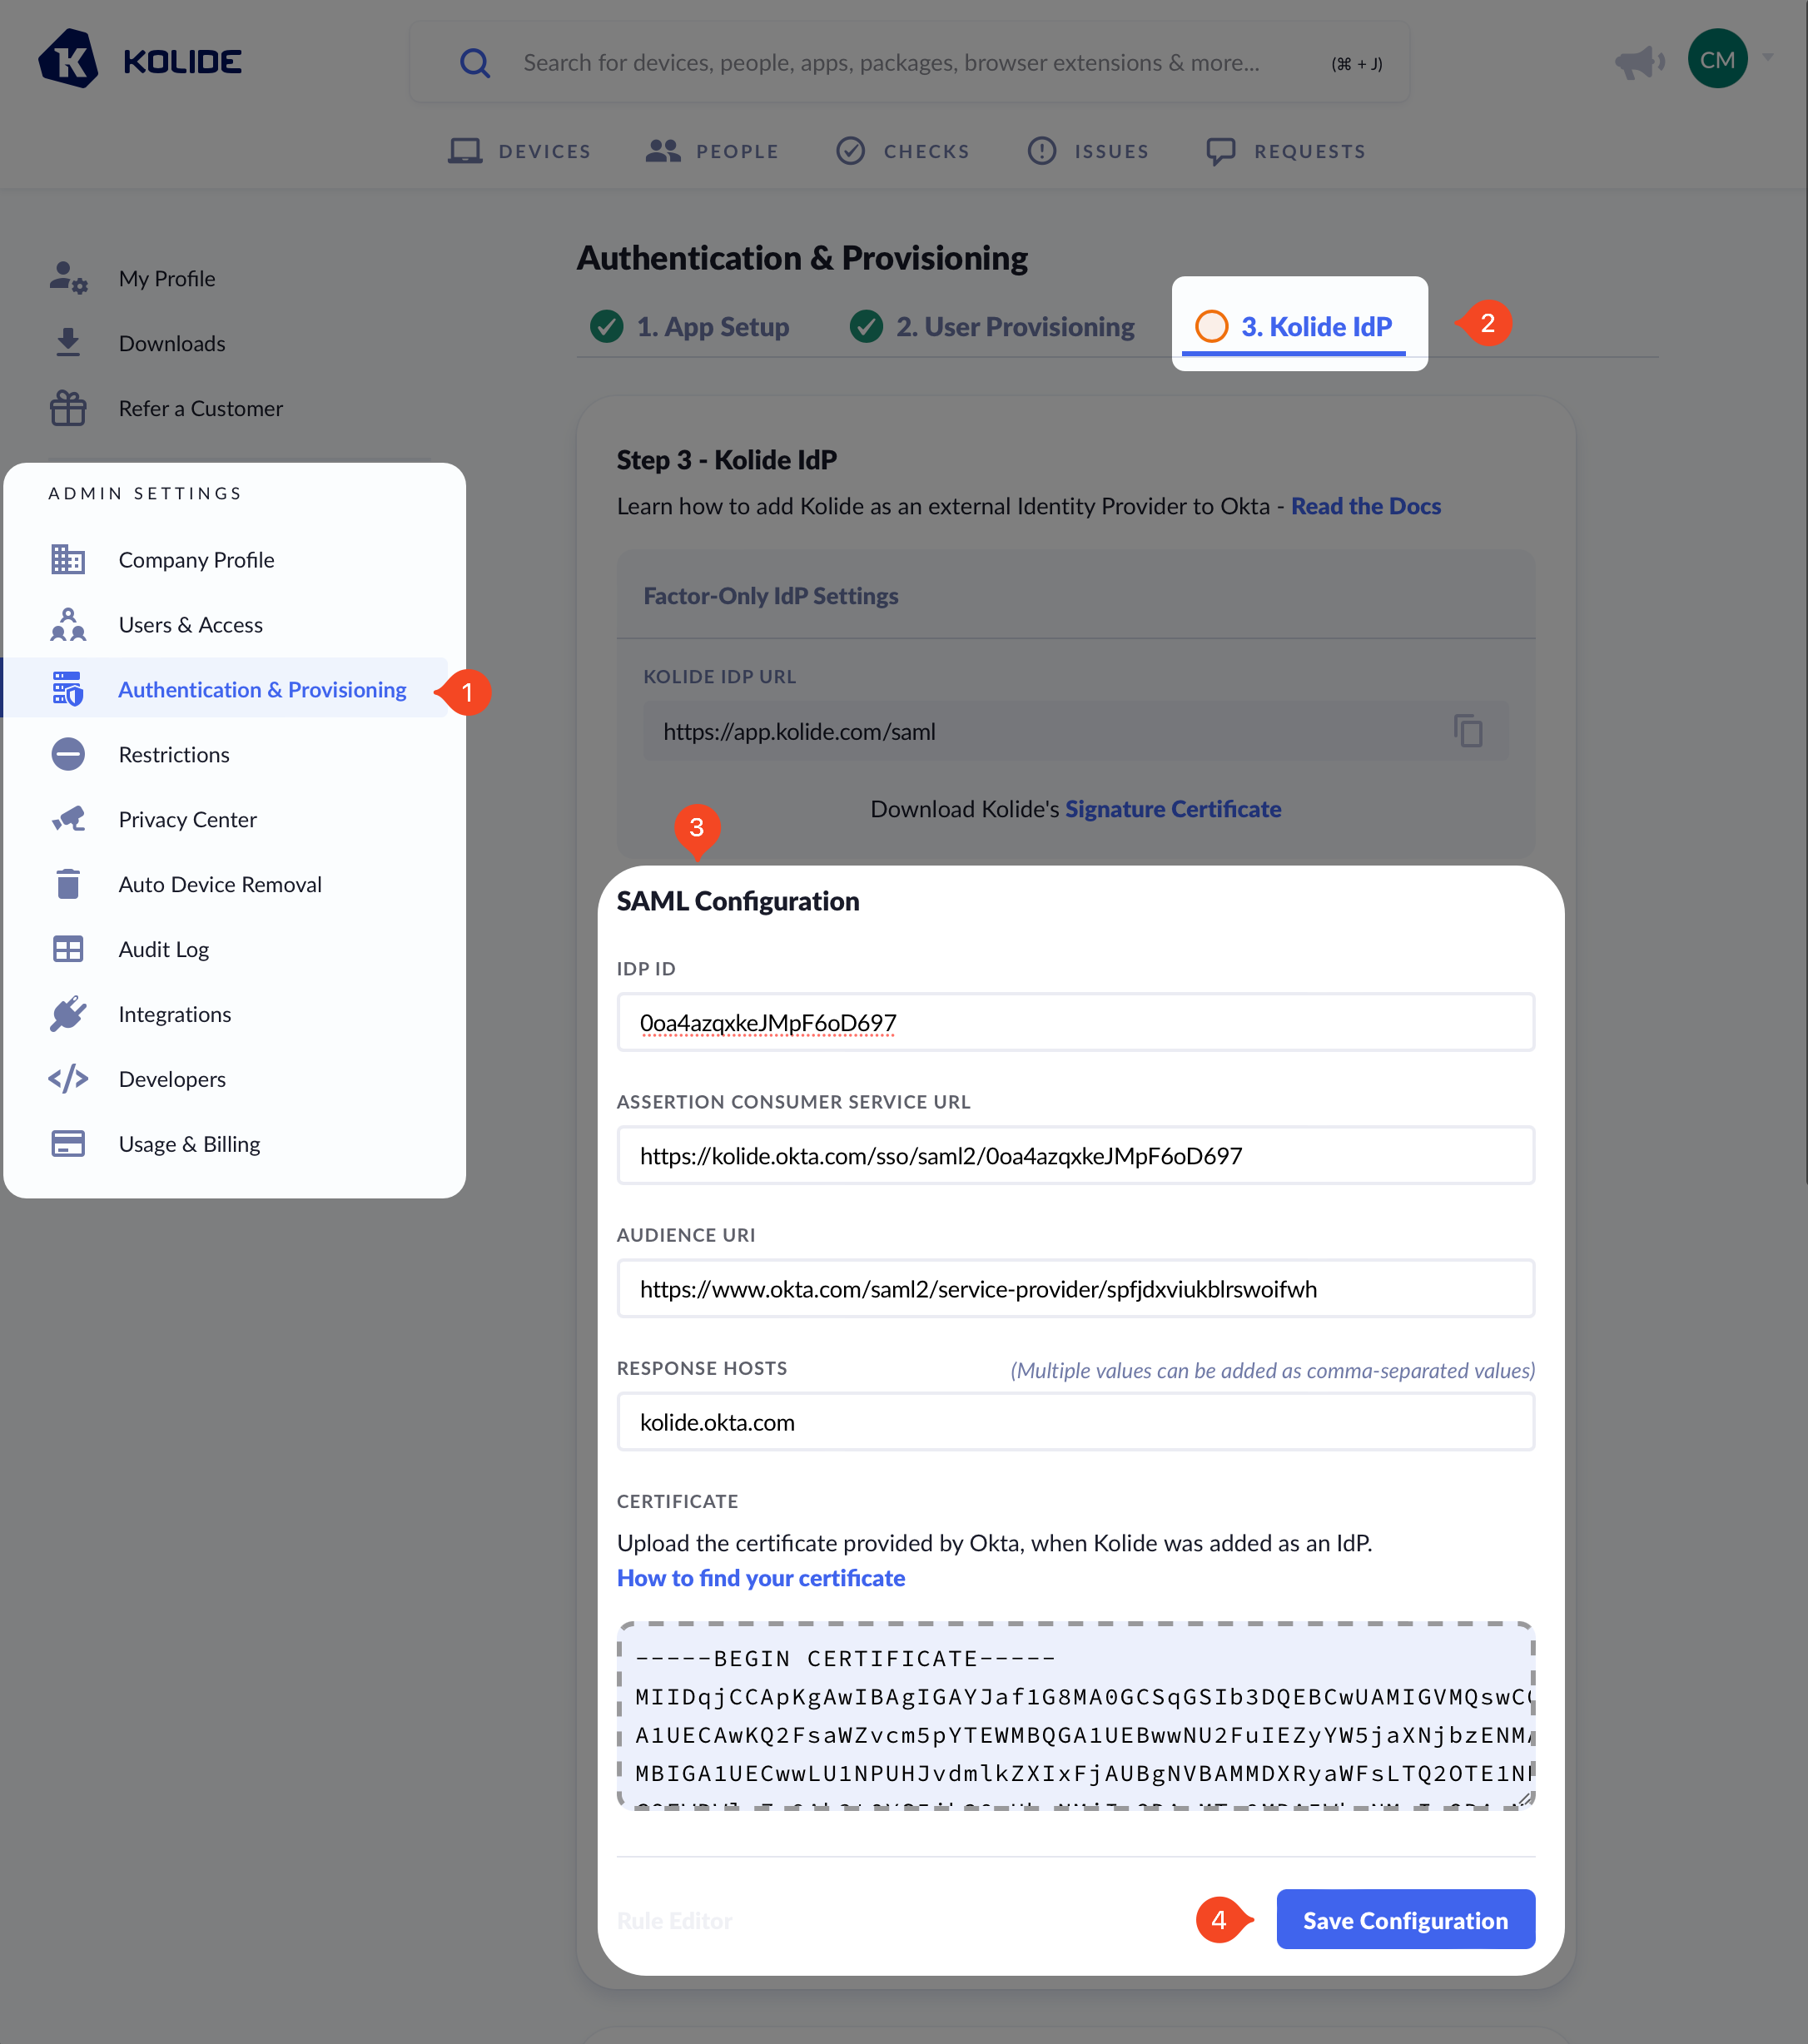
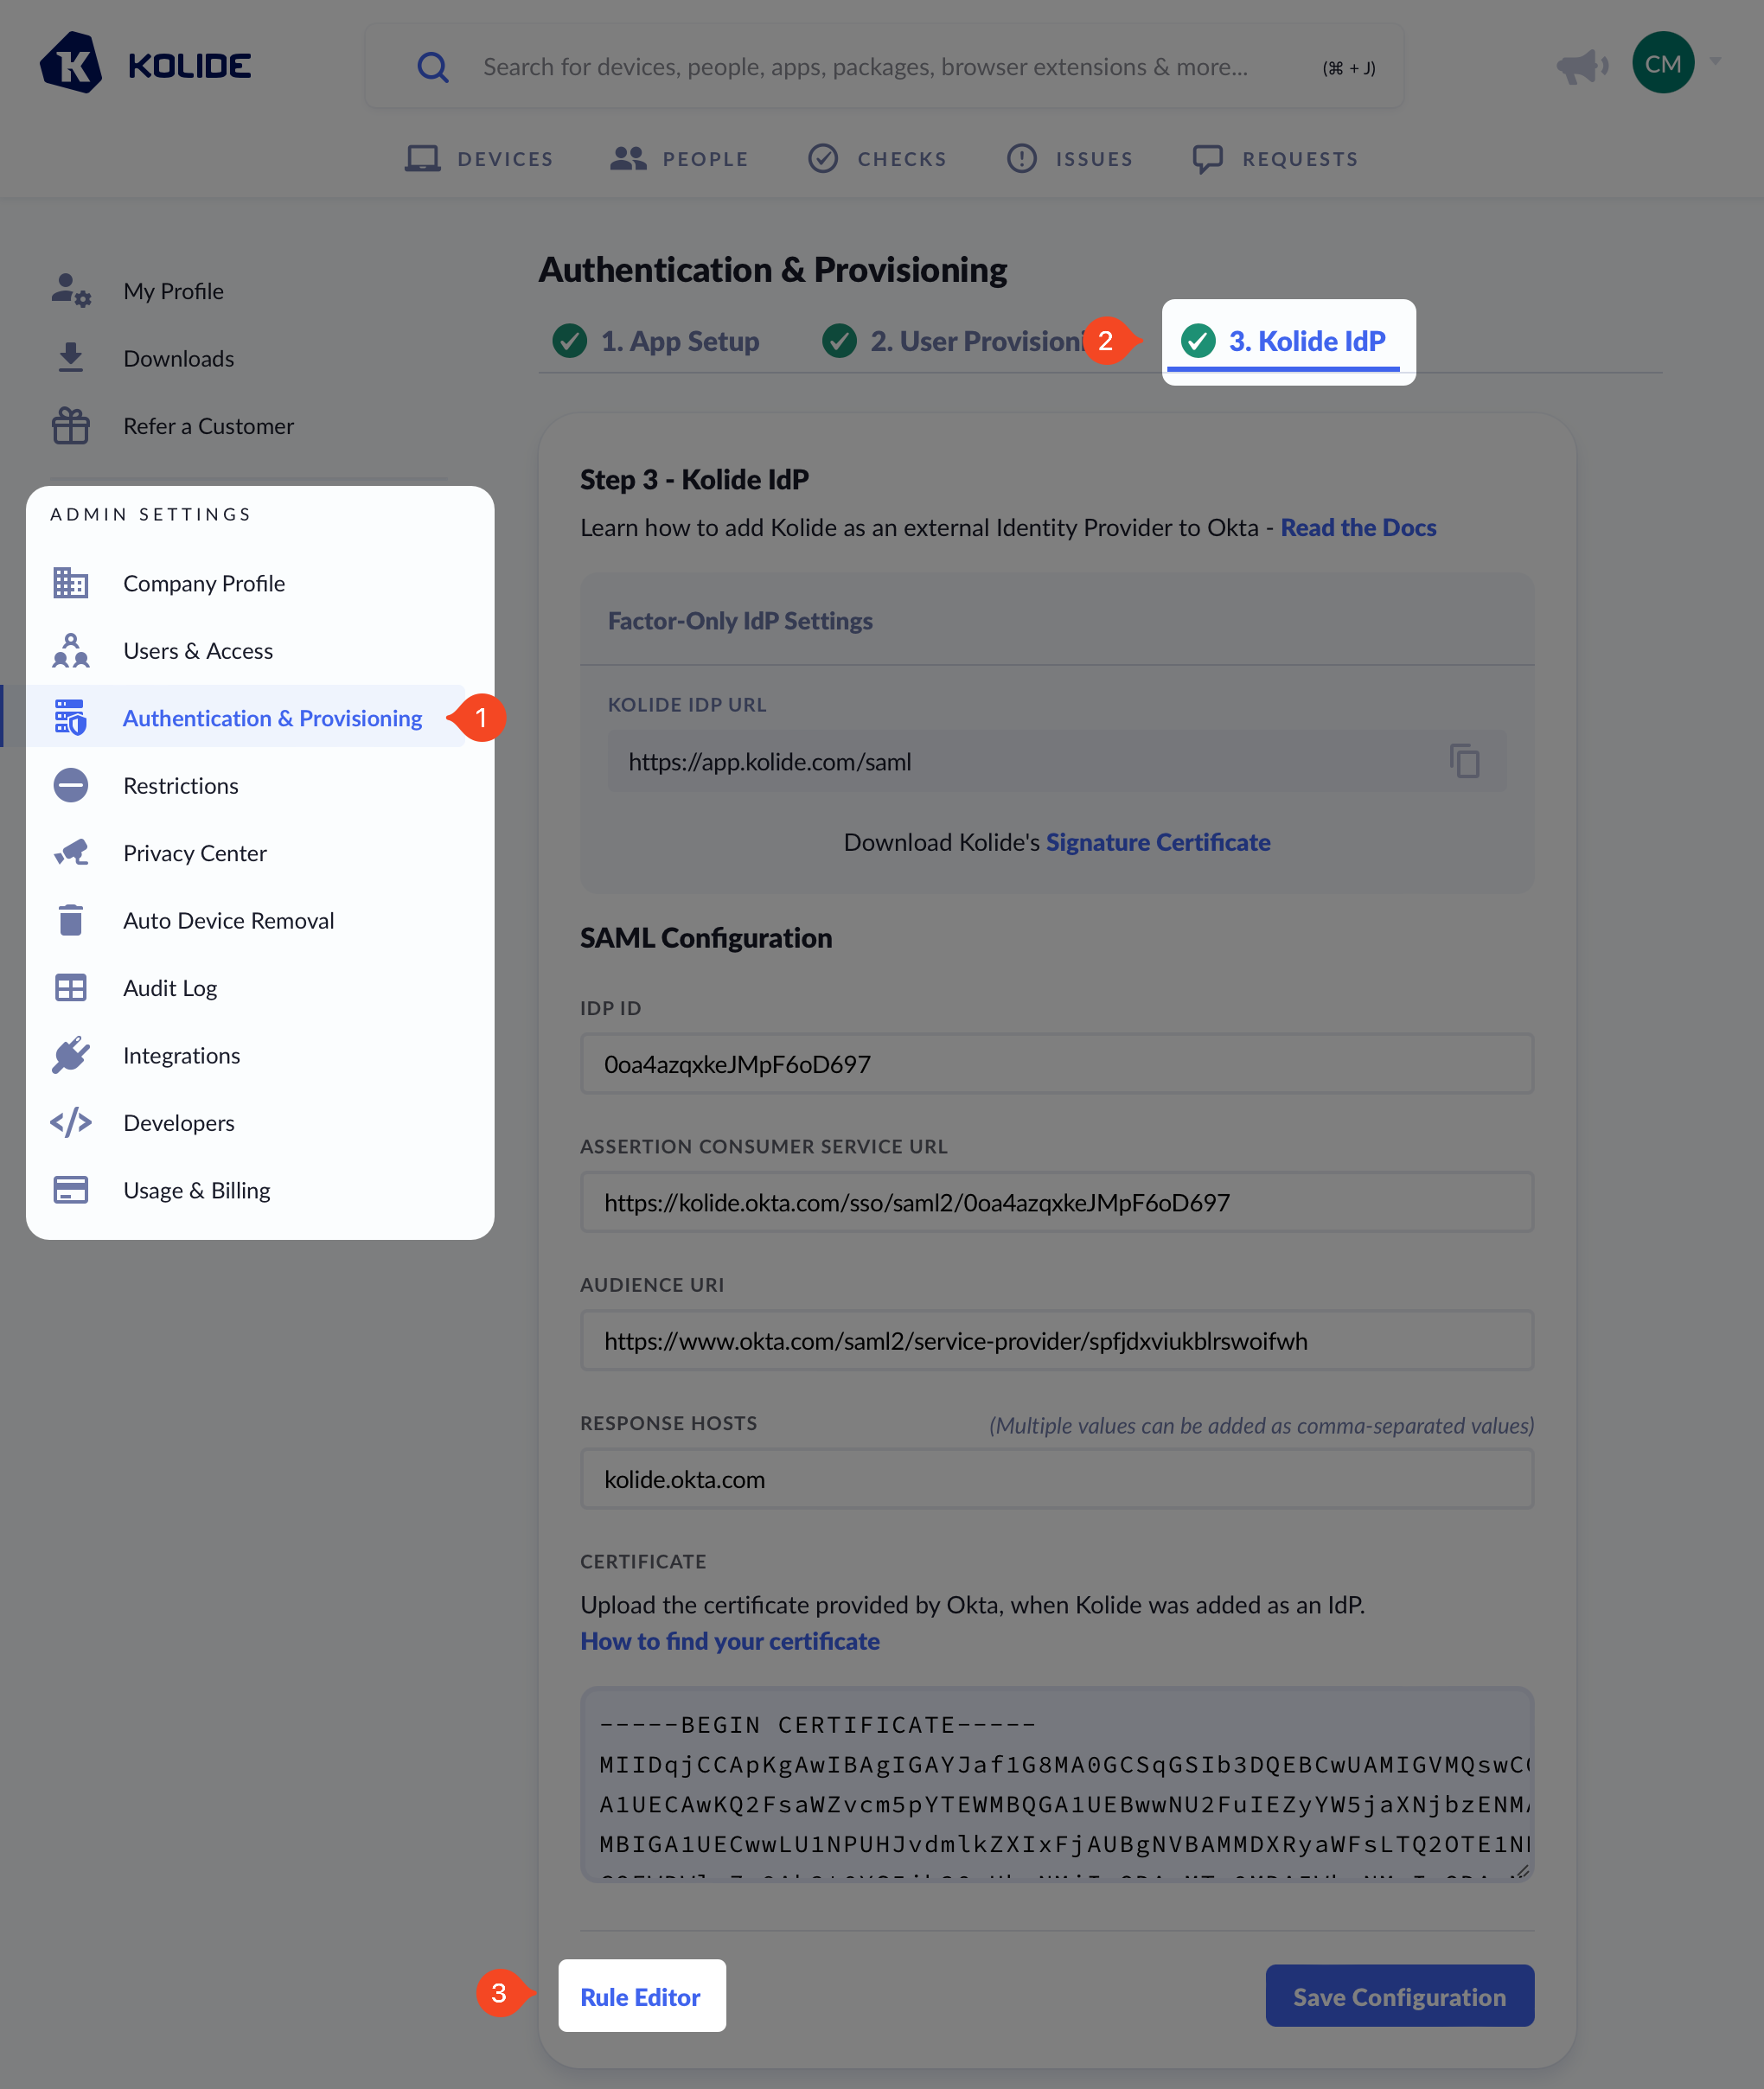
Before you get started, make sure you are signed into https://app.kolide.com. Once signed in, click the avatar in the upper-right, then click Settings, and finally, in the left-hand navigation menu, click Authentication & Provisioning and the Kolide IdP tab.
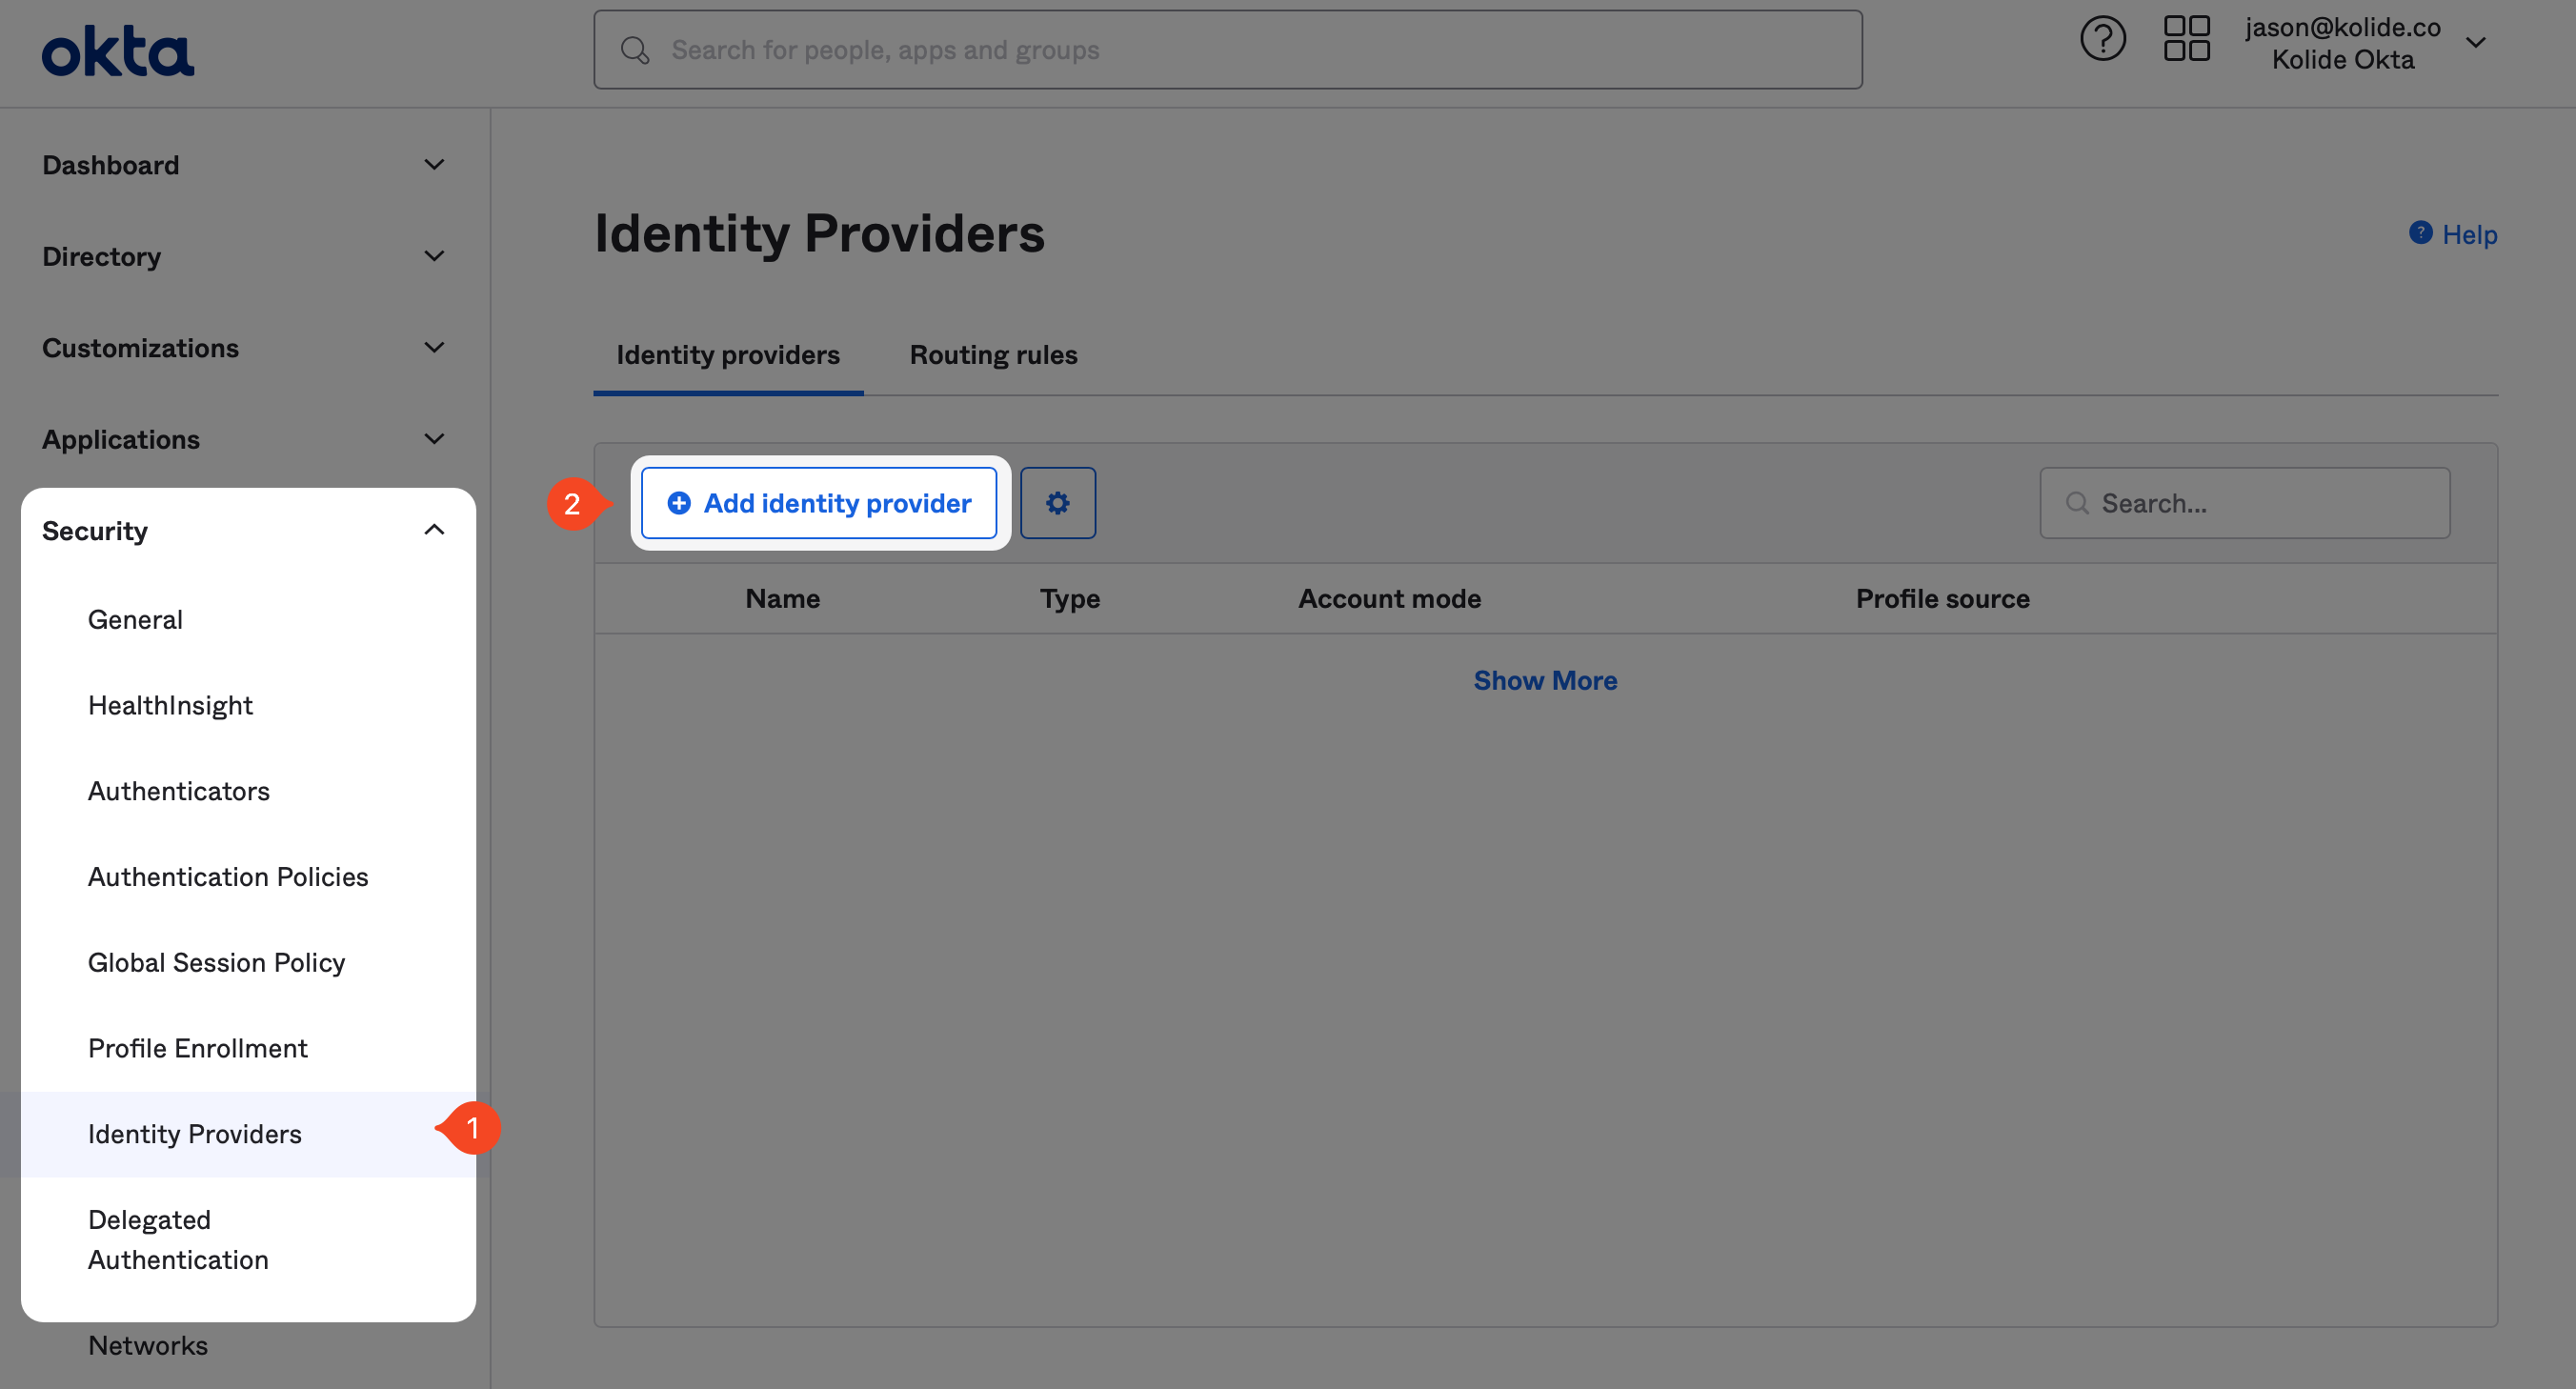
Add Identity Provider to Okta
If you haven’t already, in another tab, sign into your Okta Administrative portal
https://${yourOktaDomain}-admin.okta.com. Once signed in, click
Security > Identity Providers in the left-hand sidebar, and click
Add identity provider near the top of the resulting page.
On the next page, click the SAML 2.0 IdP option and click Next.
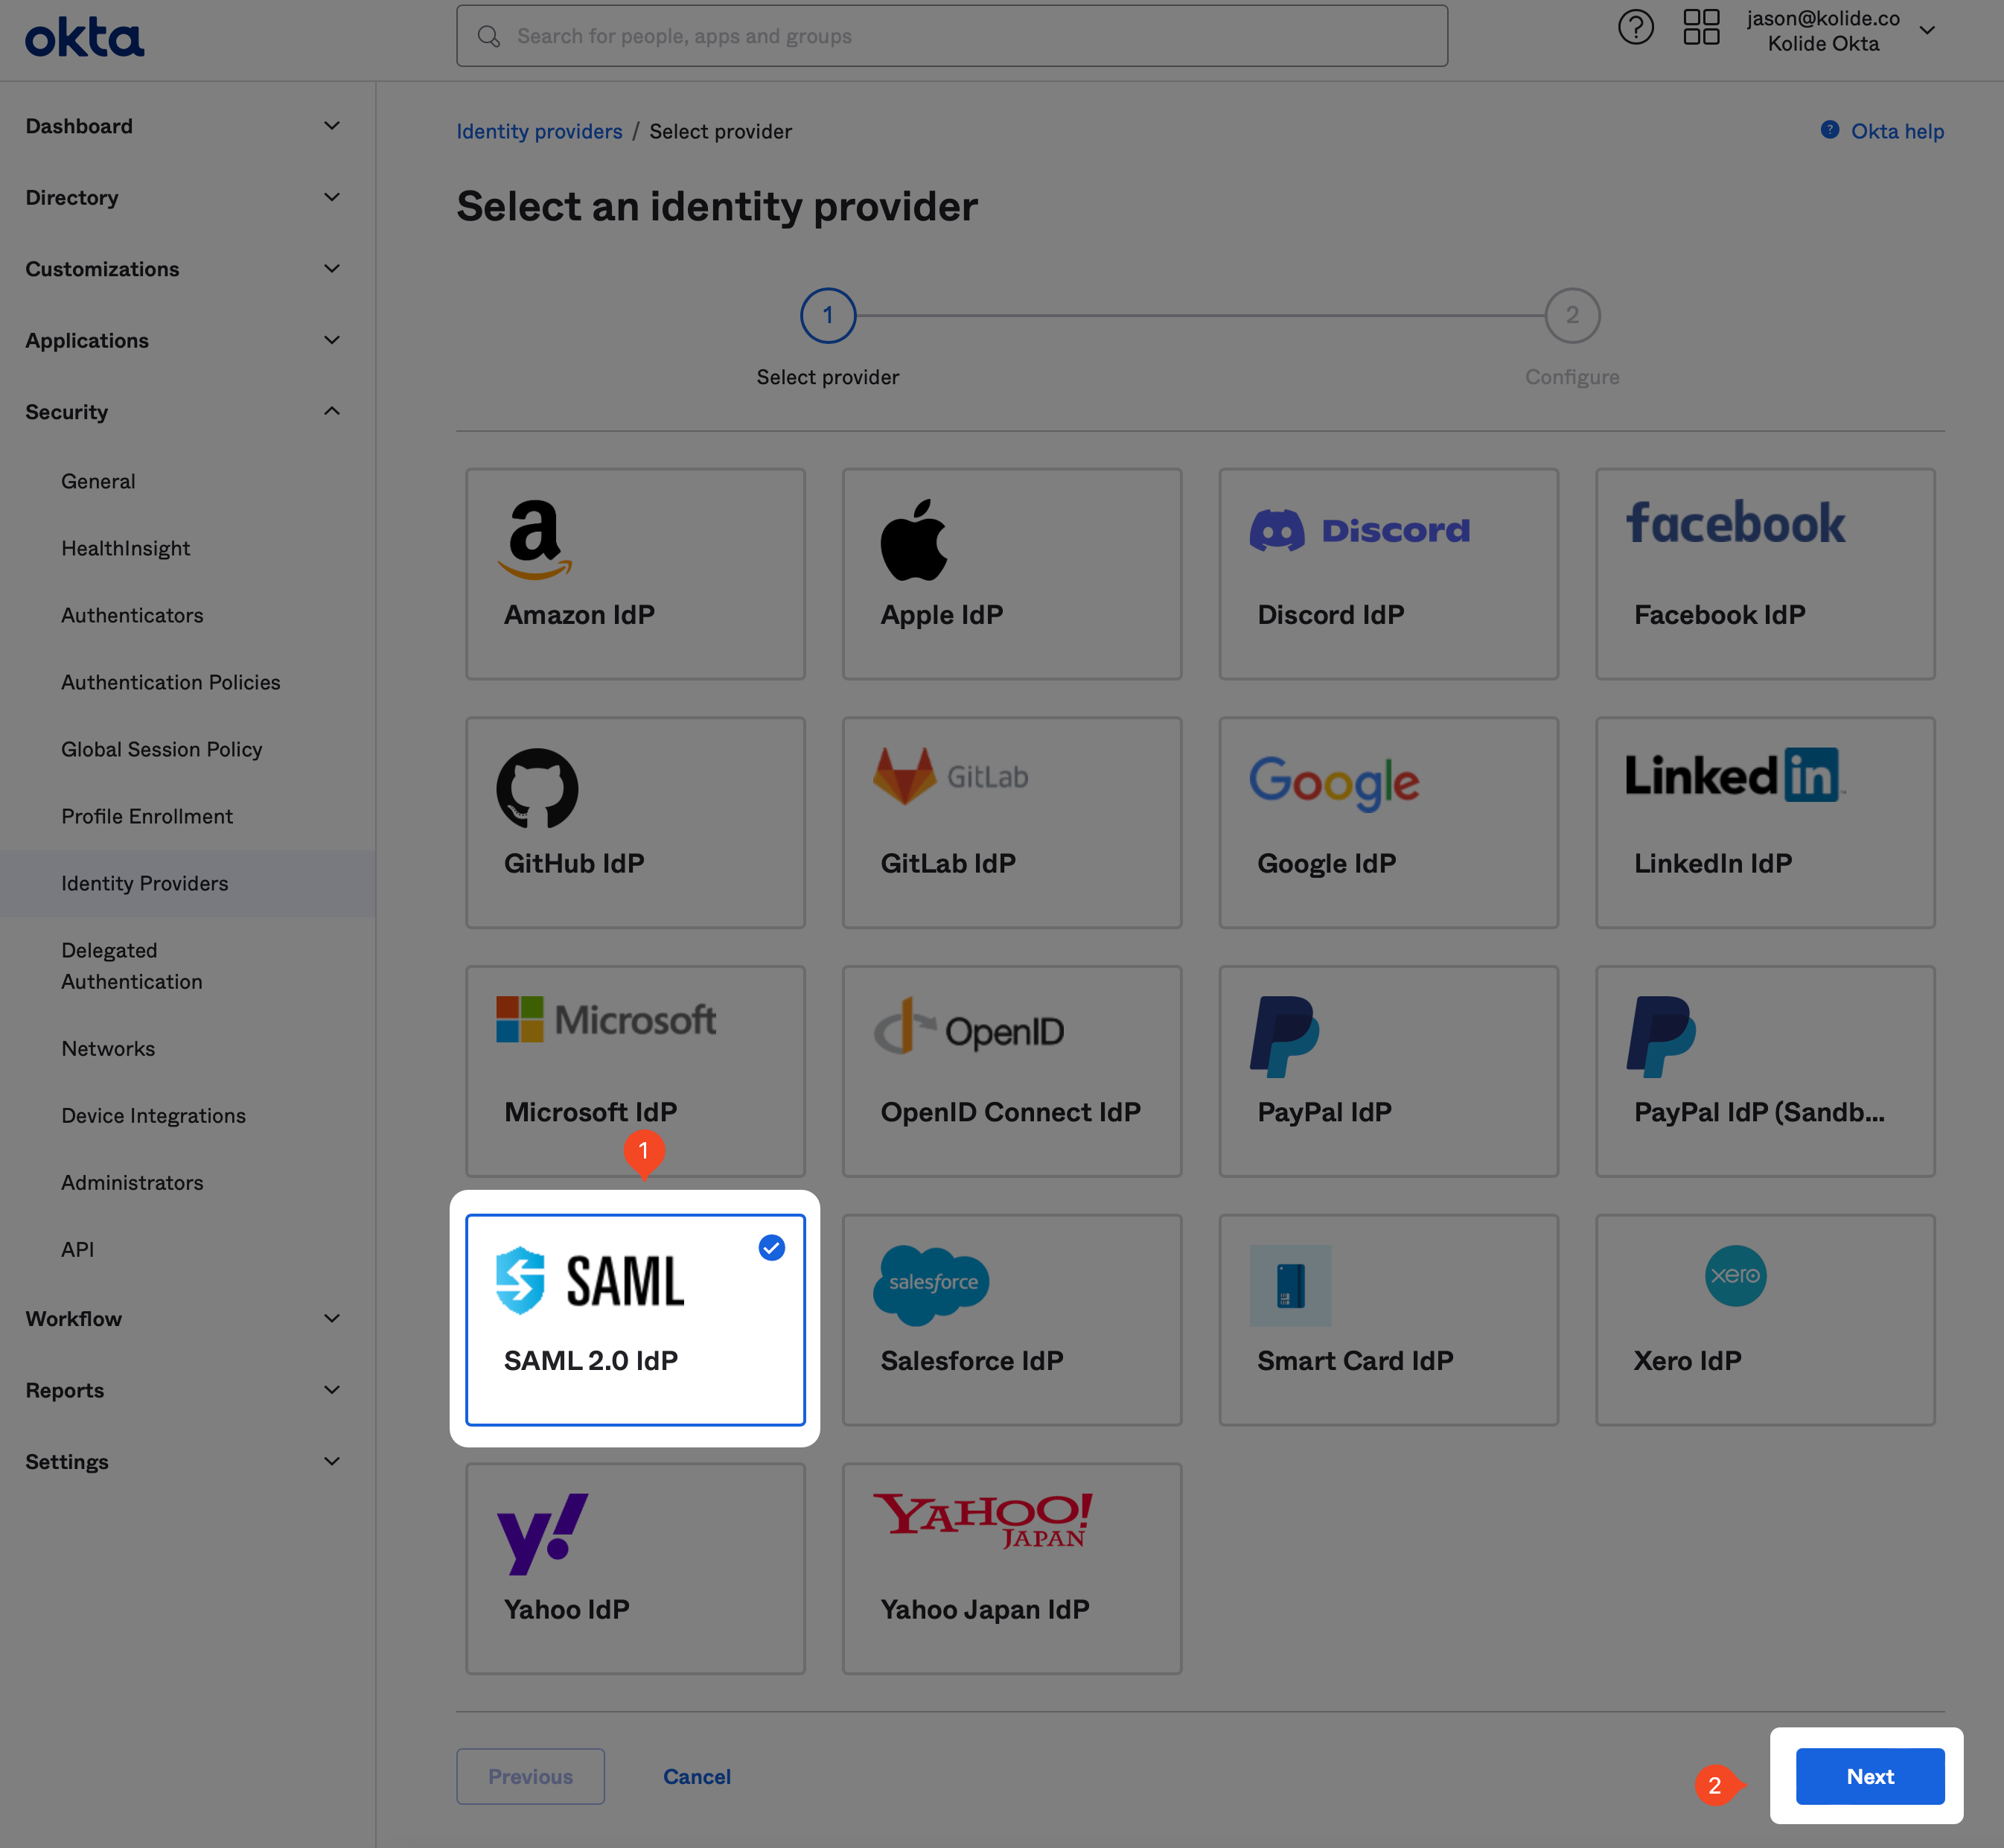
Once you’re at the IdP configuration step, fill out the form as follows:
- Name - Kolide
- IdP Usage - Factor Only
- IdP Issuer URI - https://auth.kolide.com/saml
- IdP Single Sign-On URL - https://auth.kolide.com/saml
- IdP Signature Certificate - Click here to download
- Destination - https://auth.kolide.com/saml
Keep every other field’s default settings and click Finish.
Configure the IdP within Kolide
You will be redirected back to the Identity Providers screen. Once there, click the gray disclosure icon to the left of the Kolide entry to reveal information we will need to copy into Kolide.
In addition, you’ll also want to download the IdP certificate by clicking Actions > Download Certificate.
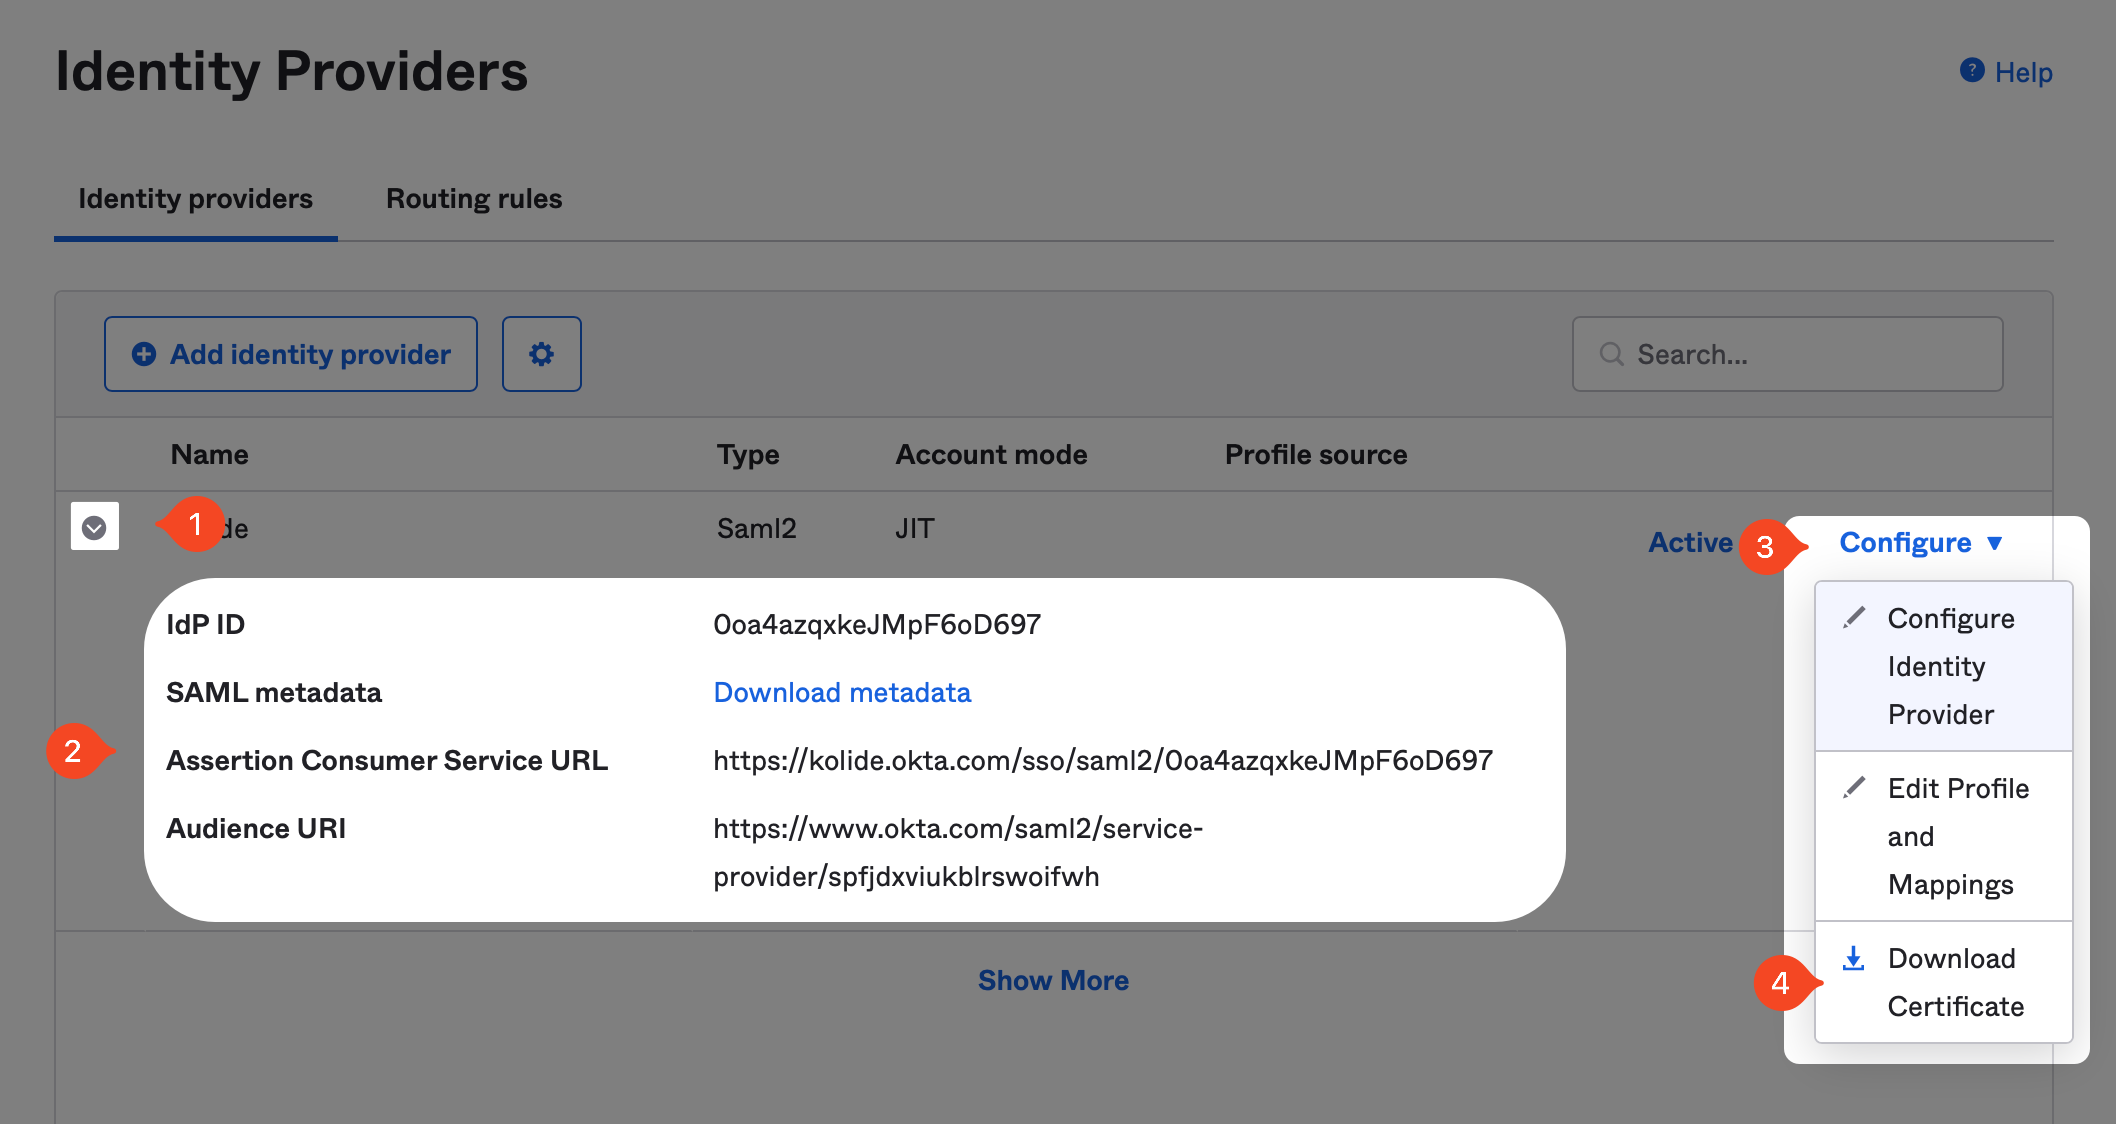
Now in Kolide, simply copy the values into their respective fields in the form and click Save.
https://login.yourdomain.com,
it is important that you use the Okta domain for the Assertion Consumer Service URL and
the Response Host fields. For example, use https://yourdomain.okta.com and not https://login.yourdomain.com
Add Kolide as IdP Authenticator in Okta
From the Okta Admin portal, browse to Security > Authenticators and click the Add authenticator button.
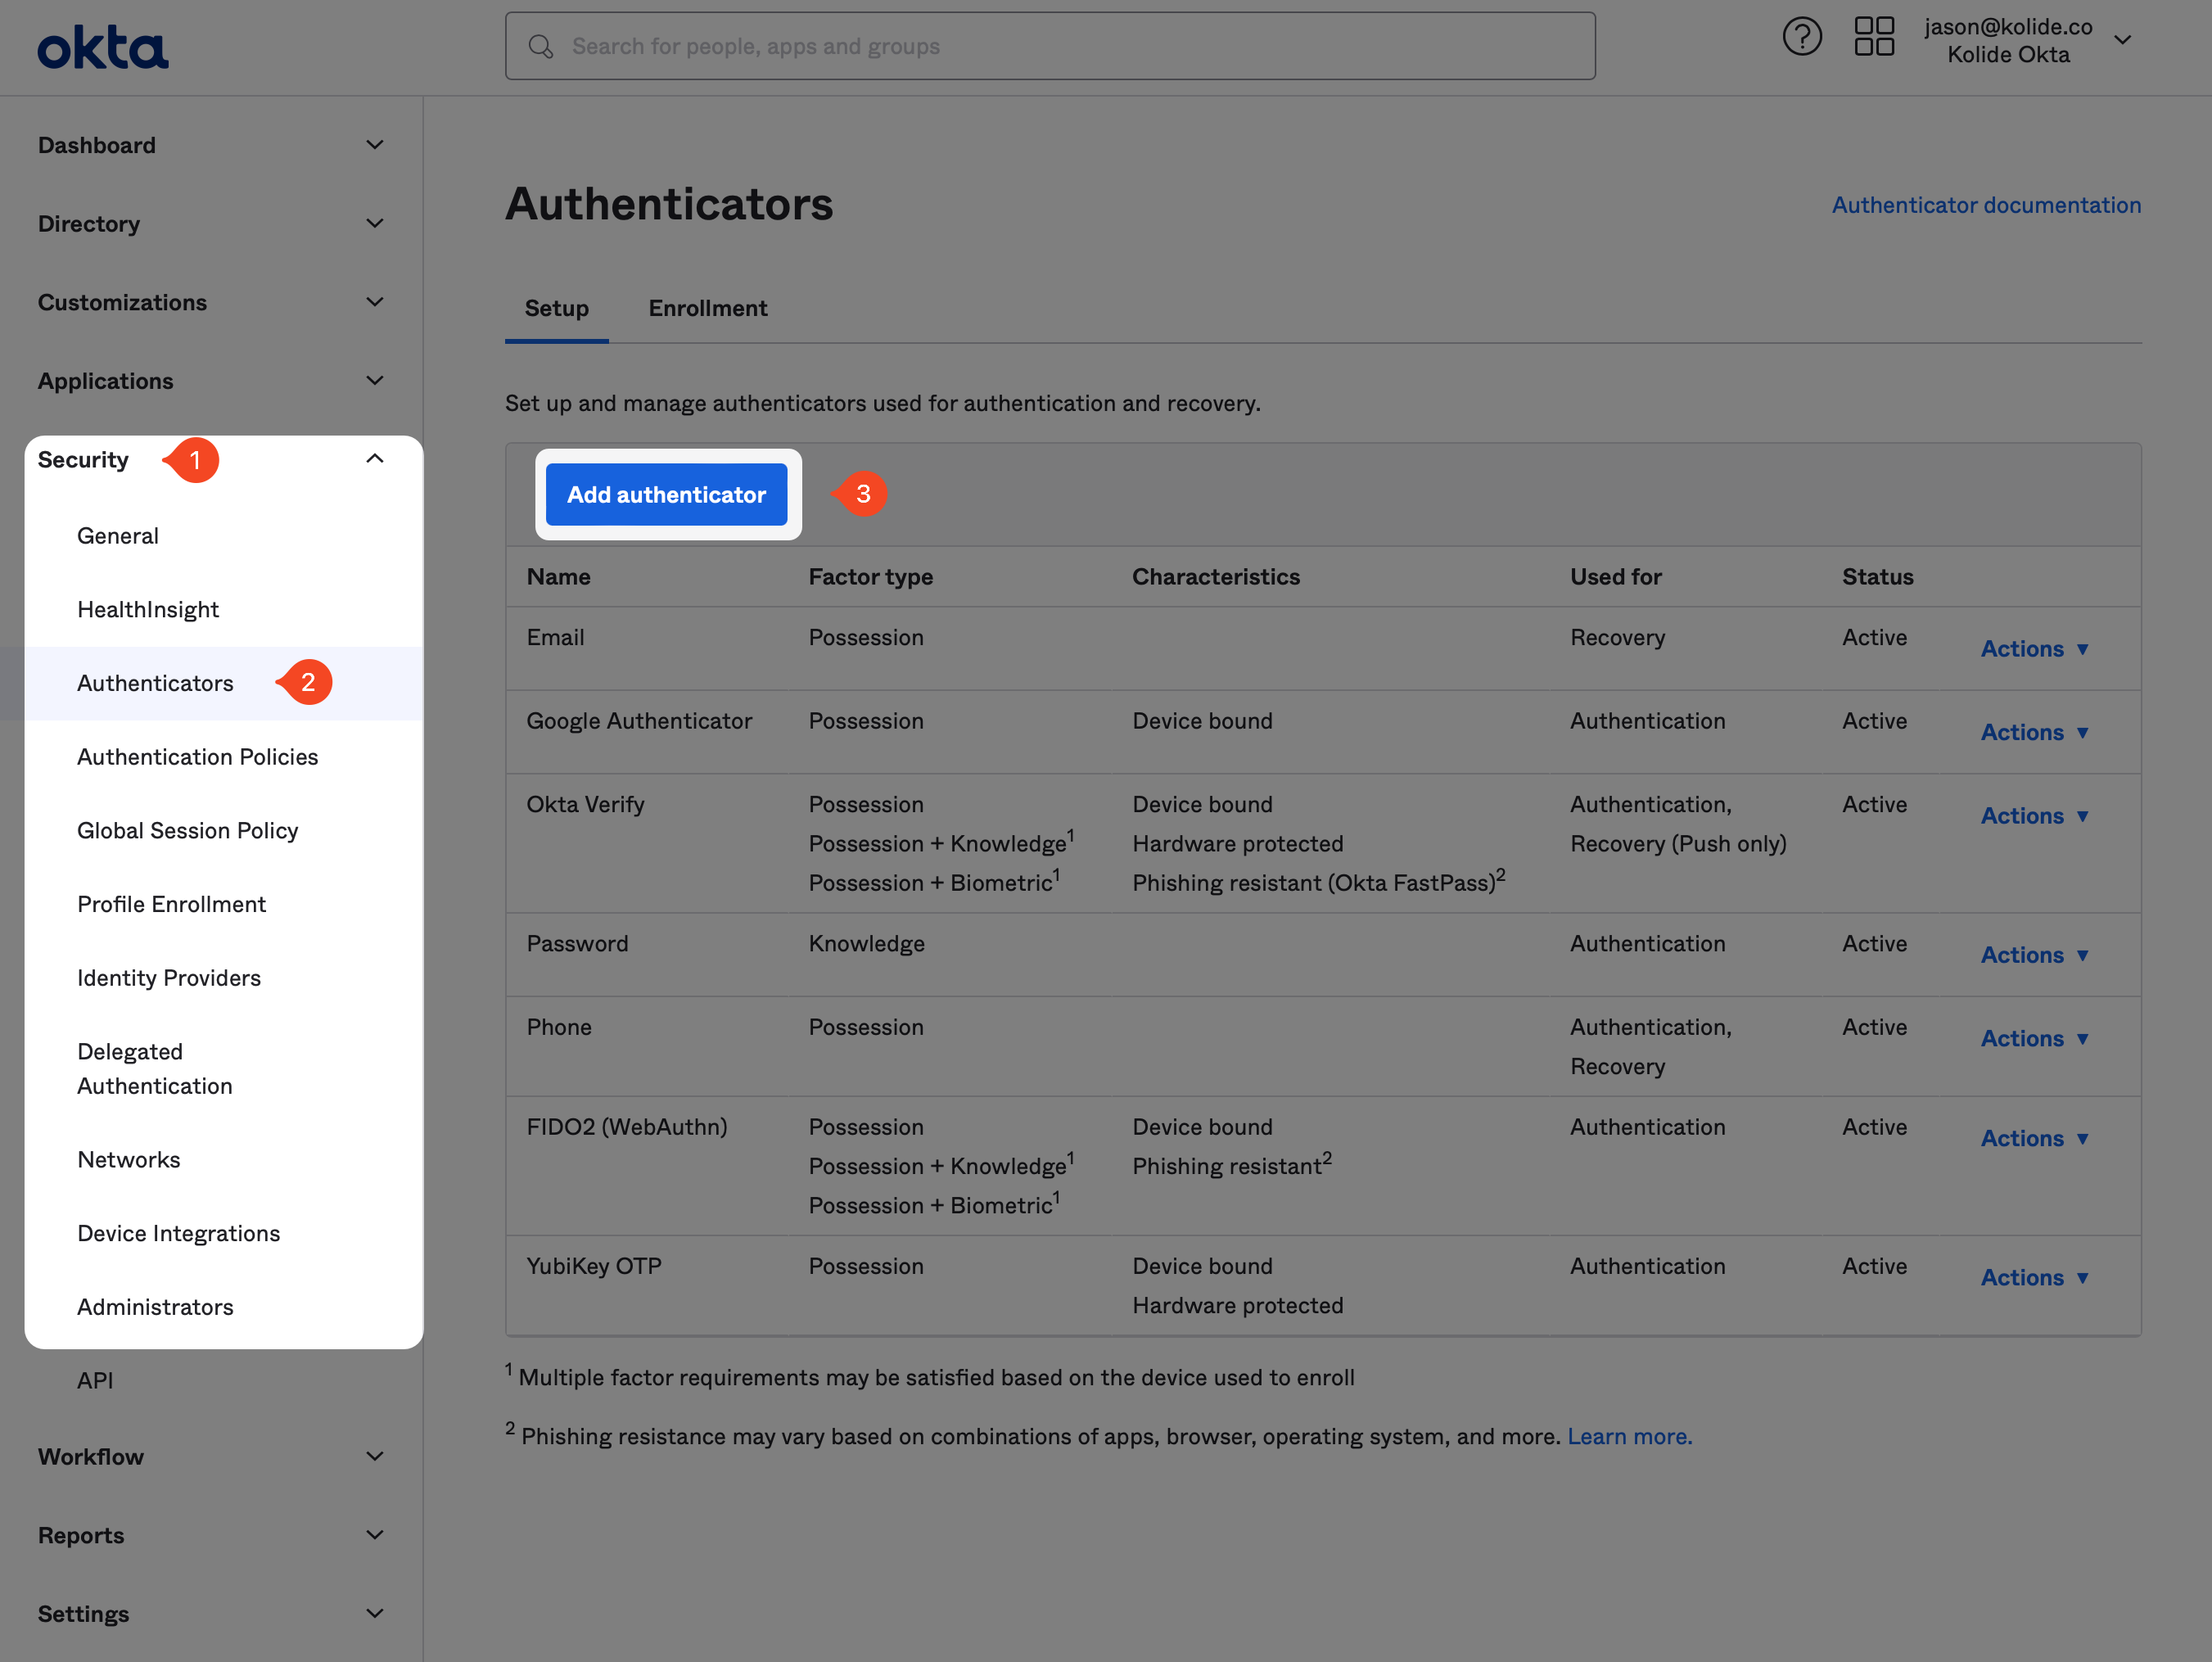
From there, locate the option called IdP Authenticator and click the Add button.
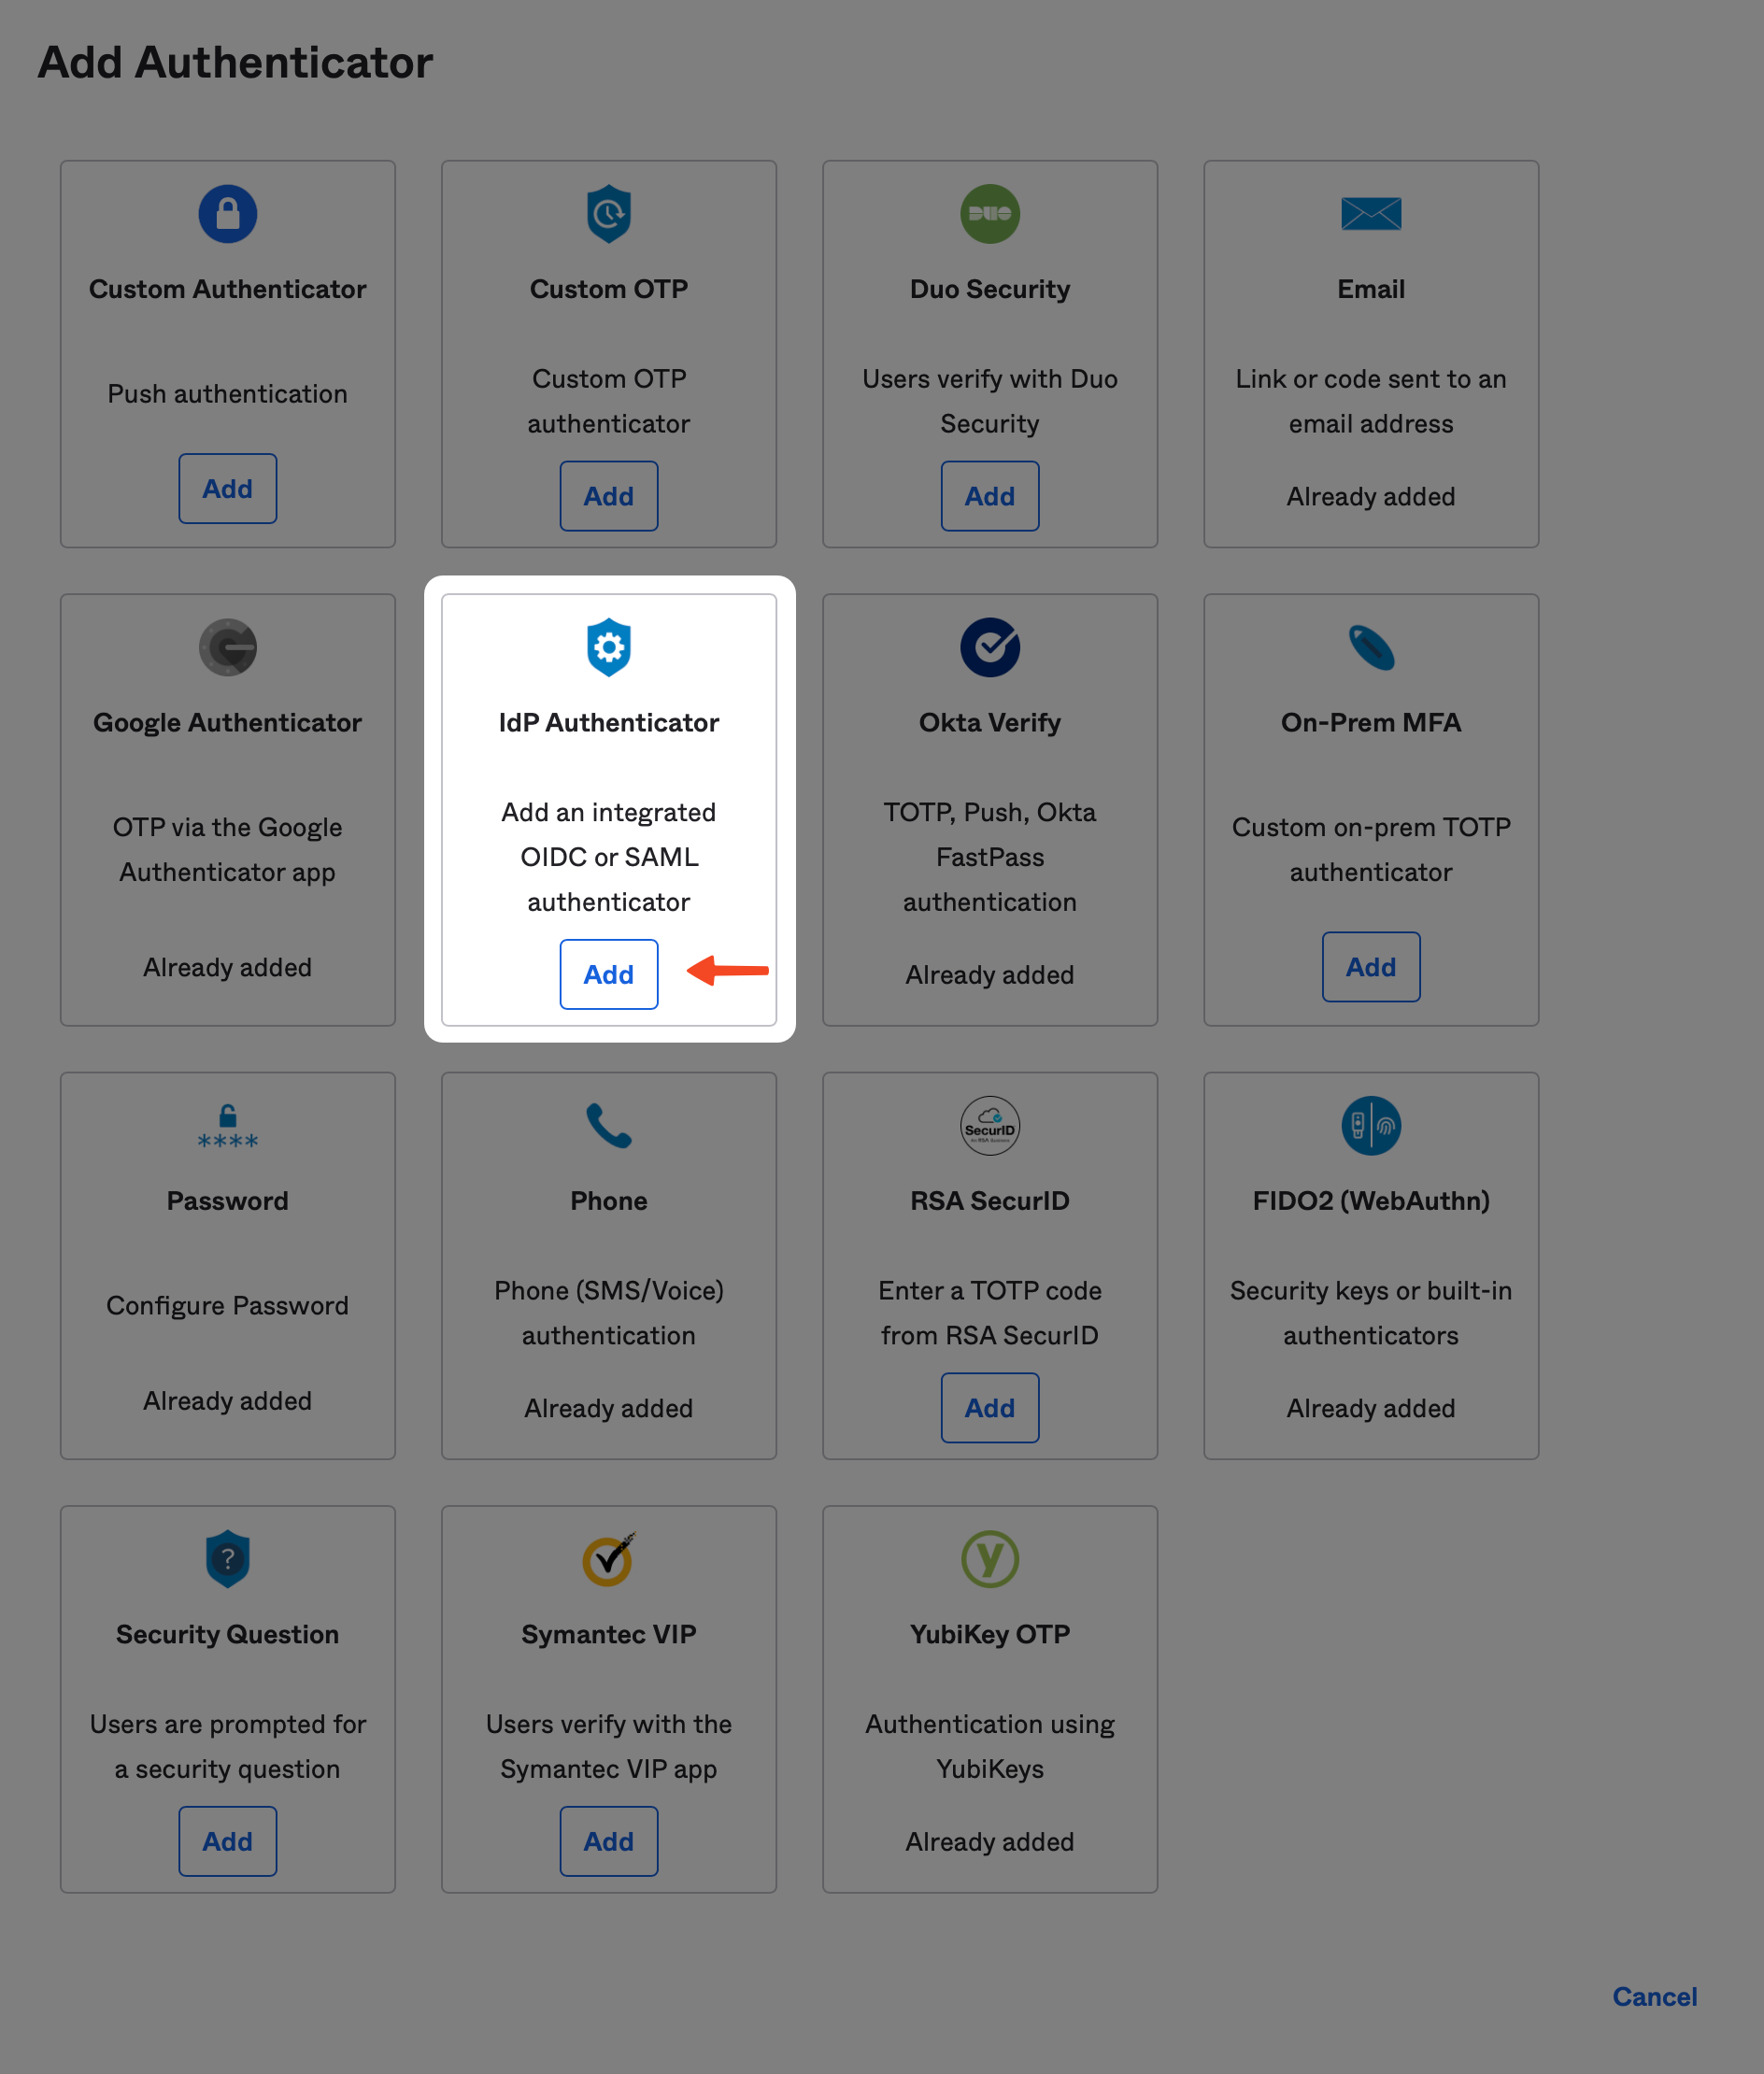
From the Identity Provider dropdown box, choose the Kolide IdP you created above, then click the Add button.

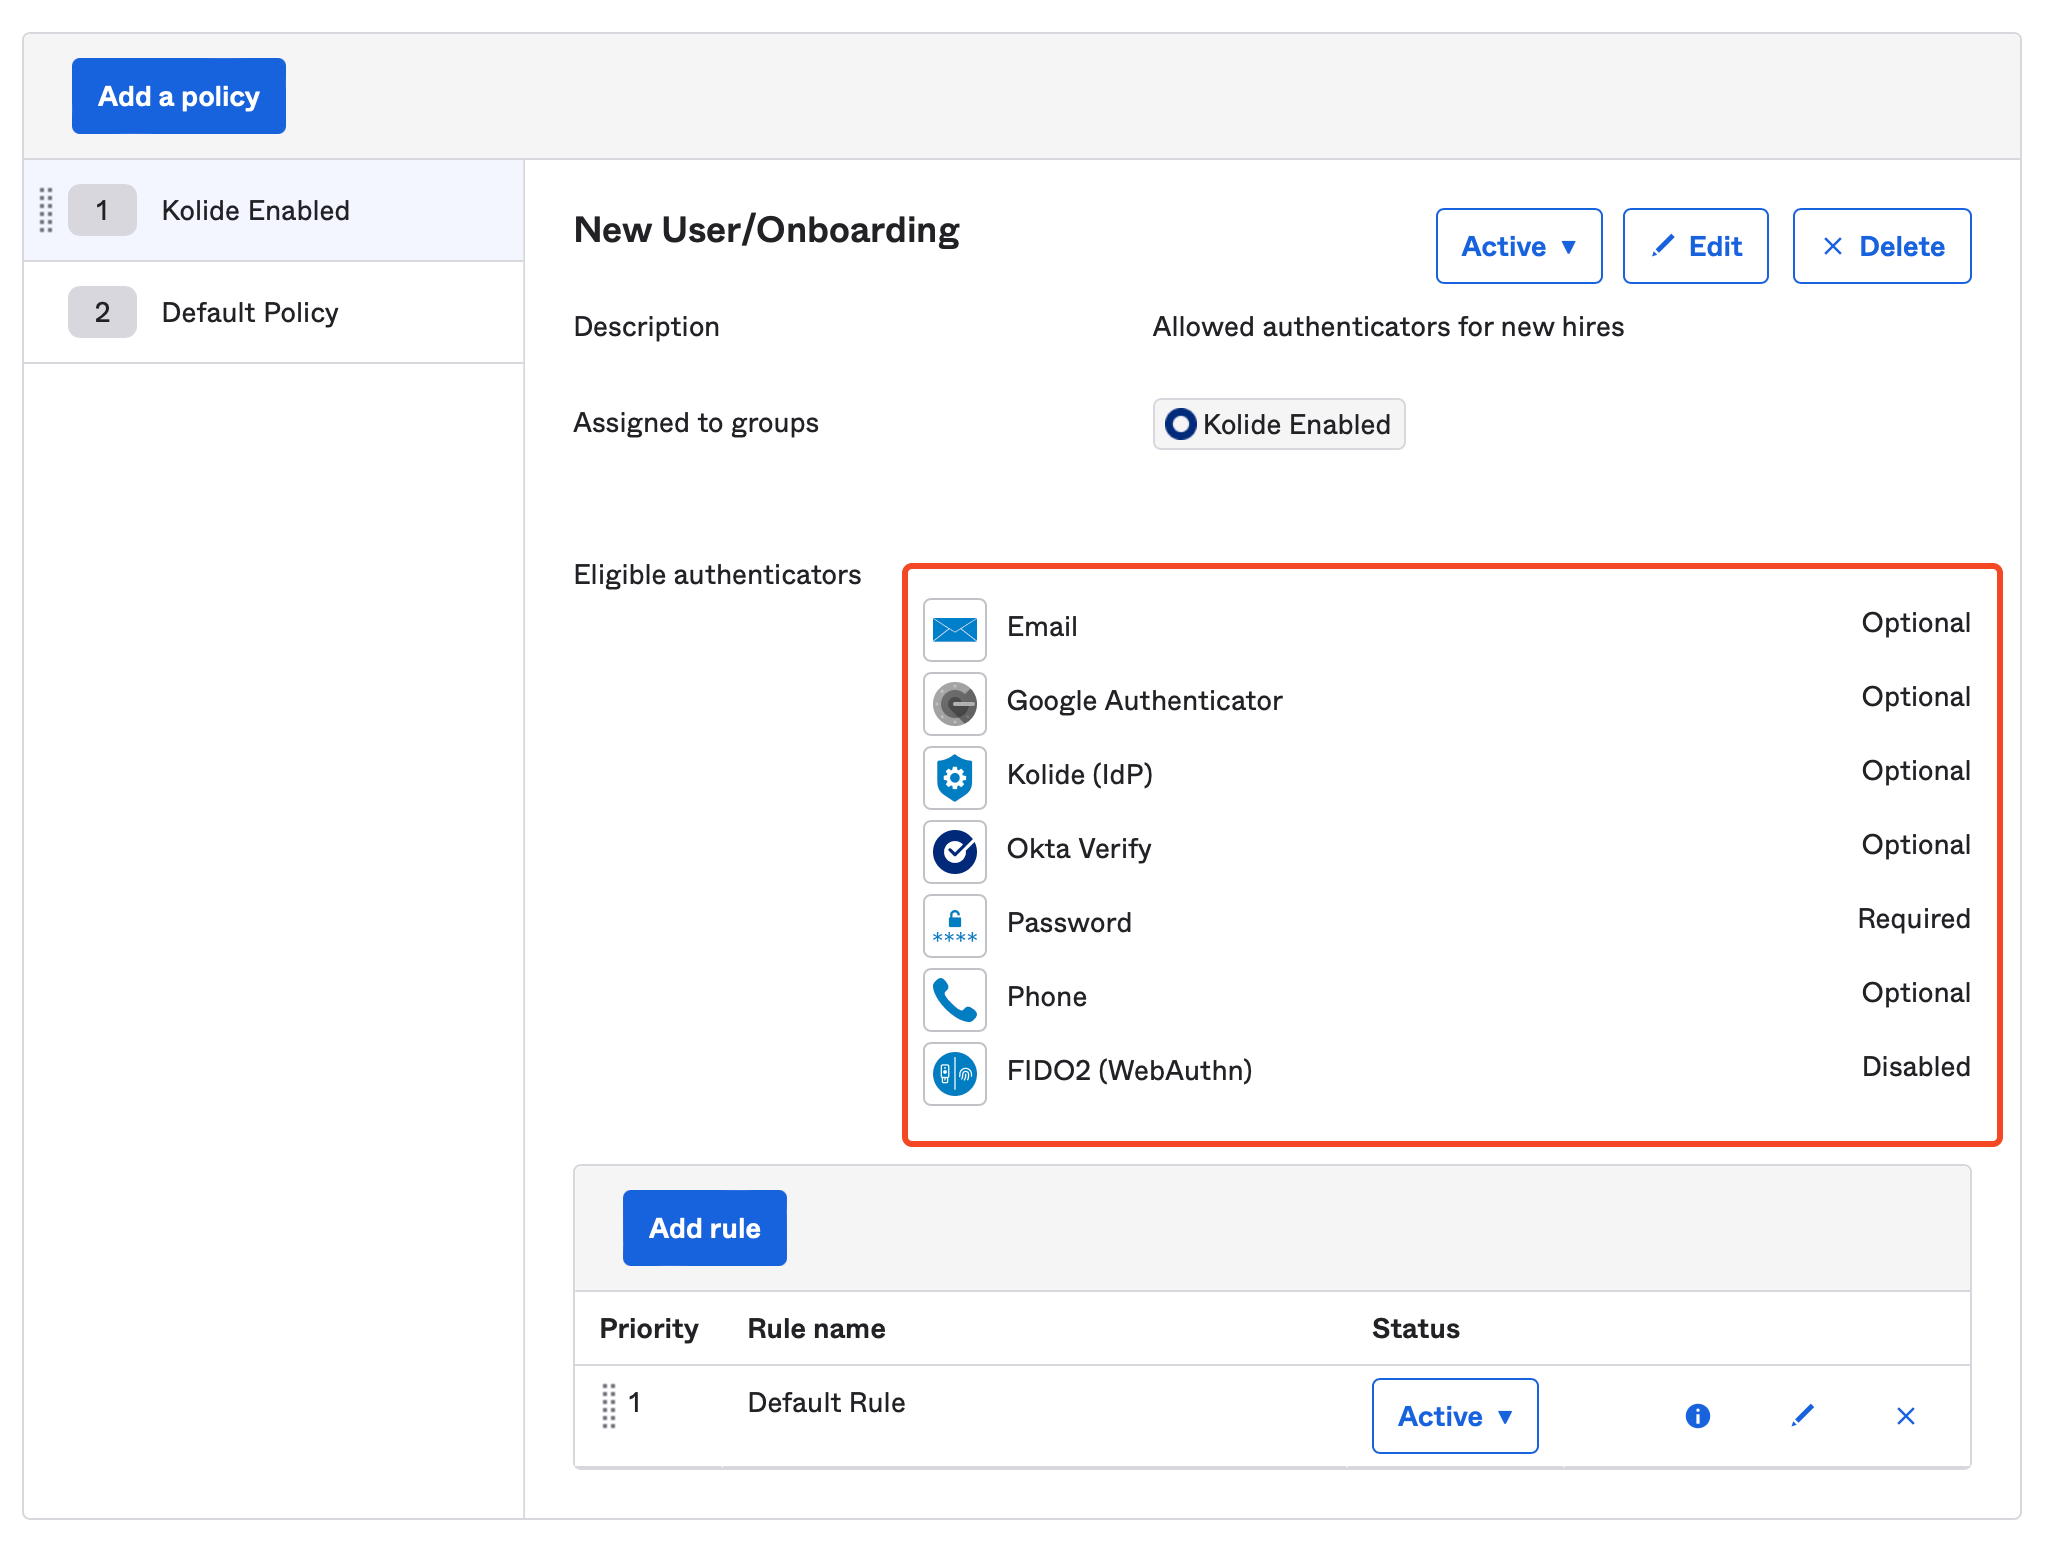
Verify Authenticator Enrollment Policies
It’s likely that you want force your users to use Kolide, so you may be tempted to update your existing Authenticator Enrollment Policies in Security > Authenticators > Enrollment to require Kolide.
We do not recommend doing this. To enforce the use of Kolide, we will be using a different technique that is also compatible with Kolide’s factor sequencing.
Instead, you should ensure that Kolide is set to Optional as shown below:
Add Kolide to your Okta Authentication Policies
Now that we’ve added Kolide as an authenticator, we can begin integrating into the existing auth policies that are associated with your Okta apps.
To begin, in the Okta Administrative portal navigate to Security > Authentication Policies and click into the authentication policy you want to configure.

After clicking into the target Authentication Policy, click Add rule. In the form that appears, name the rule “Kolide” and ensure the rule is scoped to only people in the “Kolide Enabled” group you created earlier in the guide.
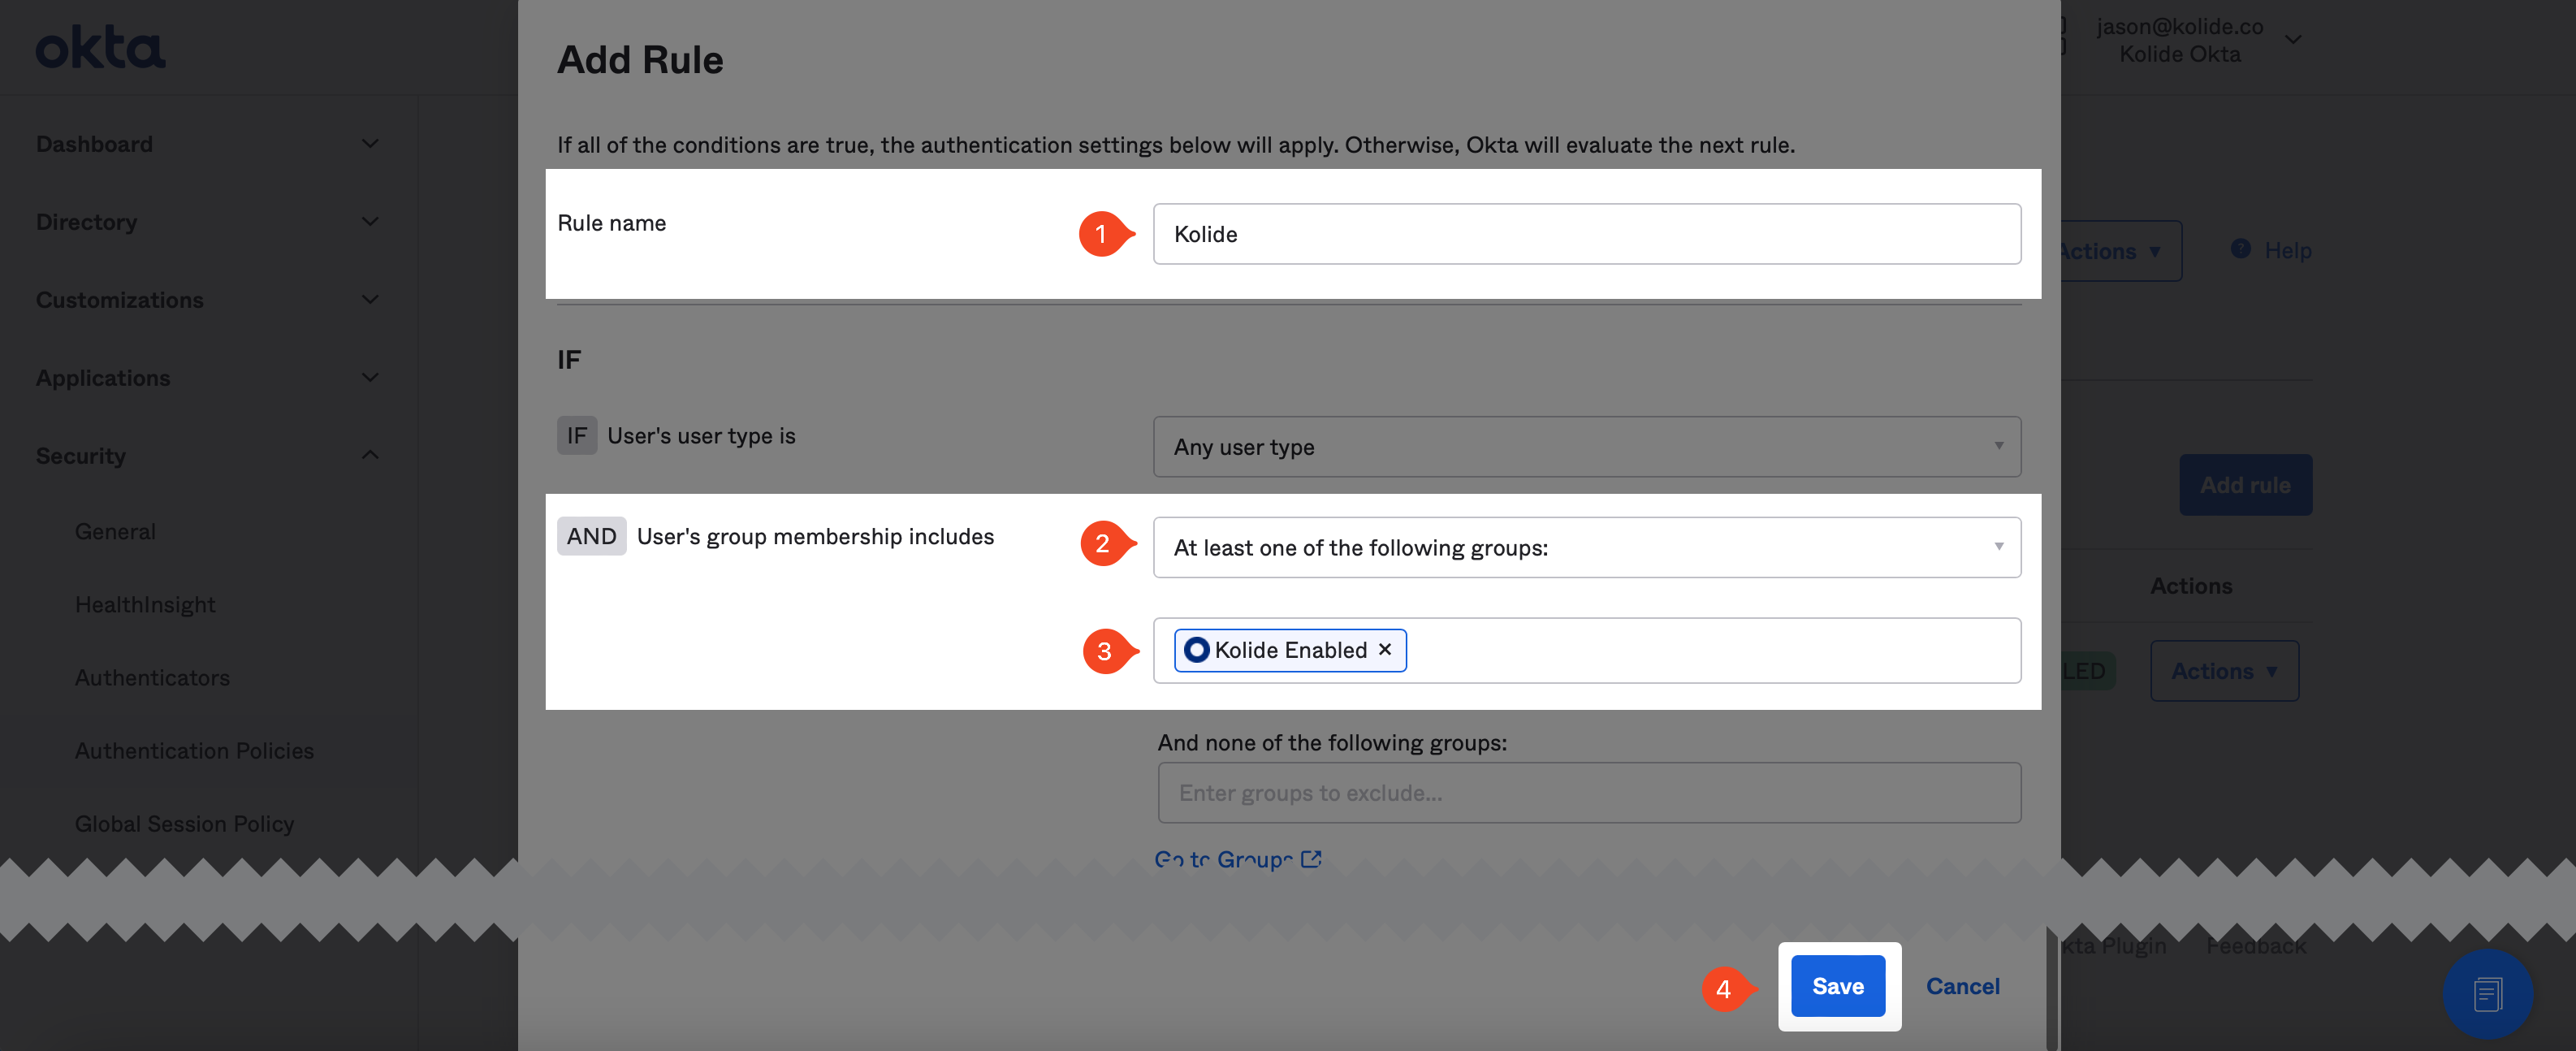
Don’t worry about setting the possession factor constraints, we will take care of that later. Scroll to the bottom of the form and click Save.
Use Okta API to Modify Rules
Now that we’ve created the rules, we need to modify them using the Okta API so that we can set the appropriate constraints to only allow the Kolide authenticator as the sole possession-based factor. Due to limitations in Okta’s UI, this must be done programmatically. Don’t worry, Kolide makes this easy.
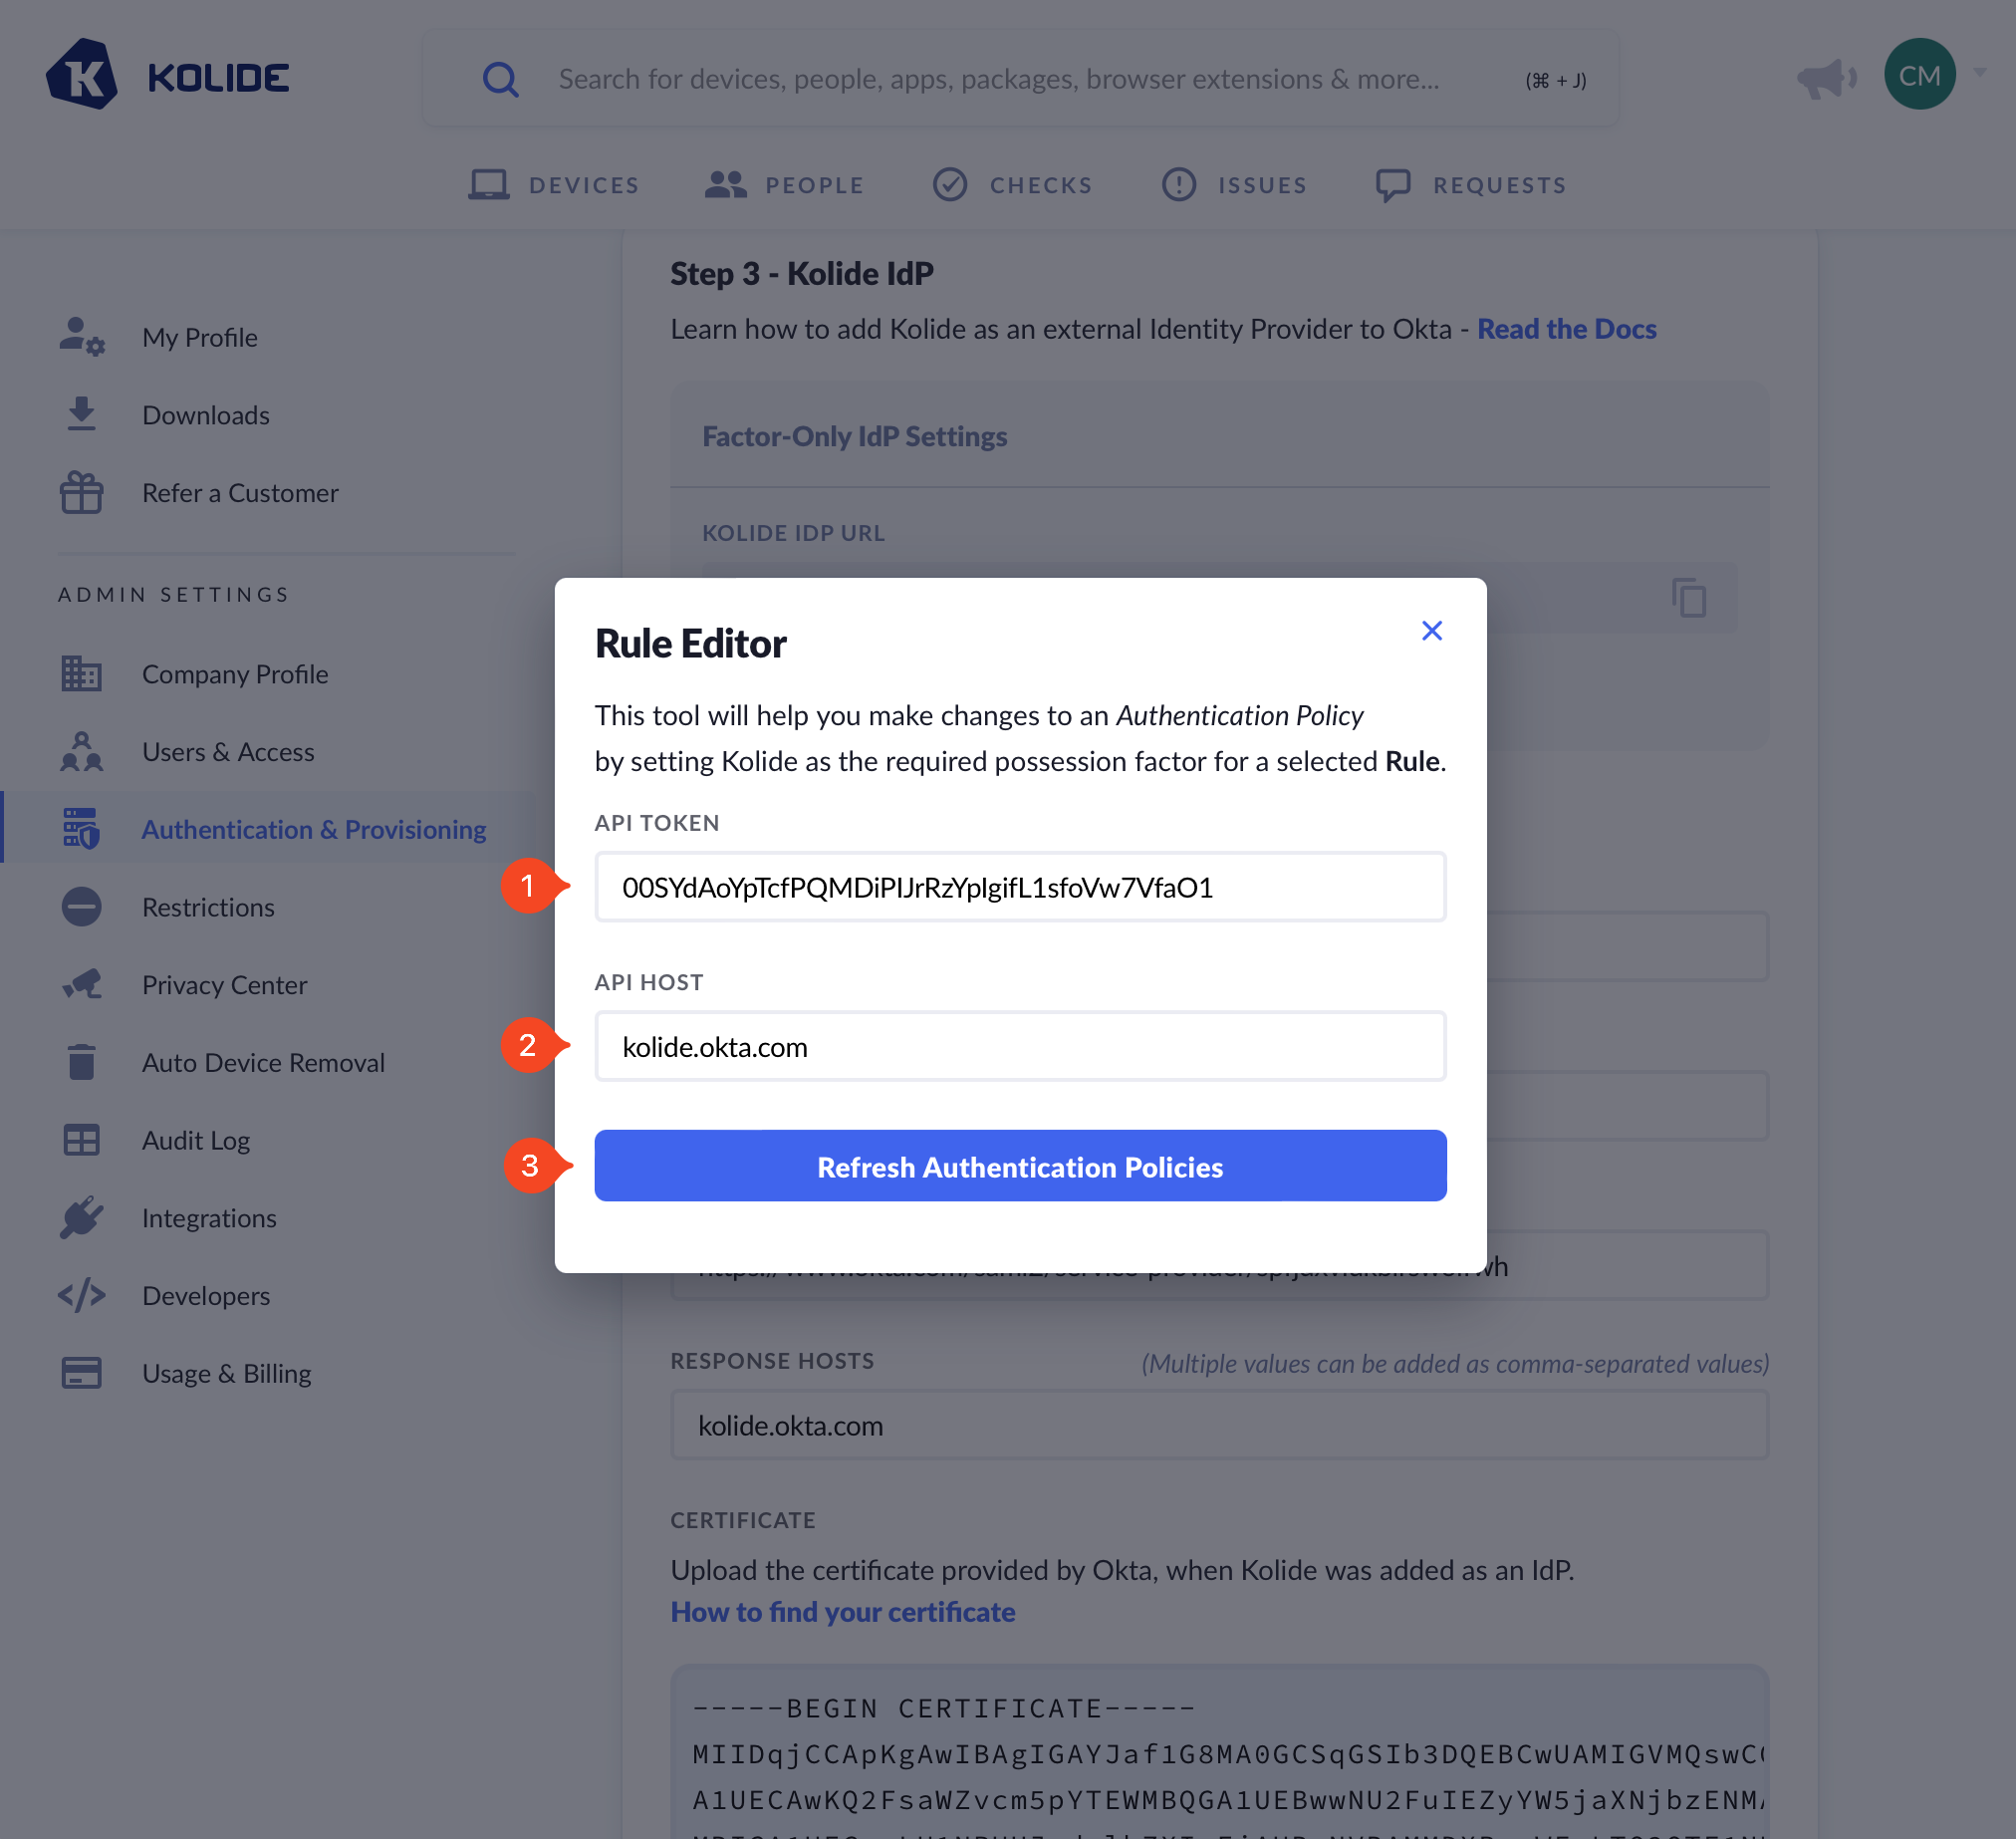
To get started, the IdP setup screen in Kolide, click the link labeled Rule Editor.
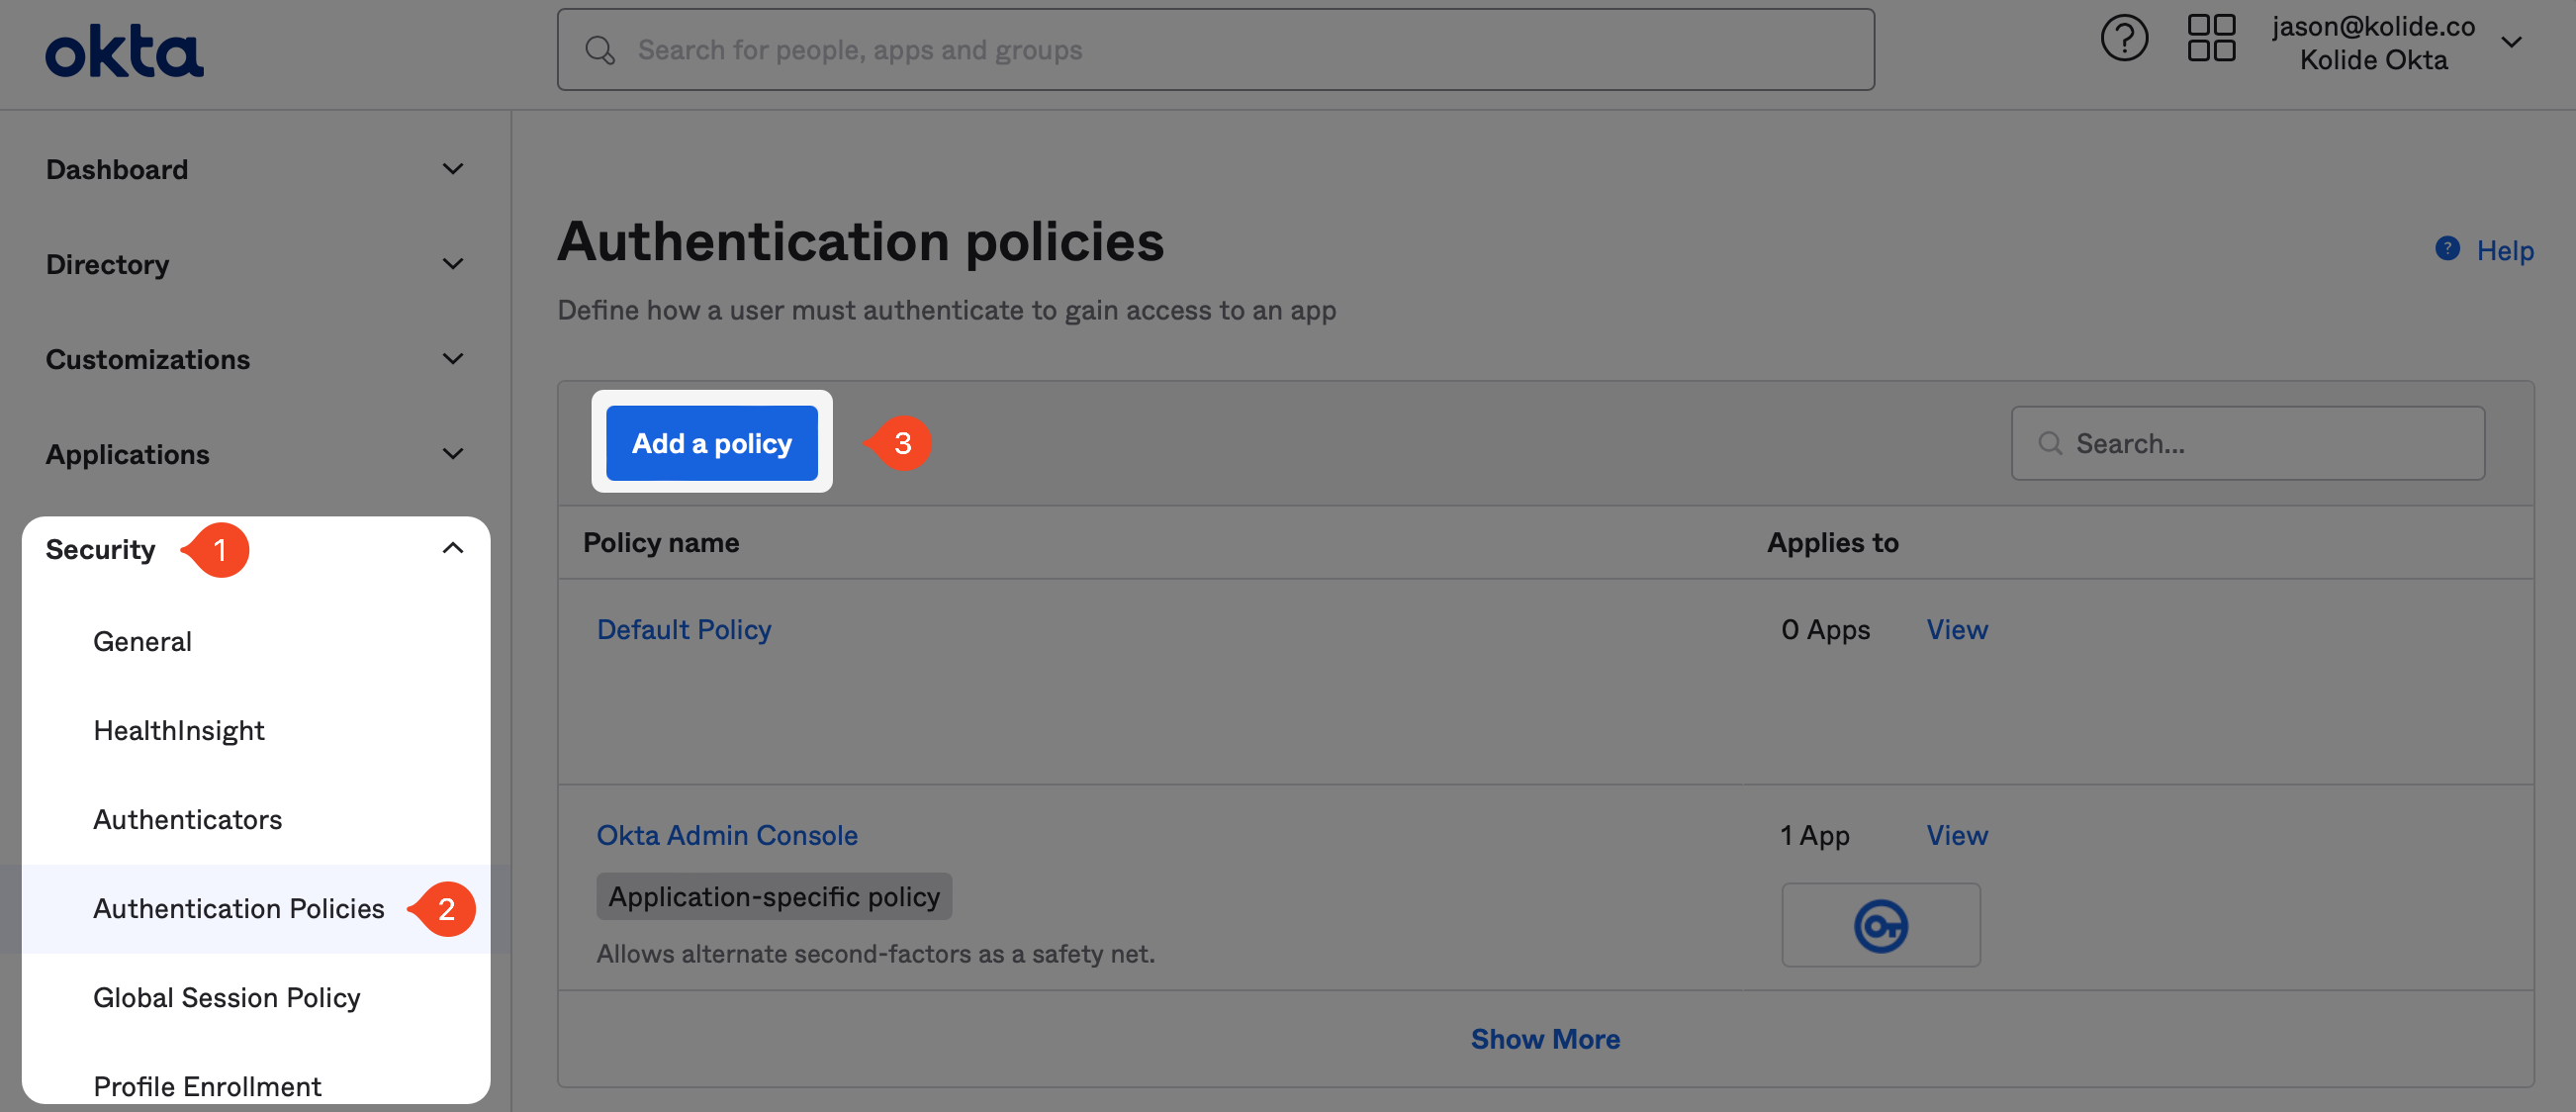
Now back in Okta, generate an API key by following these steps
- In the left-hand navigation click Security > API and then Create Token
- In the modal that appears, create a descriptive name like, “Kolide Rule Editor” and click Create Token
- Copy the value in your clipboard.
Now paste this value into Kolide, ensure the API host is correct and then press the Refresh Authentication Policies button.
Once you complete this step, we recommend revoking the token as you and Kolide will no longer need it.
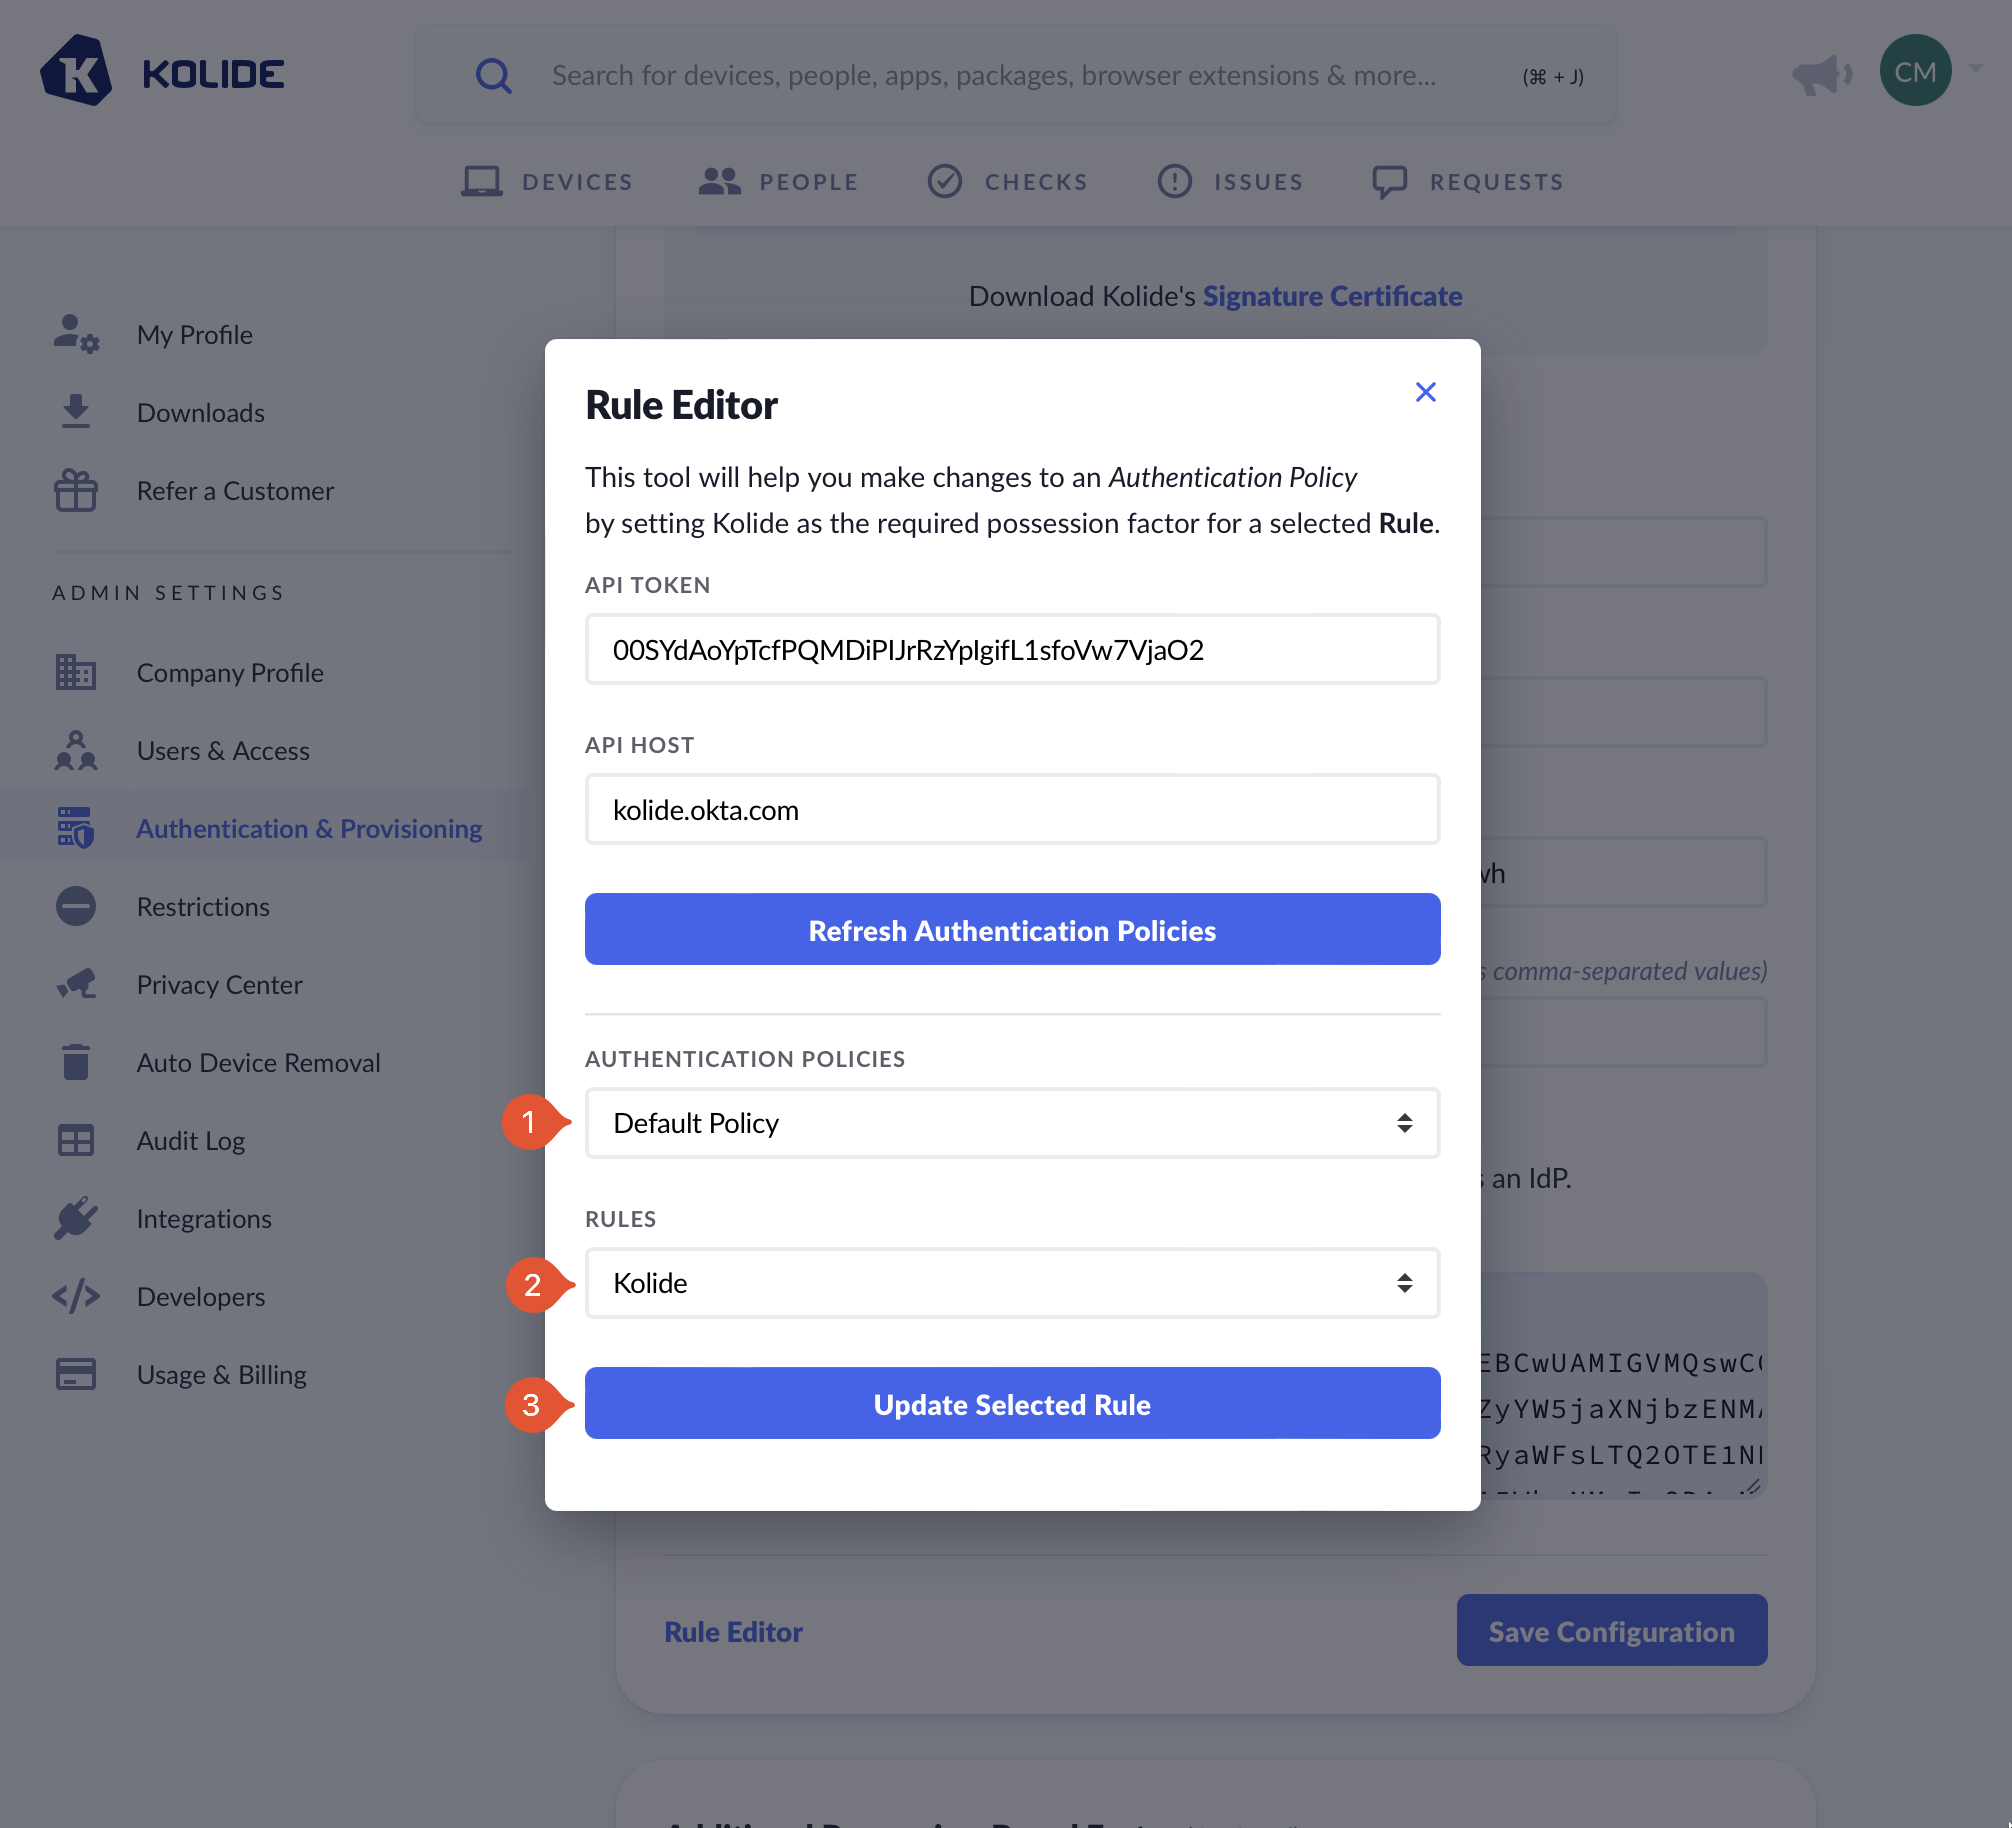
After clicking the button, a new dropdown will appear. In this dropdown, select the Auth Policy you would like to update and then underneath, select the “Kolide” rule you created earlier in the guide.
A selection of “Available Rule Actions” with the default rule Password and Kolide IdP selected.
You’ll see a confirmation message that the rule has been updated. When you go to look at the rule in Okta, you’ll should see that the constraints UI was replaced with a textarea that contains the following constraints JSON:
{
  "factorMode": "2FA",
  "constraints": [
    {
      "knowledge": {
        "types": [
          "password"
        ]
      },
      "possession": {
        "methods": [
          "idp"
        ]
      }
    }
  ]
}
Test Signing In
Unless you want to sequence Kolide with an additional Factor (discussed here), you are now all done! You can test the sign in works by simplifying accessing an app protected by one of the Authentication Policies you updated. If Okta isn’t prompting you for your possession-factor try testing auth using Private/Incognito mode in your browser.
Step 5. Set Up Factor Sequencing (Optional)
If your organization requires an additional possession-based factor beyond Kolide, you have the option to sequence the Kolide step after the user has successfully completed a different possession-based factor of your choosing. We call this “factor sequencing”.
Factor sequencing is a great choice if you want to use Kolide in conjunction with Webauthn, Yubikeys, Okta Verify, or Okta FastPass.
Overview
First, to get a sense of the end-user experience, watch the video below of Kolide being used in conjunction with Okta Verify.
With factor sequencing enabled, a user must go through a required possession-factor before their Device is checked in Kolide.
Factor sequencing works by using an additional application called a Proxy app. Essentially, the sequence is as follows:
- The User attempts to sign into app protected by Okta
- The User is asked by Okta to verify with Kolide as their sole possession-factor
- The User is redirected to Kolide
- Instead of Kolide verifying the Device, Kolide begins another SAML session to authenticate to a Proxy app which is configured with a special Okta Authentication Policy that requires the User to complete a different possession-based factor (like Okta Verify).
- Kolide redirects the user through the Proxy app and the user completes the sign in process.
- The User is redirected back to Kolide where they finish their Device verification.
To enable this flow, we simply set up another SAML-based app in Okta add the appropriate policy, and inform Kolide about the details.
Authentication Policy Setup Instructions
The goal of this step is to create a new Okta Authentication Policy that will only be assigned to the Proxy app we will create later. This policy will define the additional possession-based authenticator you want end-users to go through before they complete the Kolide step.
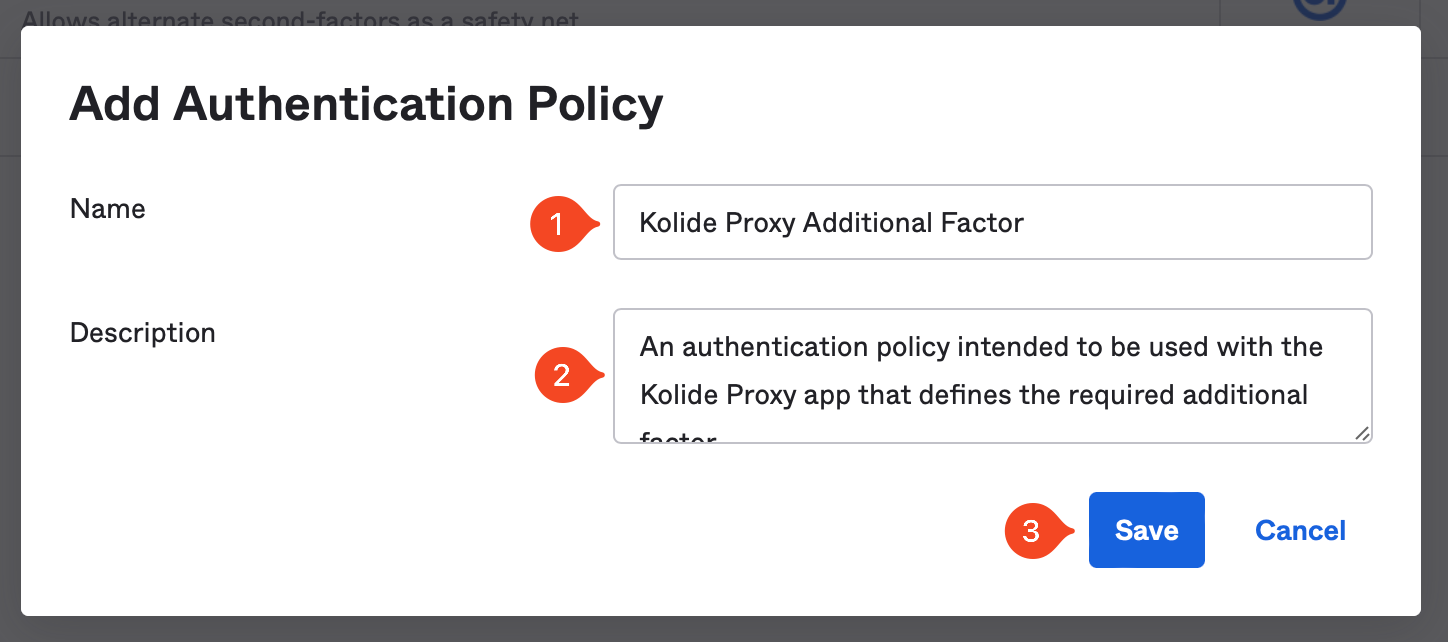
To begin, in the Okta Administrative portal navigate to Security > Authentication Policies and click Add a policy.
In the modal that appears, enter the information as follows:
- Name: Kolide Proxy Additional Factor
- Description: An authentication policy intended to be used with the Kolide Proxy app that defines the required additional factor.
Now click Save.
Next, click Add Rule.
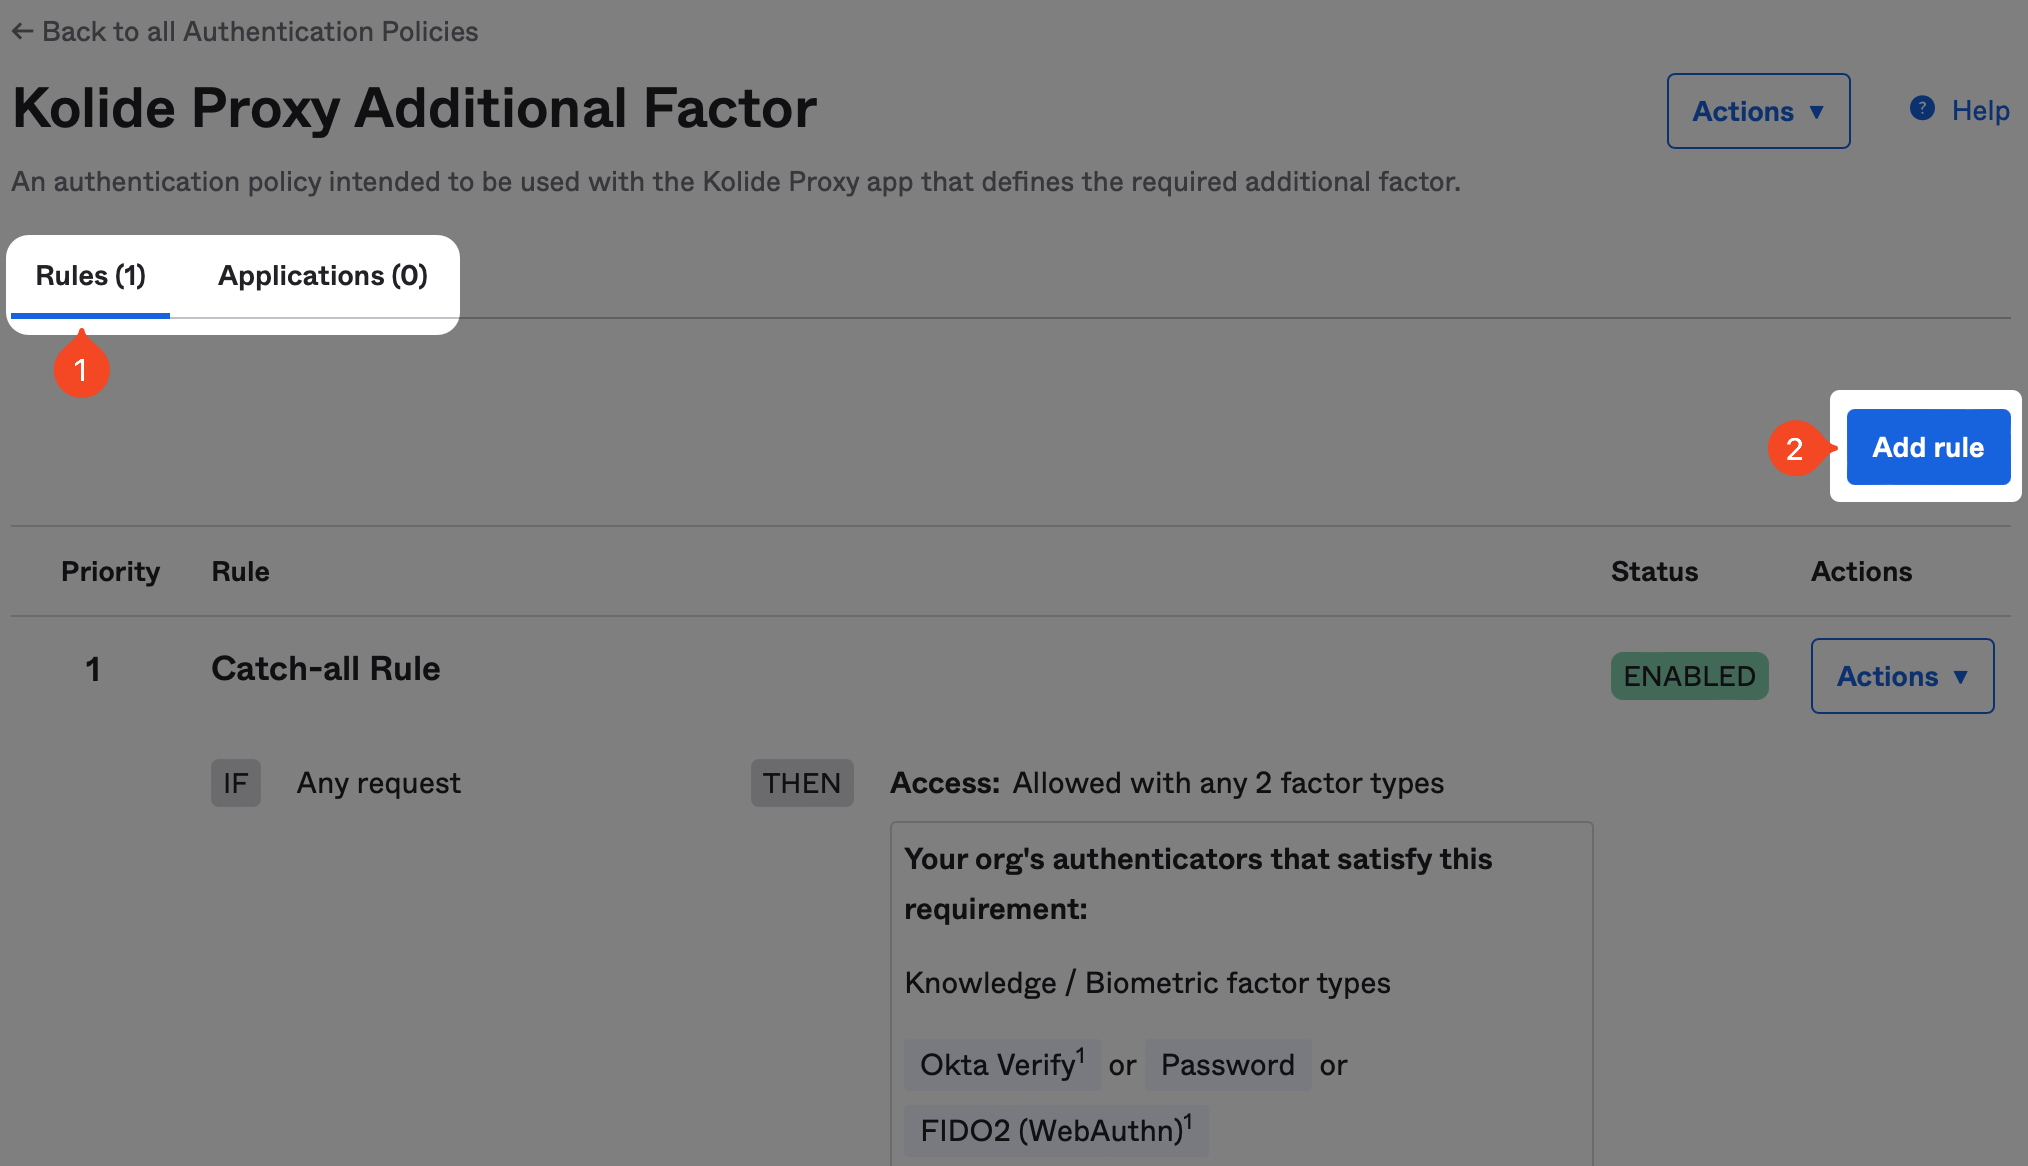
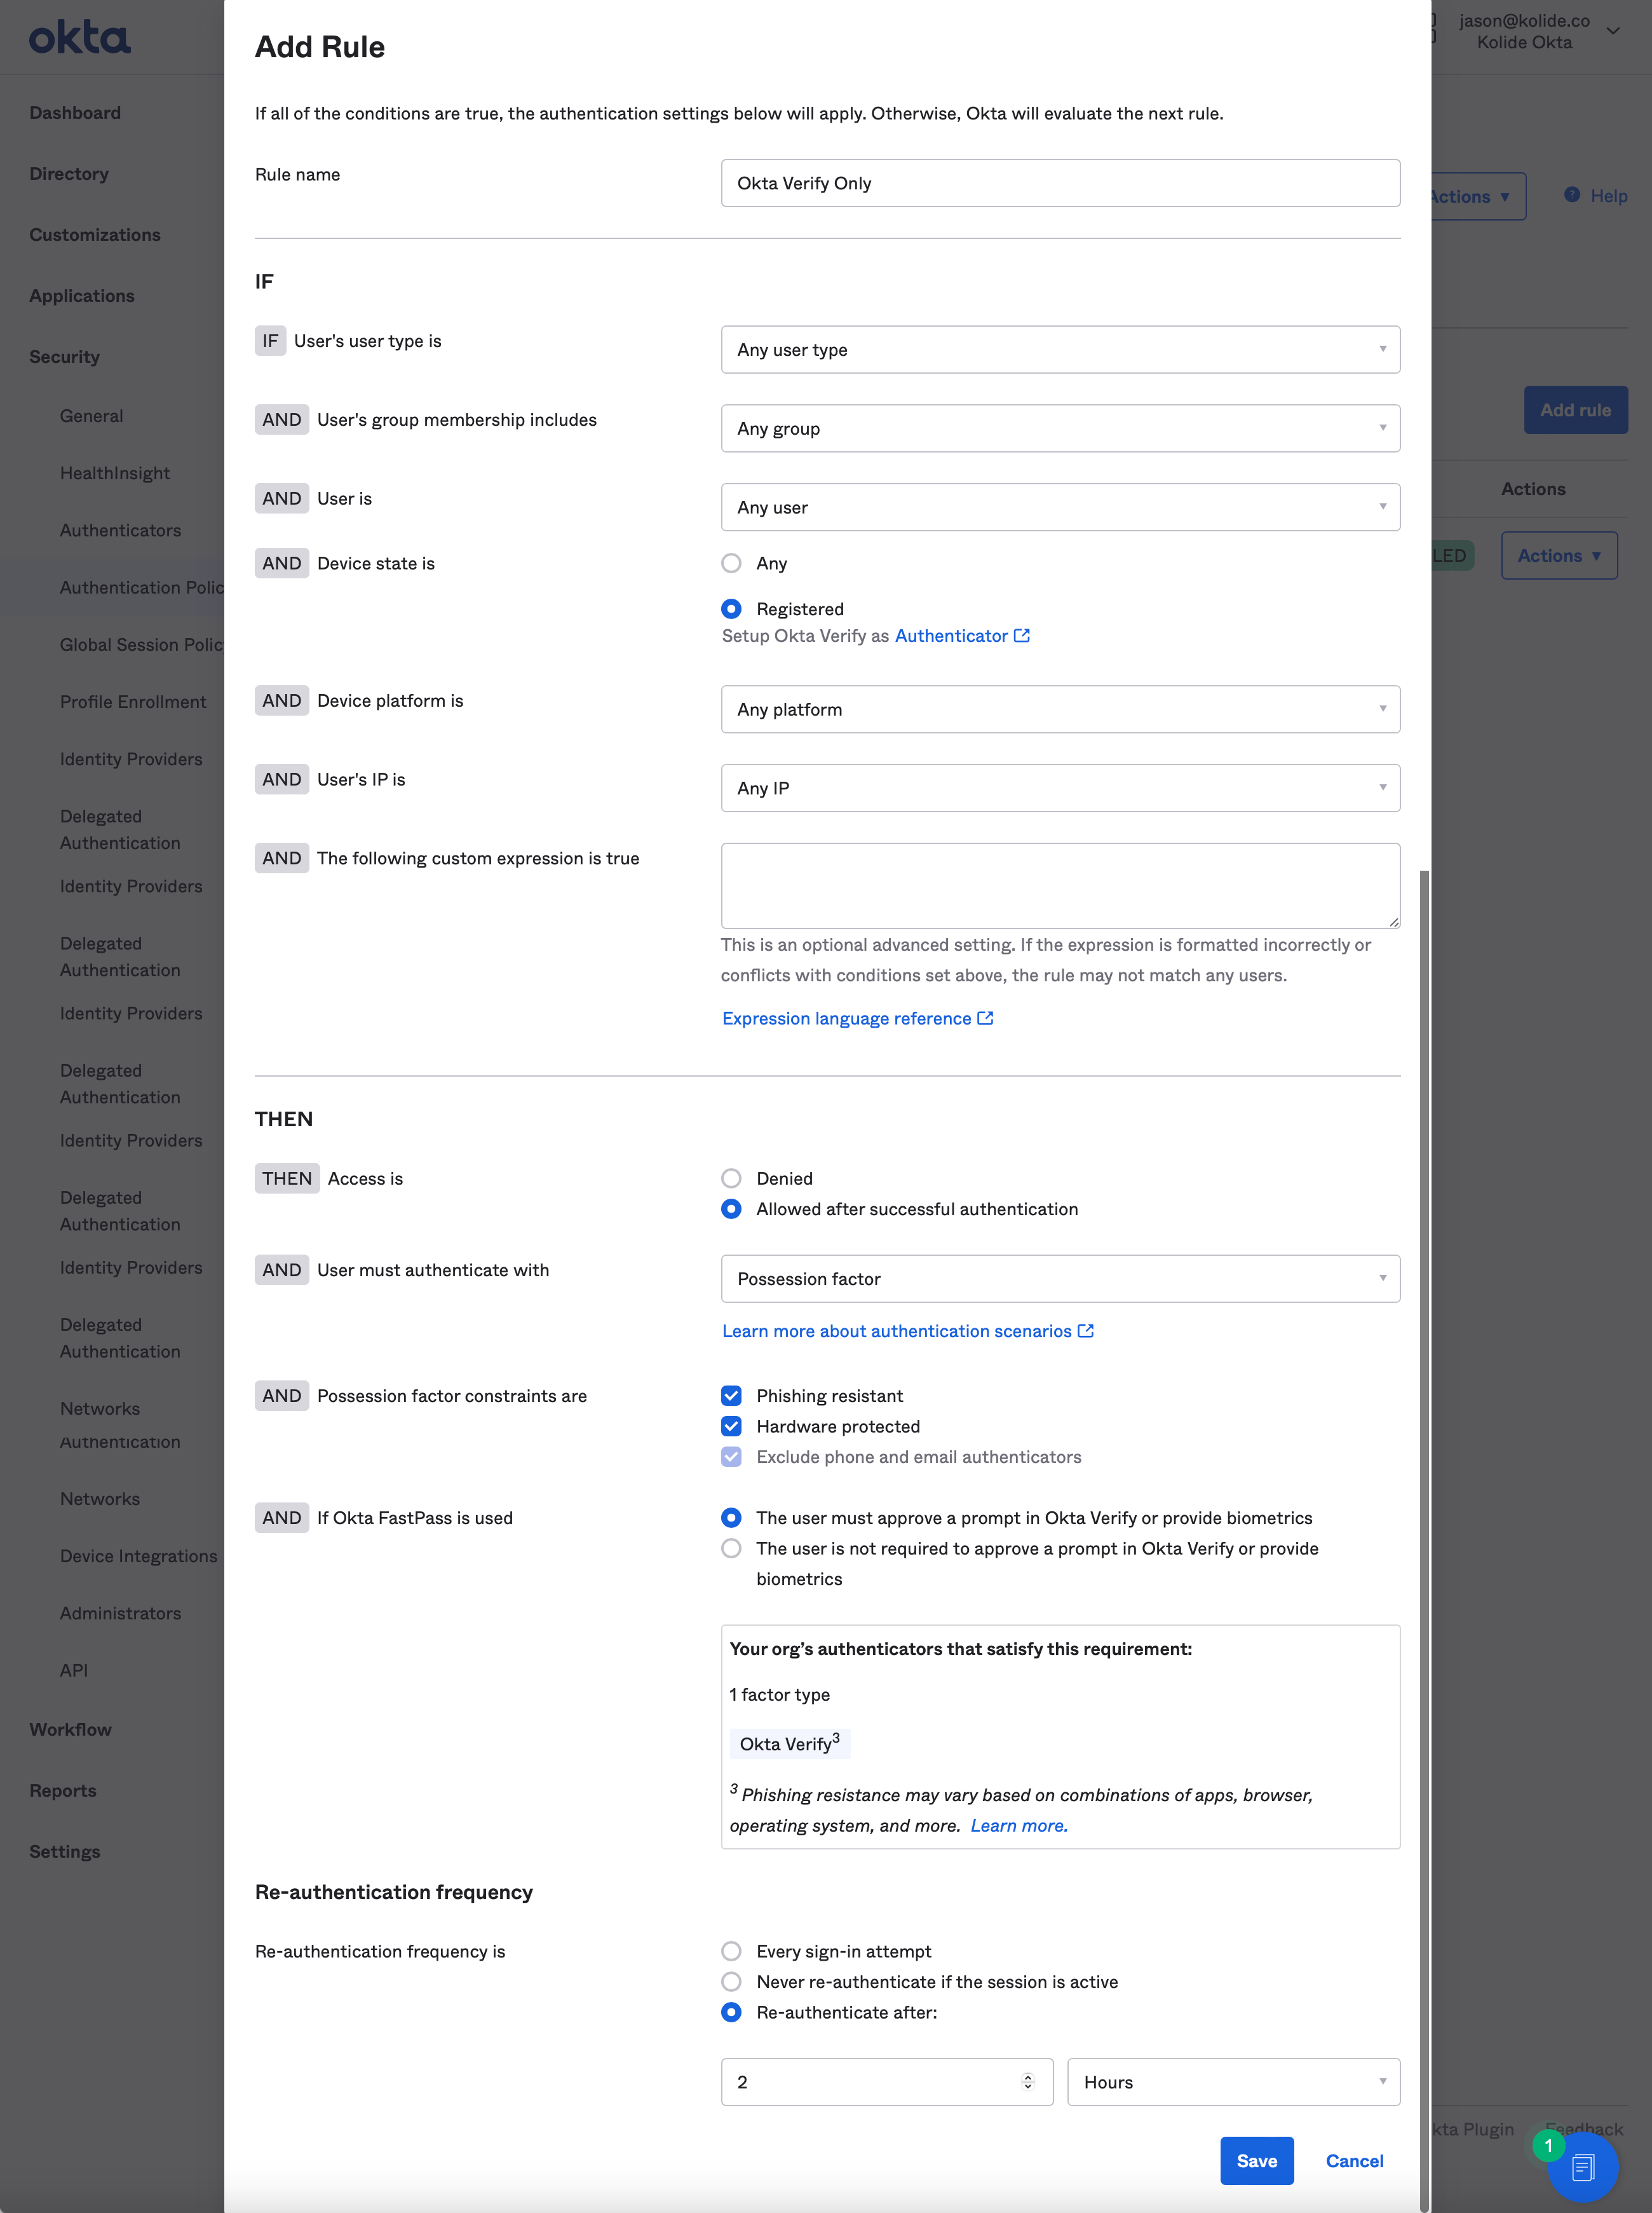
Now it’s time to configure the rule. The exact configuration will be highly dependent on the type of possession-based authenticator you want to allow. As an example, if you want to use Okta Verify, you’ll set the following options:
- Name: Okta Verify Only
- Device state is: Registered
- User must authenticate with: Possession Factor
- Possession factor constraints are: Hardware Protected
Once you have the rule/policy set up, click Save. Don’t worry about assigning the the policy to an Application, we’ll do that in the next step.
Proxy App Setup Instructions
In Okta, on the left sidebar, select Applications then click the Applications link in the expanded submenu. Next, click the Create App Integration button.
In the modal that pops up, select the SAML 2.0 radio button and click Next.
Next, type “Kolide Proxy” into the App name field. Check the Do not display application icon to users checkbox. Click Next.

Now, toggle back to your Kolide tab, as you will need some information from Kolide’s App Info screen, shown above, to plug into the Okta App.
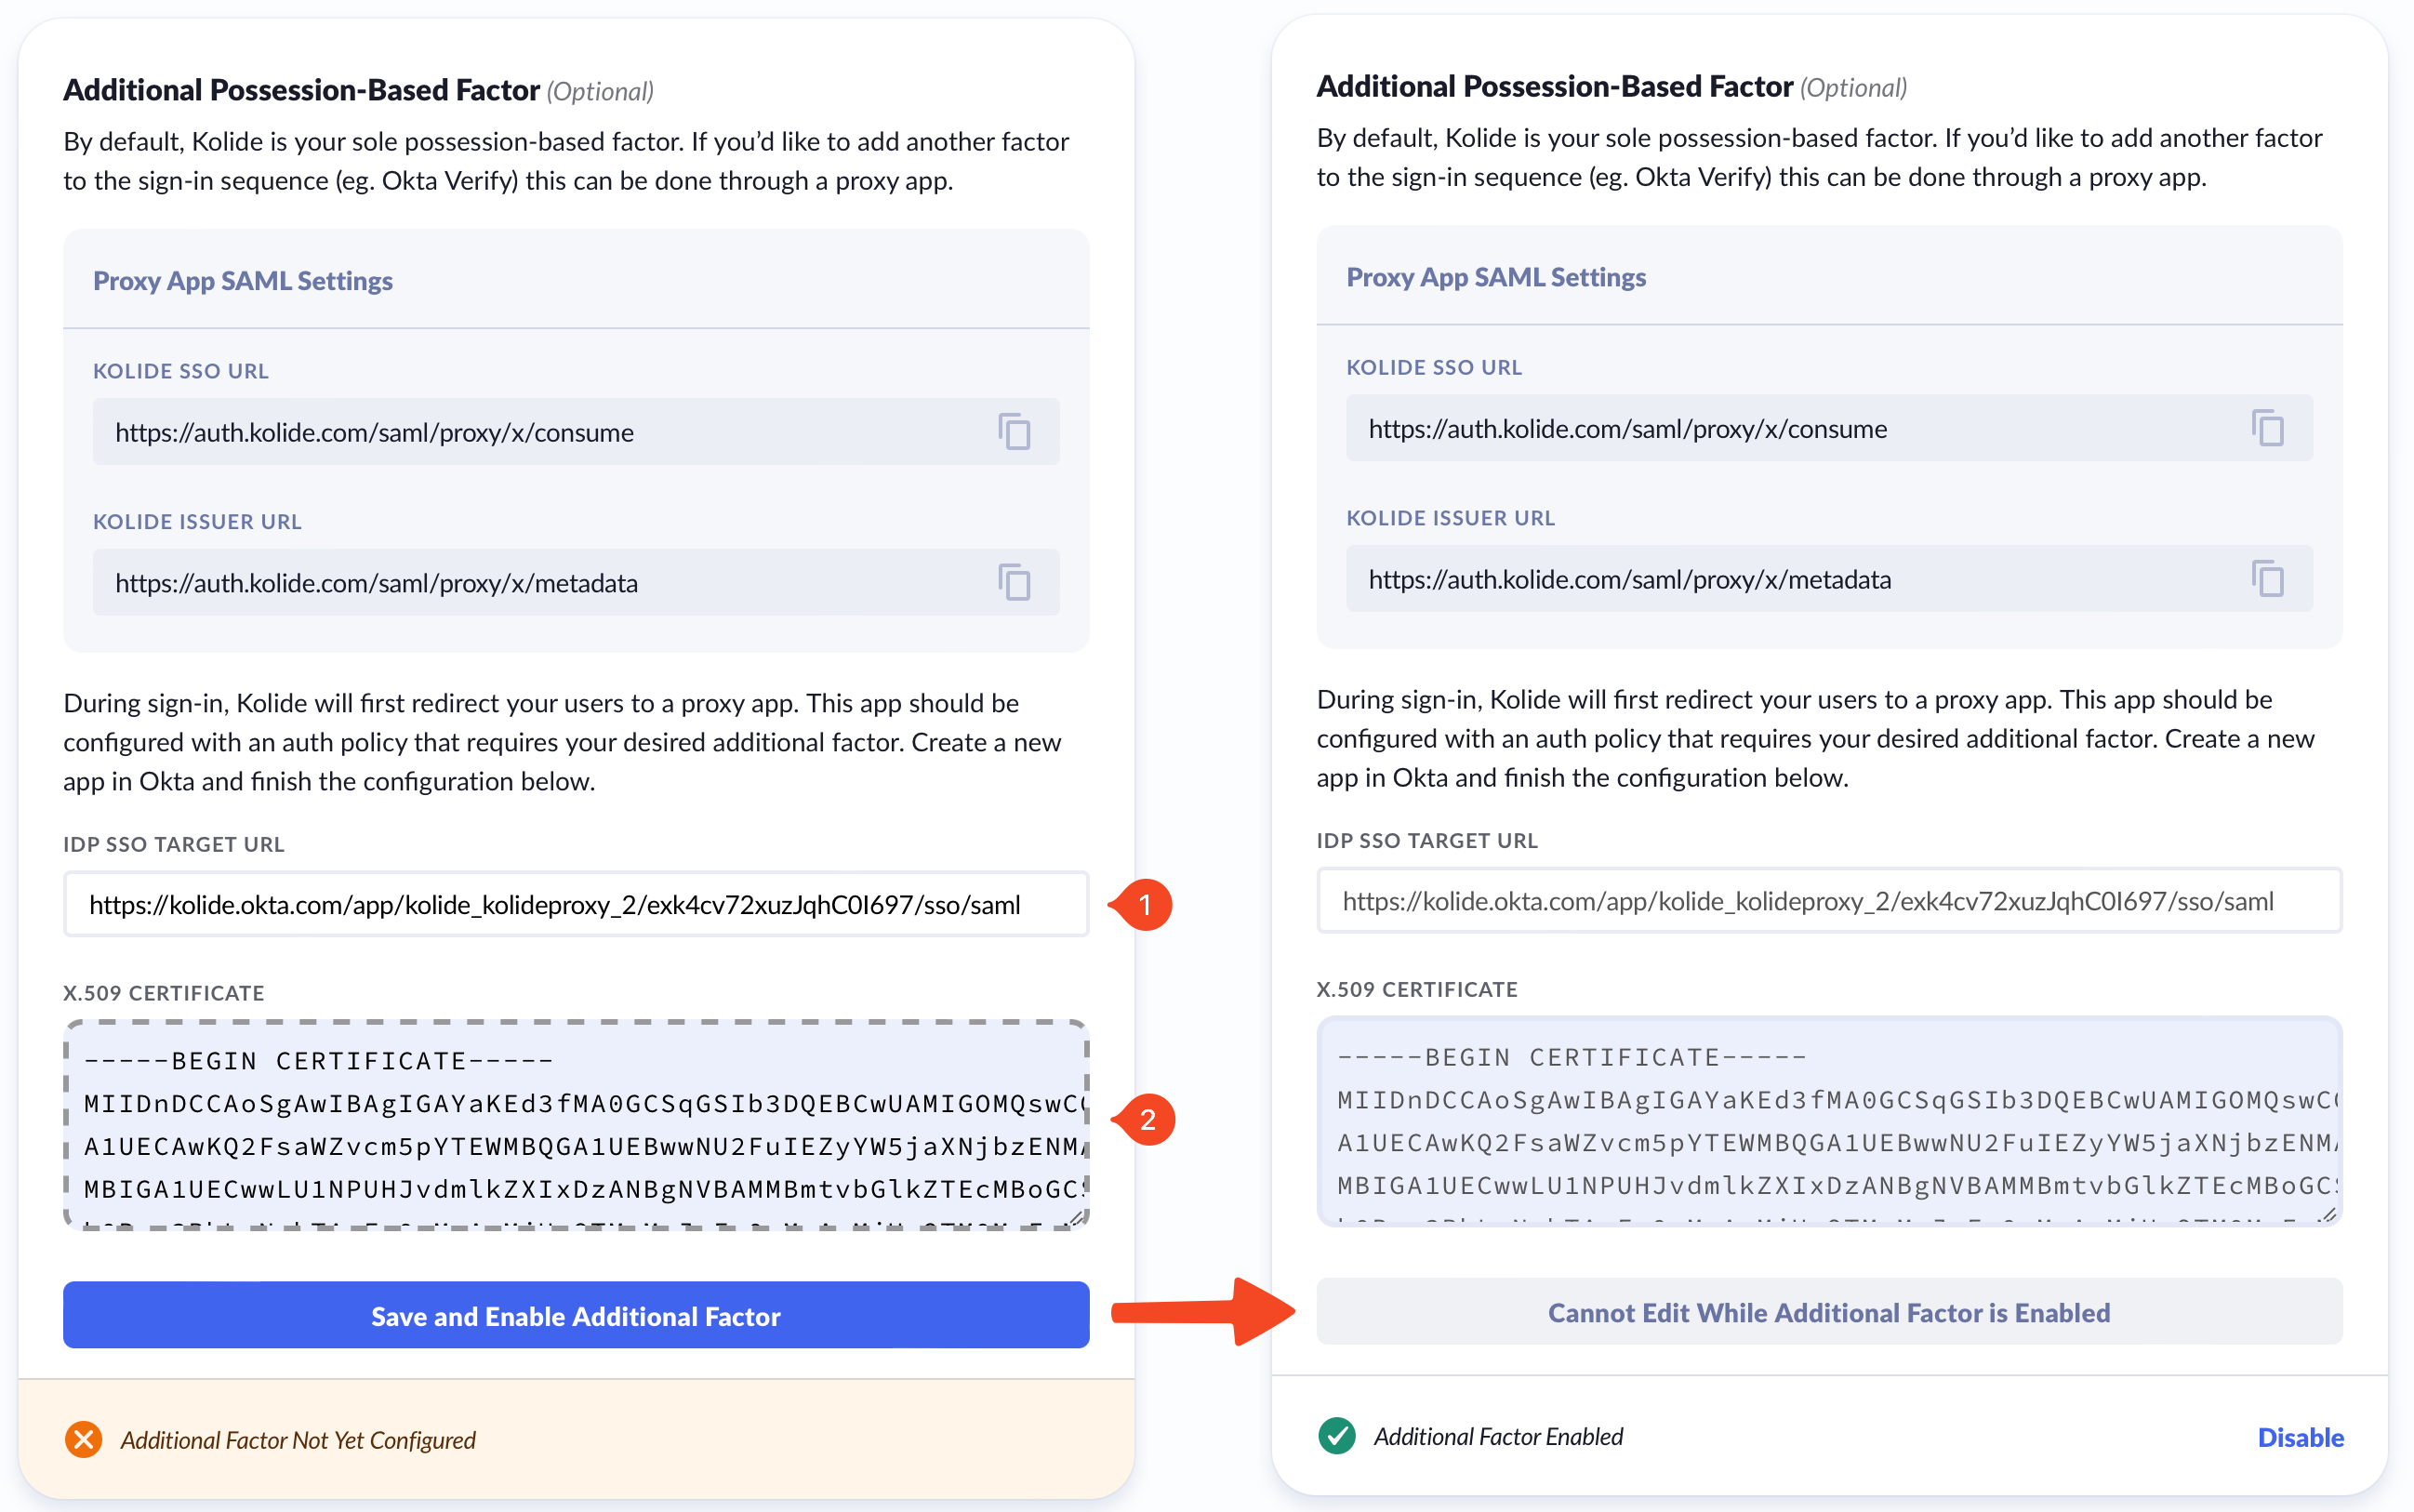
From the Kolide IdP tab of Authentication & Provisioning, scroll down to reveal the Additional Possession-Based Factor modal.
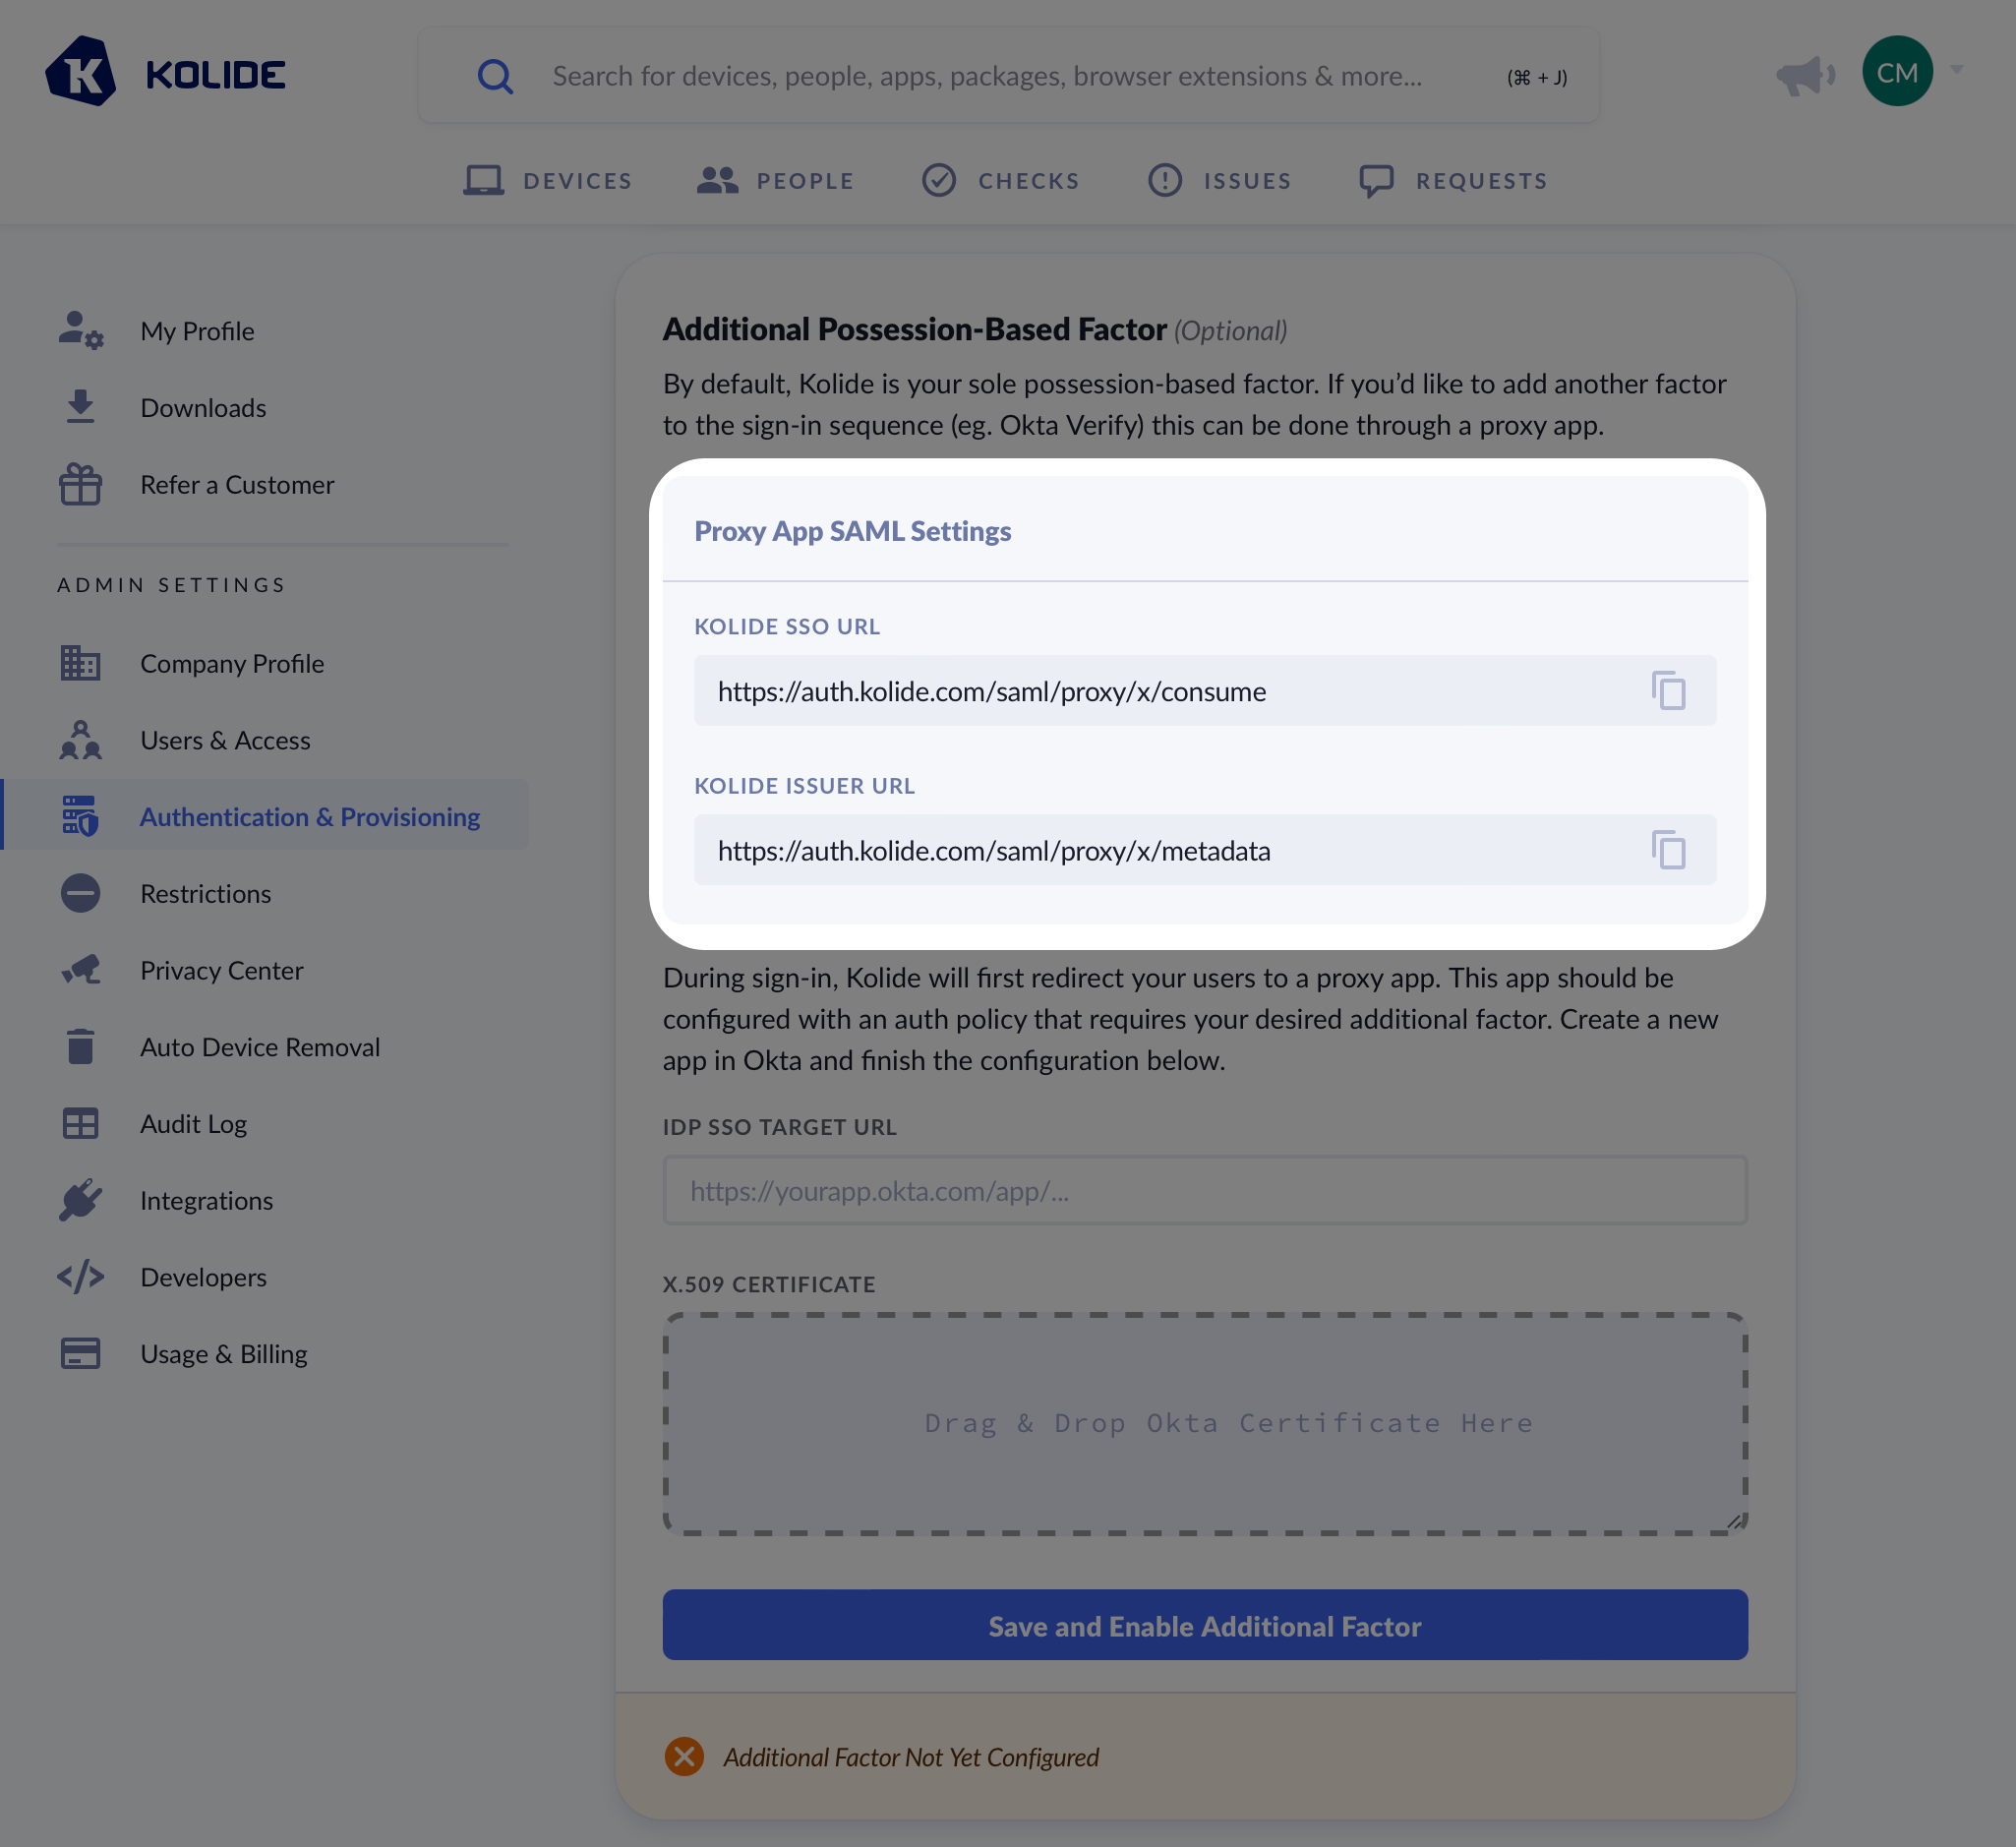
Make sure you copy the values from your Kolide app directly and do not use the example values shown as an example in the screenshot.
You will want to copy the values from Kolide as follows:
| Okta Field | Kolide Field |
|---|---|
| Single sign-on URL | Kolide SSO URL |
| Audience URI | Kolide Issuer URL |
In addition, you’ll want to set the following values:
-
Name ID Format -
Unspecified -
Application username format -
Custom -
Expression for username format -
user.login -
Update application username on -
Create and update
Custom.
If you’d like more detail you can review this Okta knowledge base article..
You can skip all the other sections of the form and click Next at the bottom of the page to proceed.
On the next screen, you’ll be asked to fill out an optional form which gives Okta insight into applications they should add integrations for. Since this app will only be used by your organization, you can just mark it as an internal app and click Finish.
Now, click the Assignments tab of the new app and add the “Kolide Enabled” group.
Now, click to the Sign On tab of the new app.
Scroll down, and click the View SAML setup instructions button.
From this screen, copy the IDP SSO URL and the X.509 Certificate values and paste them into the Additional Possession-Based Factor modal in Kolide accordingly.
Global Policy Setup Instructions
When using the Proxy App we want to ensure that end-users are not prompted for their password twice throughout the process. To accomplish this outcome, we will need to add a new rule to your Okta Global Session Policy.
To begin, in the Okta Administrative portal navigate to Security > Global Session Policy and click Add policy.
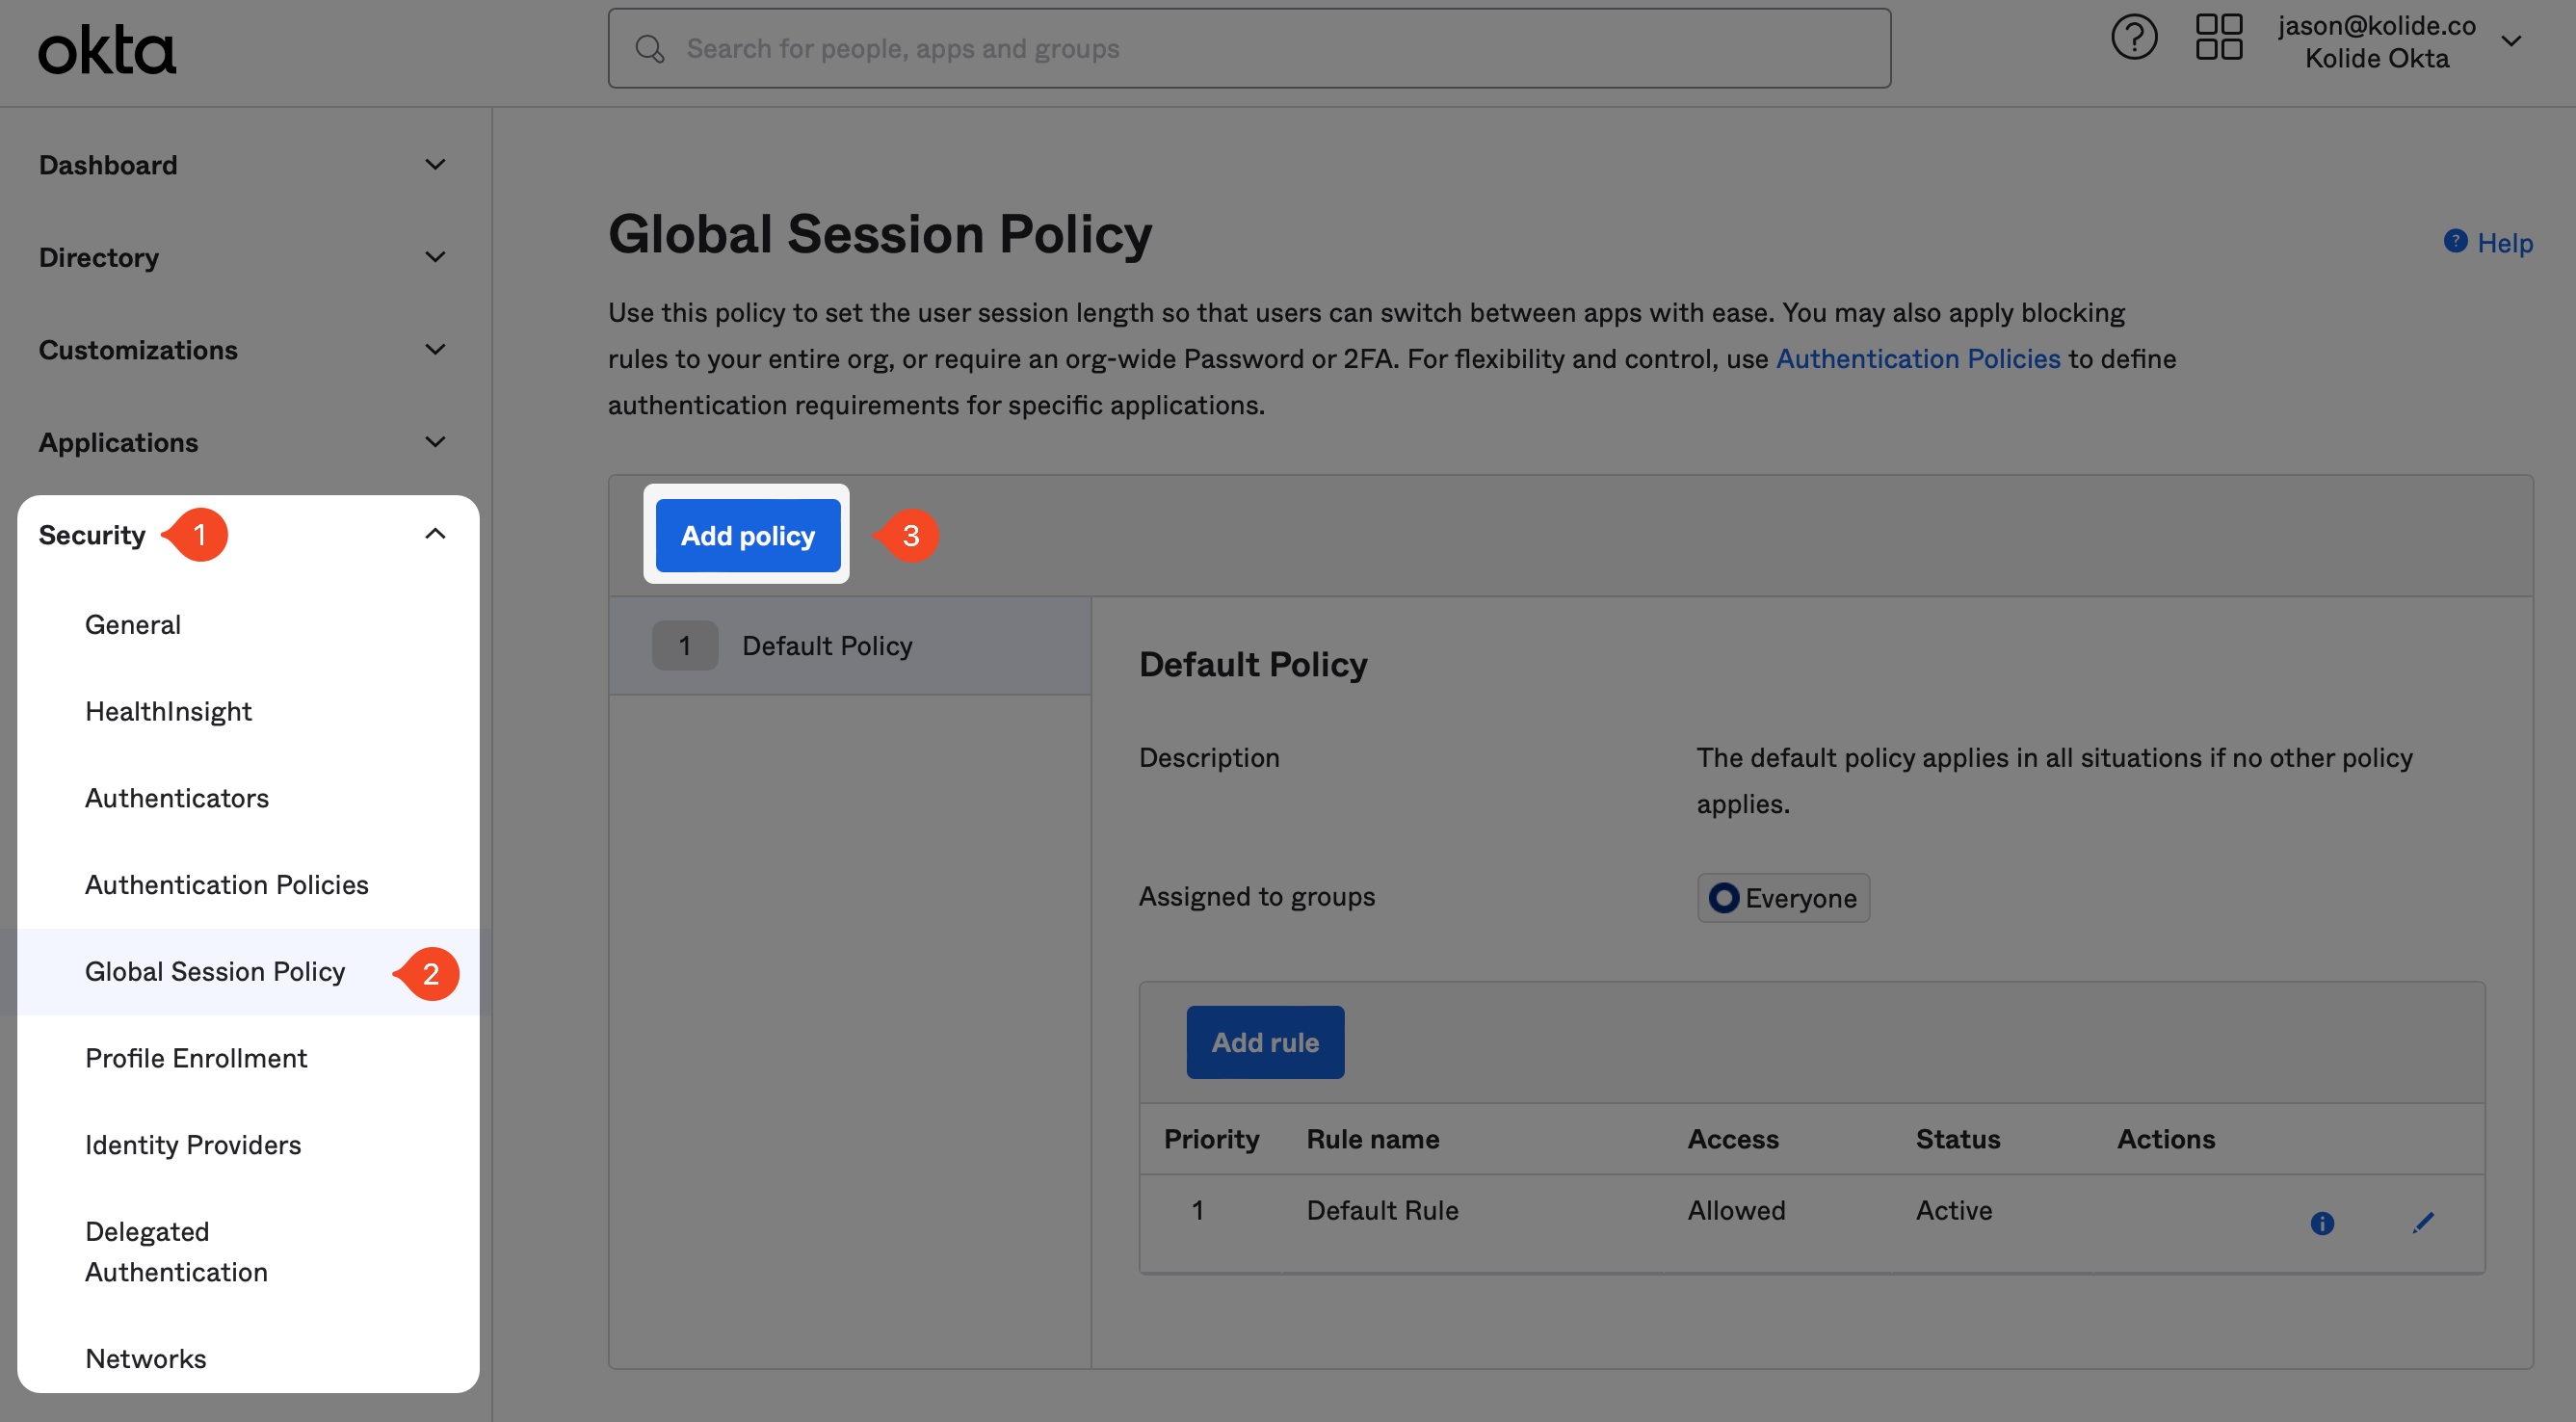
In the modal that appears, enter the information as follows:
- Name: Kolide Proxy Additional Factor
- Description: A global session policy intended to be used with the Kolide Proxy app that ensures users are not prompted for their password multiple times.
- Assign to groups: Select the group “Kolide Enabled” group you created earlier in the guide.
Now click Create policy and add rule.

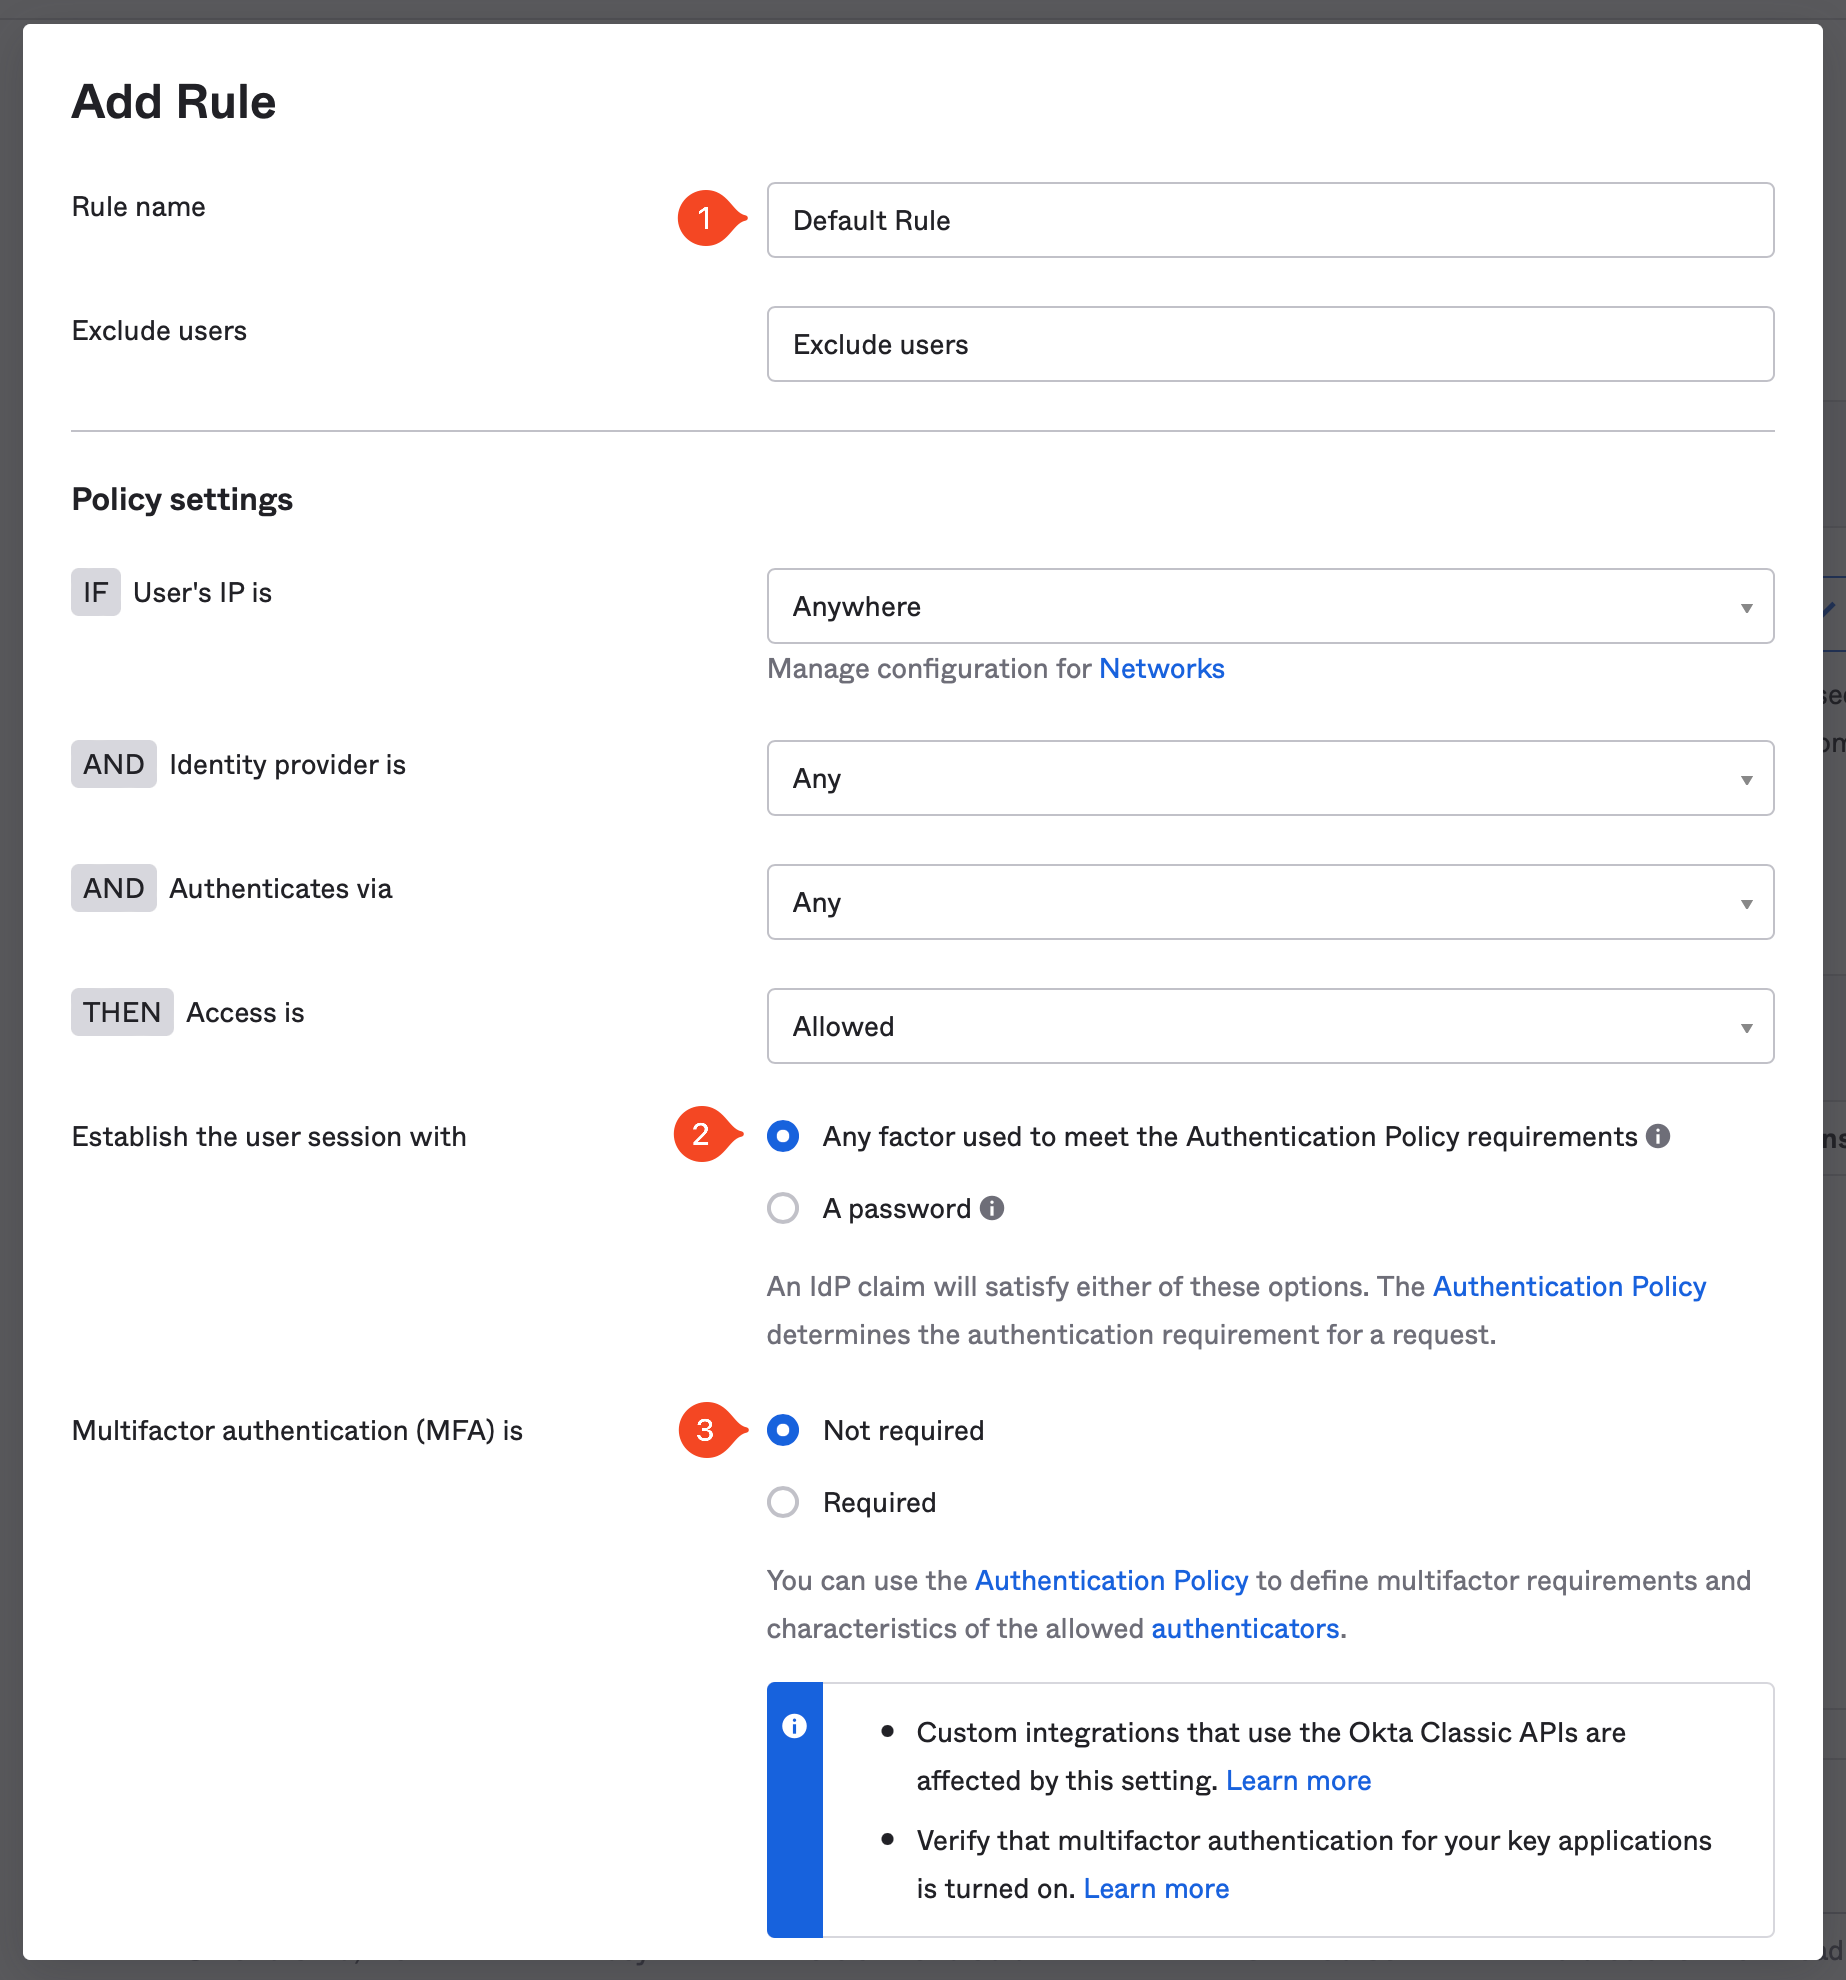
On the next screen, setup the Rule to your organization’s requirements, but make sure the following settings are set correctly:
- Establish the user session with: Any factor used to meet the Authentication Policy requirements
- Multifactor authentication (MFA) is: Not Required
These settings are necessary to ensure the end-user is not re-prompted for a password or additional factors they have already completed earlier in the sign in process. Your existing authentication policies and Kolide will ensure the user cannot bypass multi-factor authentication.
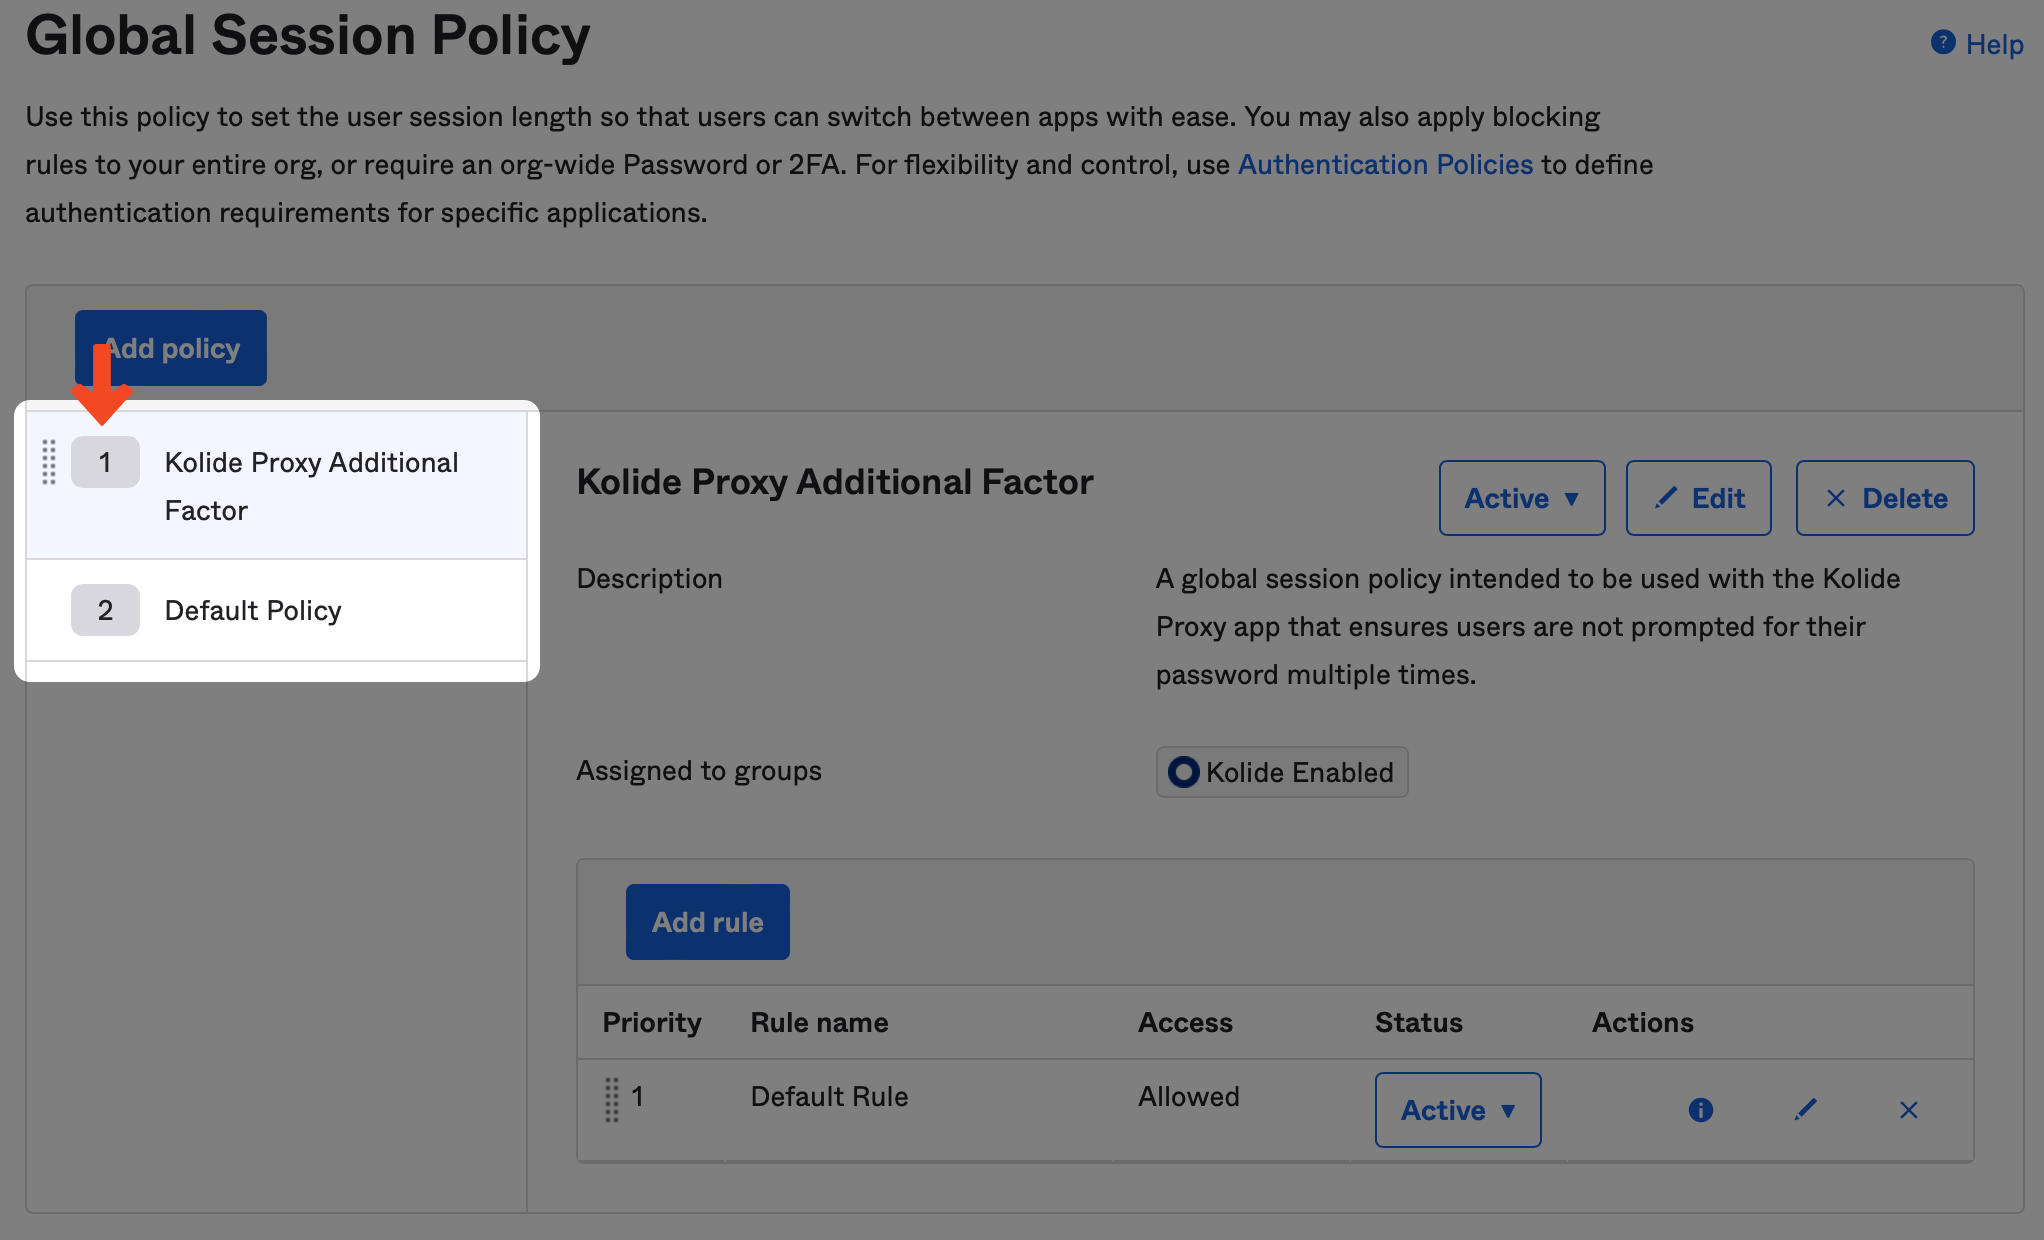
Now click Create rule.
Now that the new policy is created, make sure it’s listed above the any other Global Session policy in your instance.
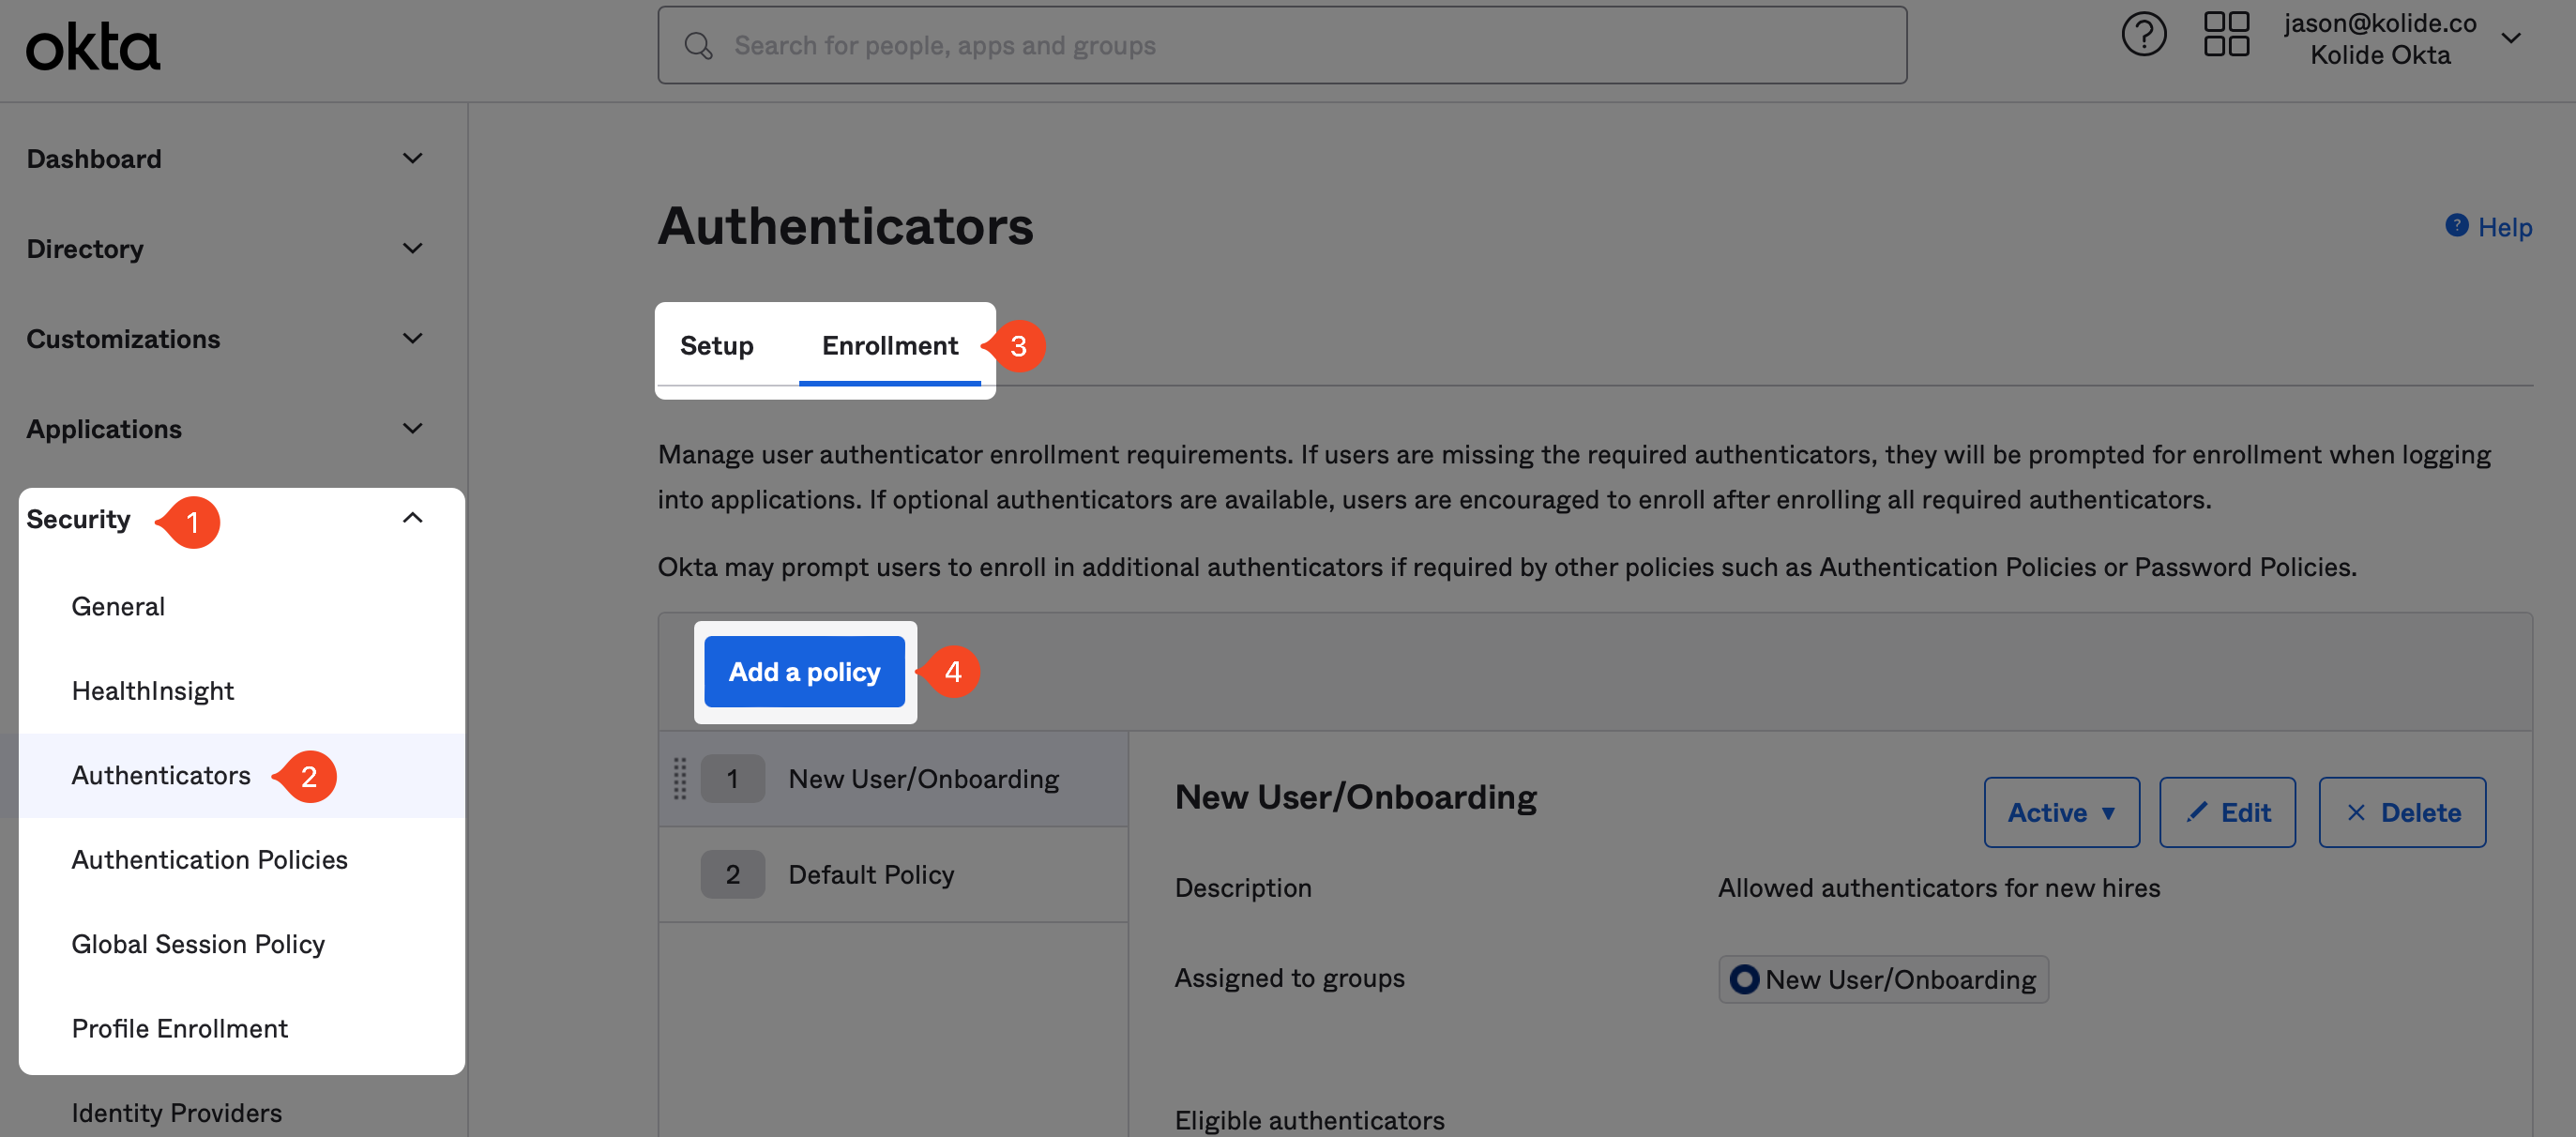
Authenticator Enrollment Policy Setup Instructions
Previously, in step 4 we ensured that the Kolide authenticator was set to optional. To enable, Factor Sequencing we will need to make separate policy for just folks using Kolide.
To begin, in the Okta Administrative portal navigate to Security > Authenticators, click Enrollment and then, Add a policy
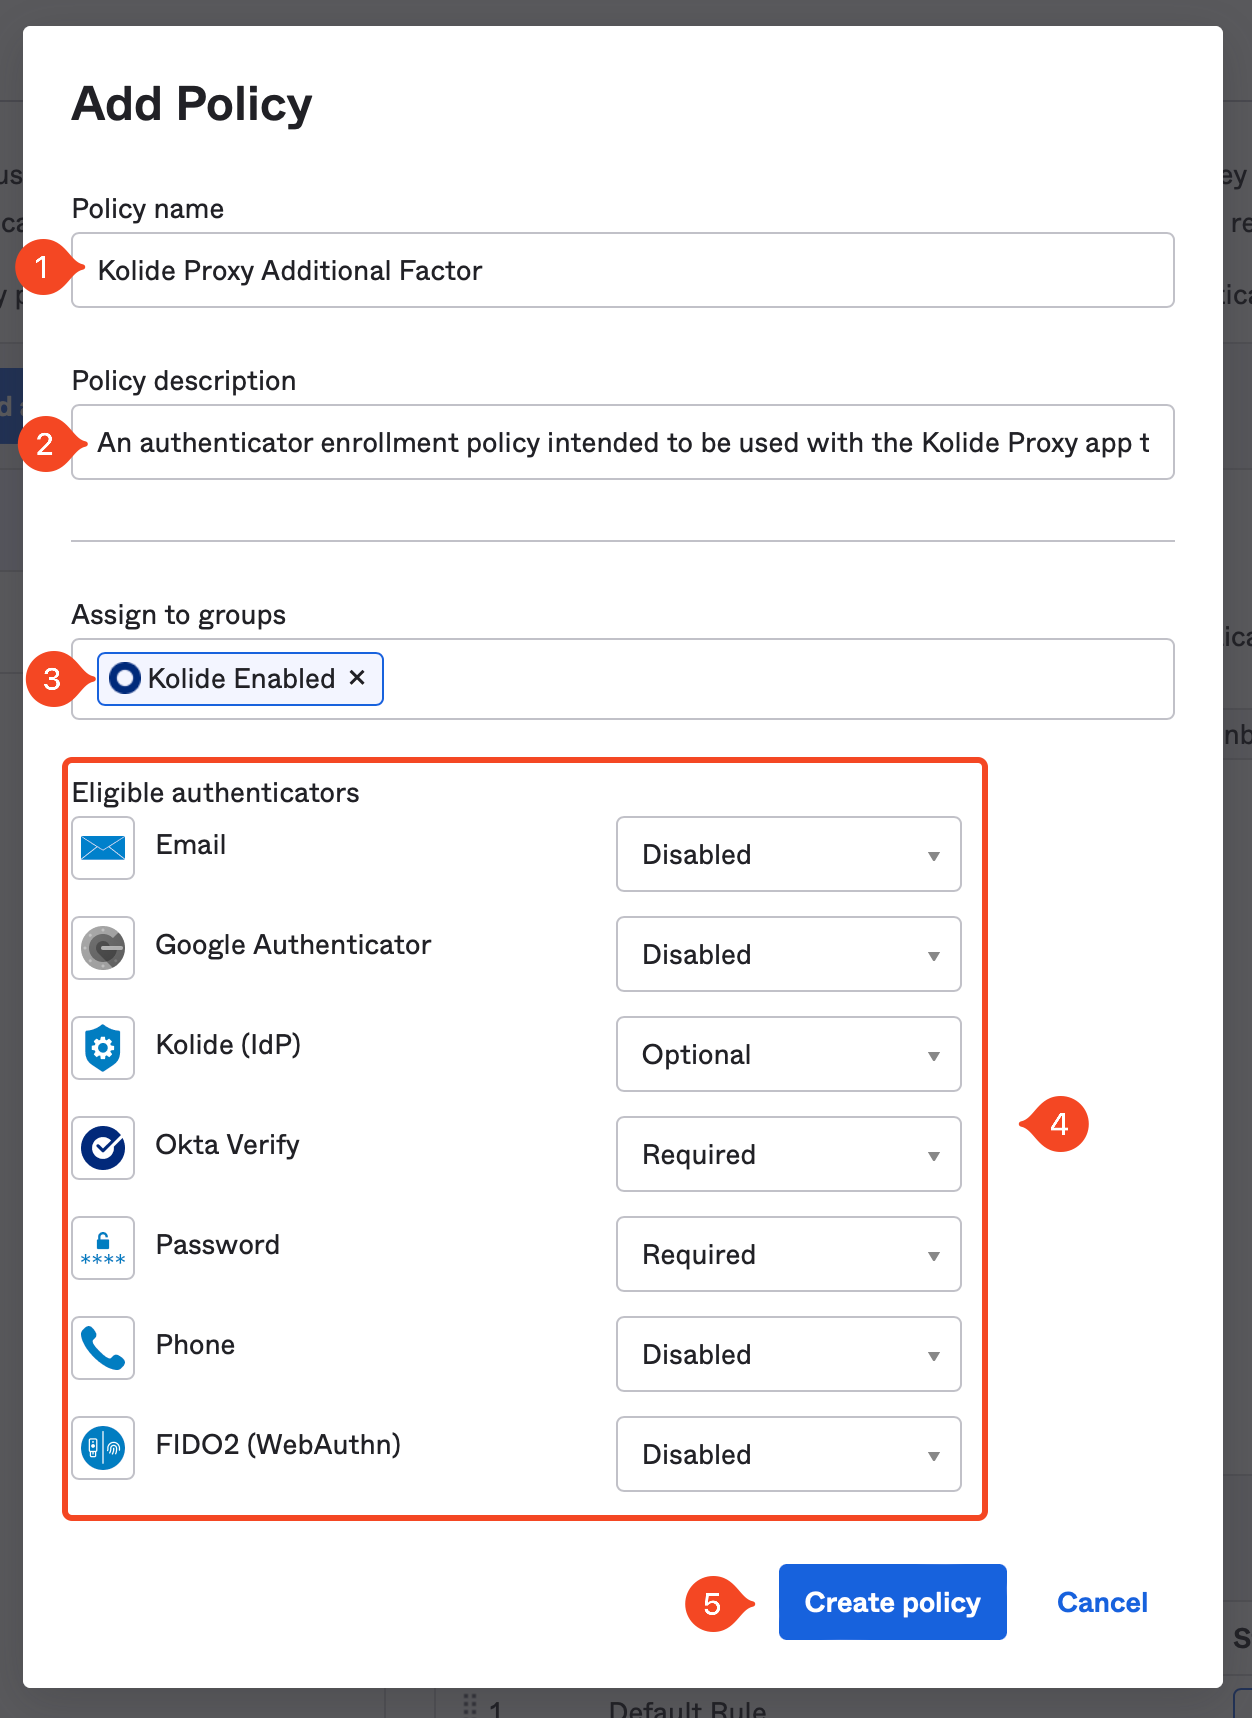
In the modal that appears fill out the fields as follows:
- Name: Kolide Proxy Additional Factor
- Description: An authenticator enrollment policy intended to be used with the Kolide Proxy app that ensures users are enrolled in the required second-factor.
- Assign to groups: Select the group “Kolide Enabled” group you created earlier in the guide.
In the eligible authenticators you will want to ensure the following is true:
- Password is set to Required
- Kolide is set to Optional
- Your required sequenced second-factor (in our case Okta Verify) is set to Required
- All other authenticators set to Disabled
Once these settings match, click Create Policy.
Now that the new policy is created, make sure it’s listed above the any other Authenticator Enrollment policy in your instance. Additionally, we need to add a default rule for the policy to take effect.
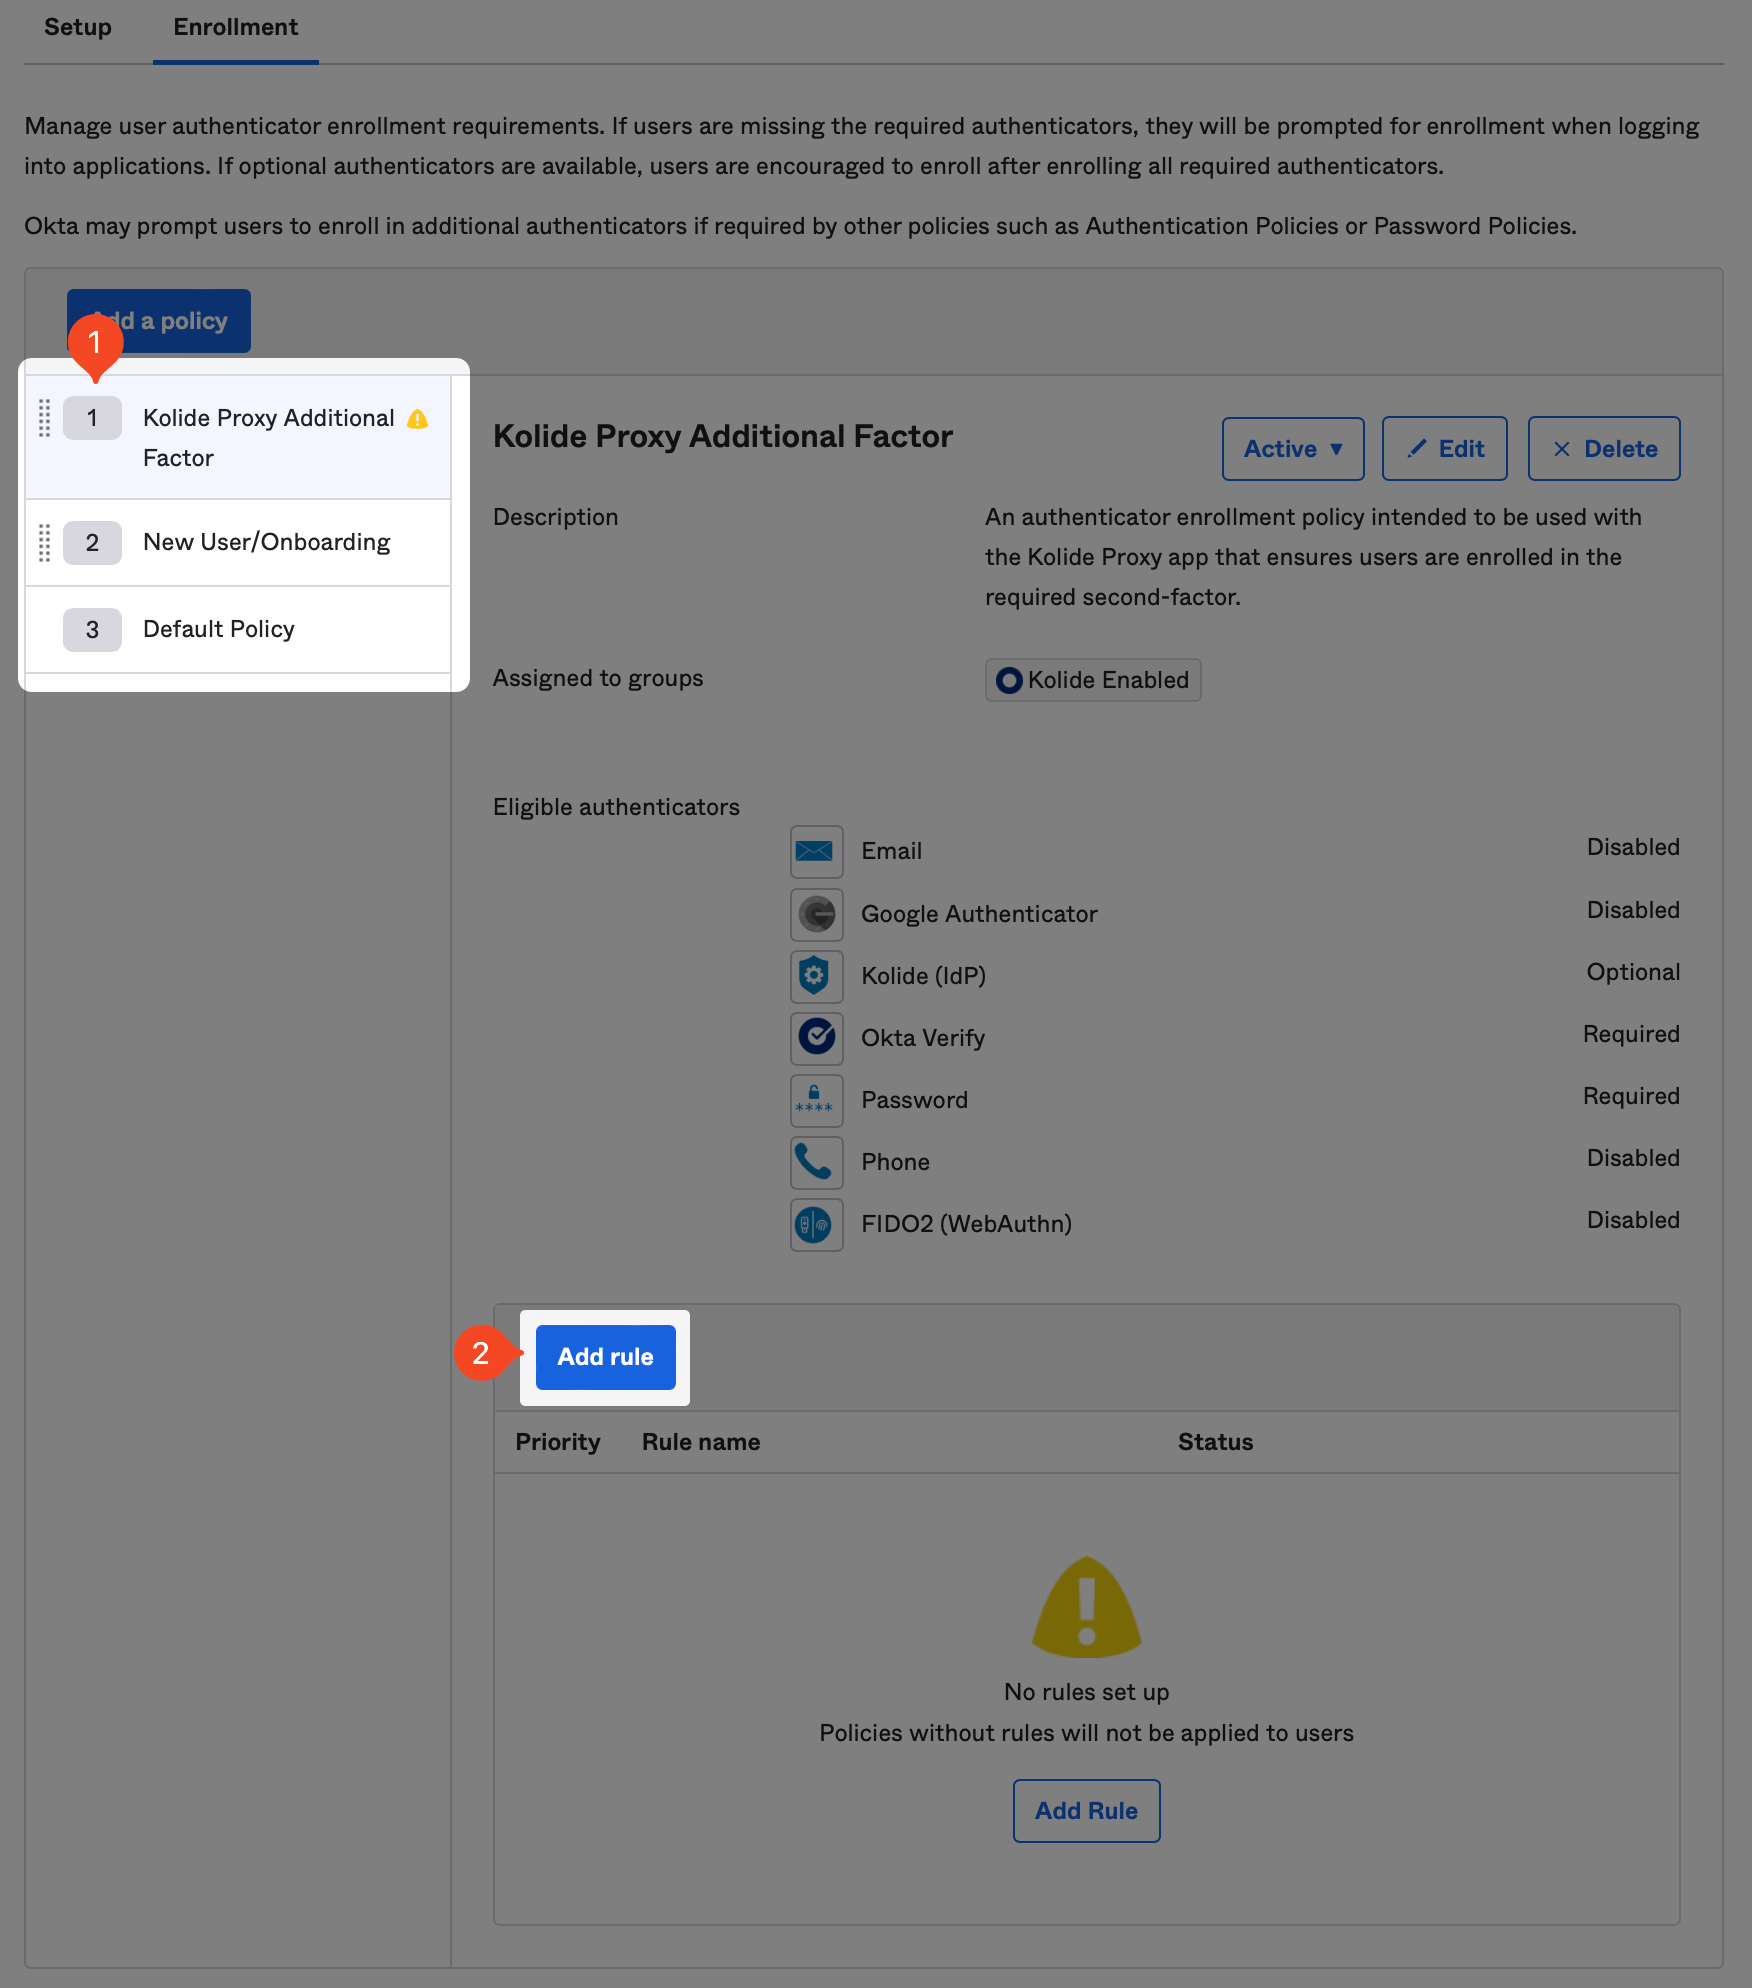
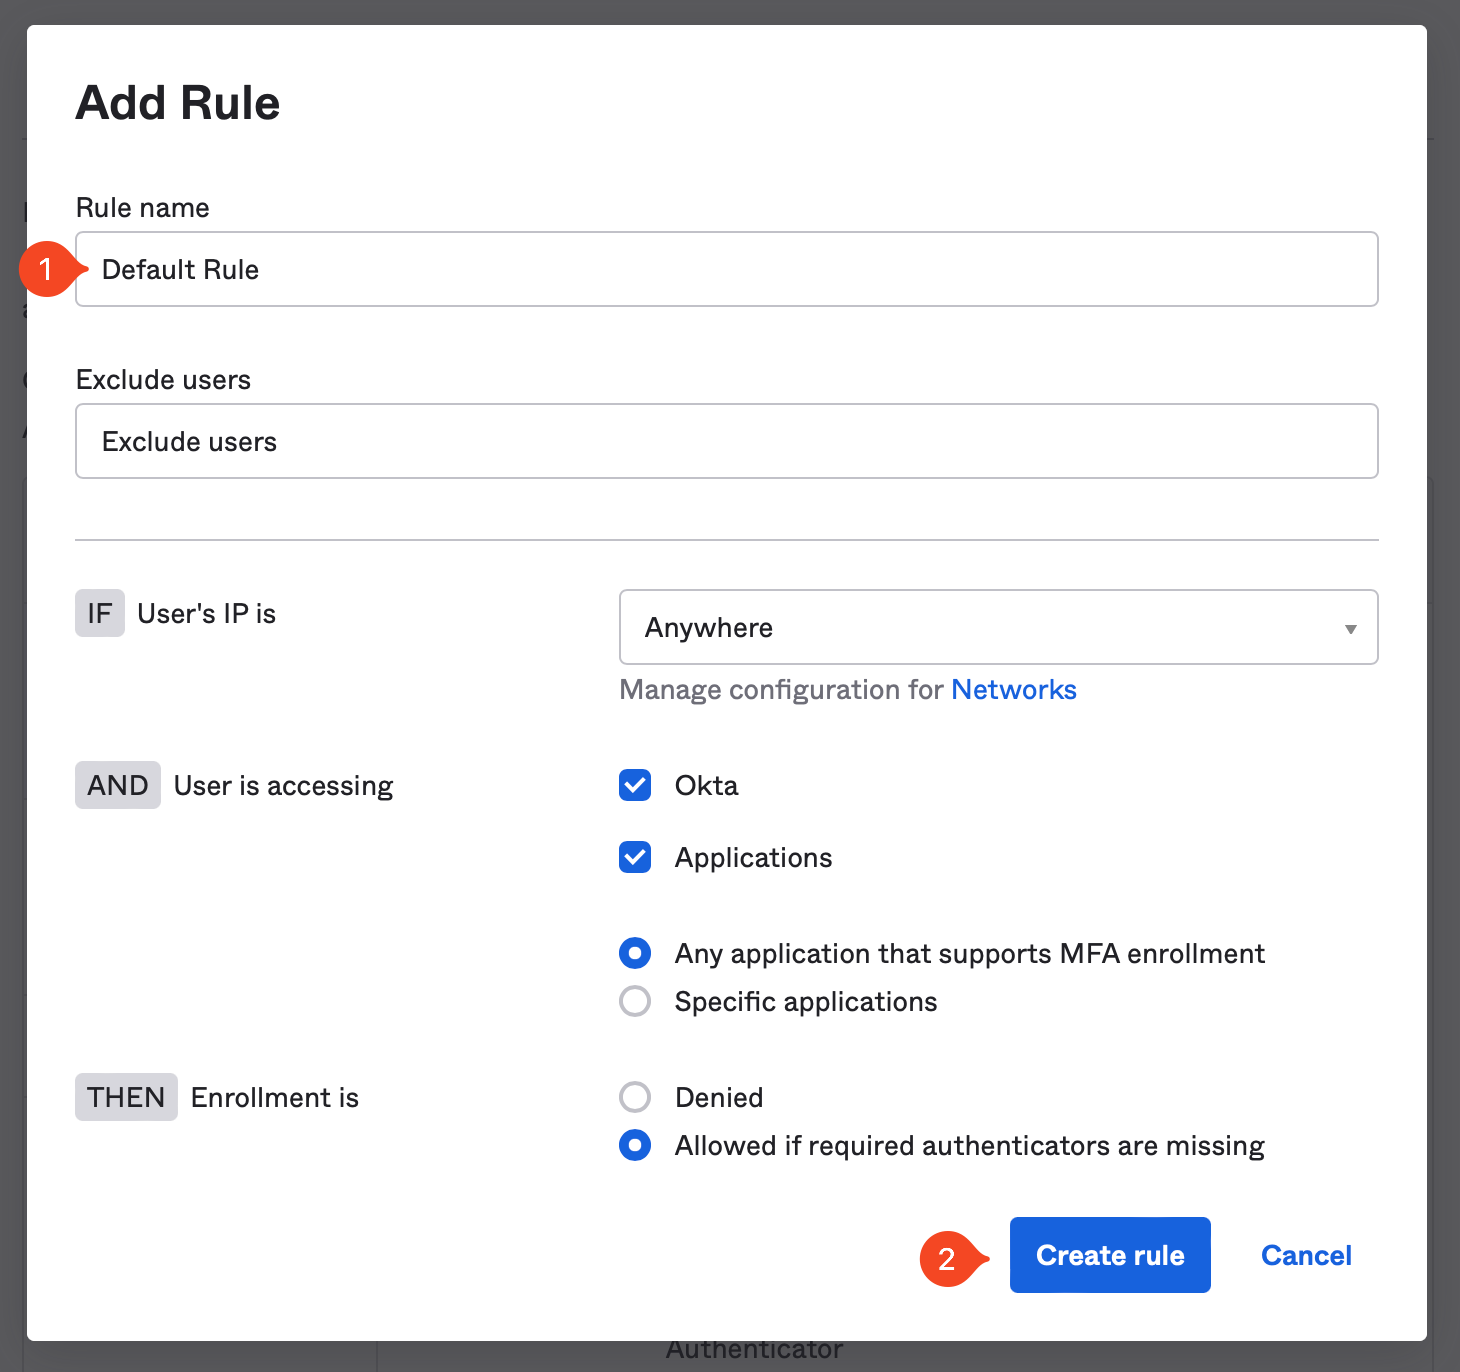
Once you’ve clicked “Add Rule”, simply name it “Default” rule and accept the defaults.
Test Signing In
You are done! Now simply access an app protected by one of these policies and enroll your device into Kolide by following the instructions.
If you need any help, please contact us at support@kolide.co.
Event Hooks
When using Factor Sequencing, Kolide will need to be notified when a user has enrolled in, or removed themselves from the Kolide authenticator. To accomplish this, we will need to setup an Event Hook in Okta.
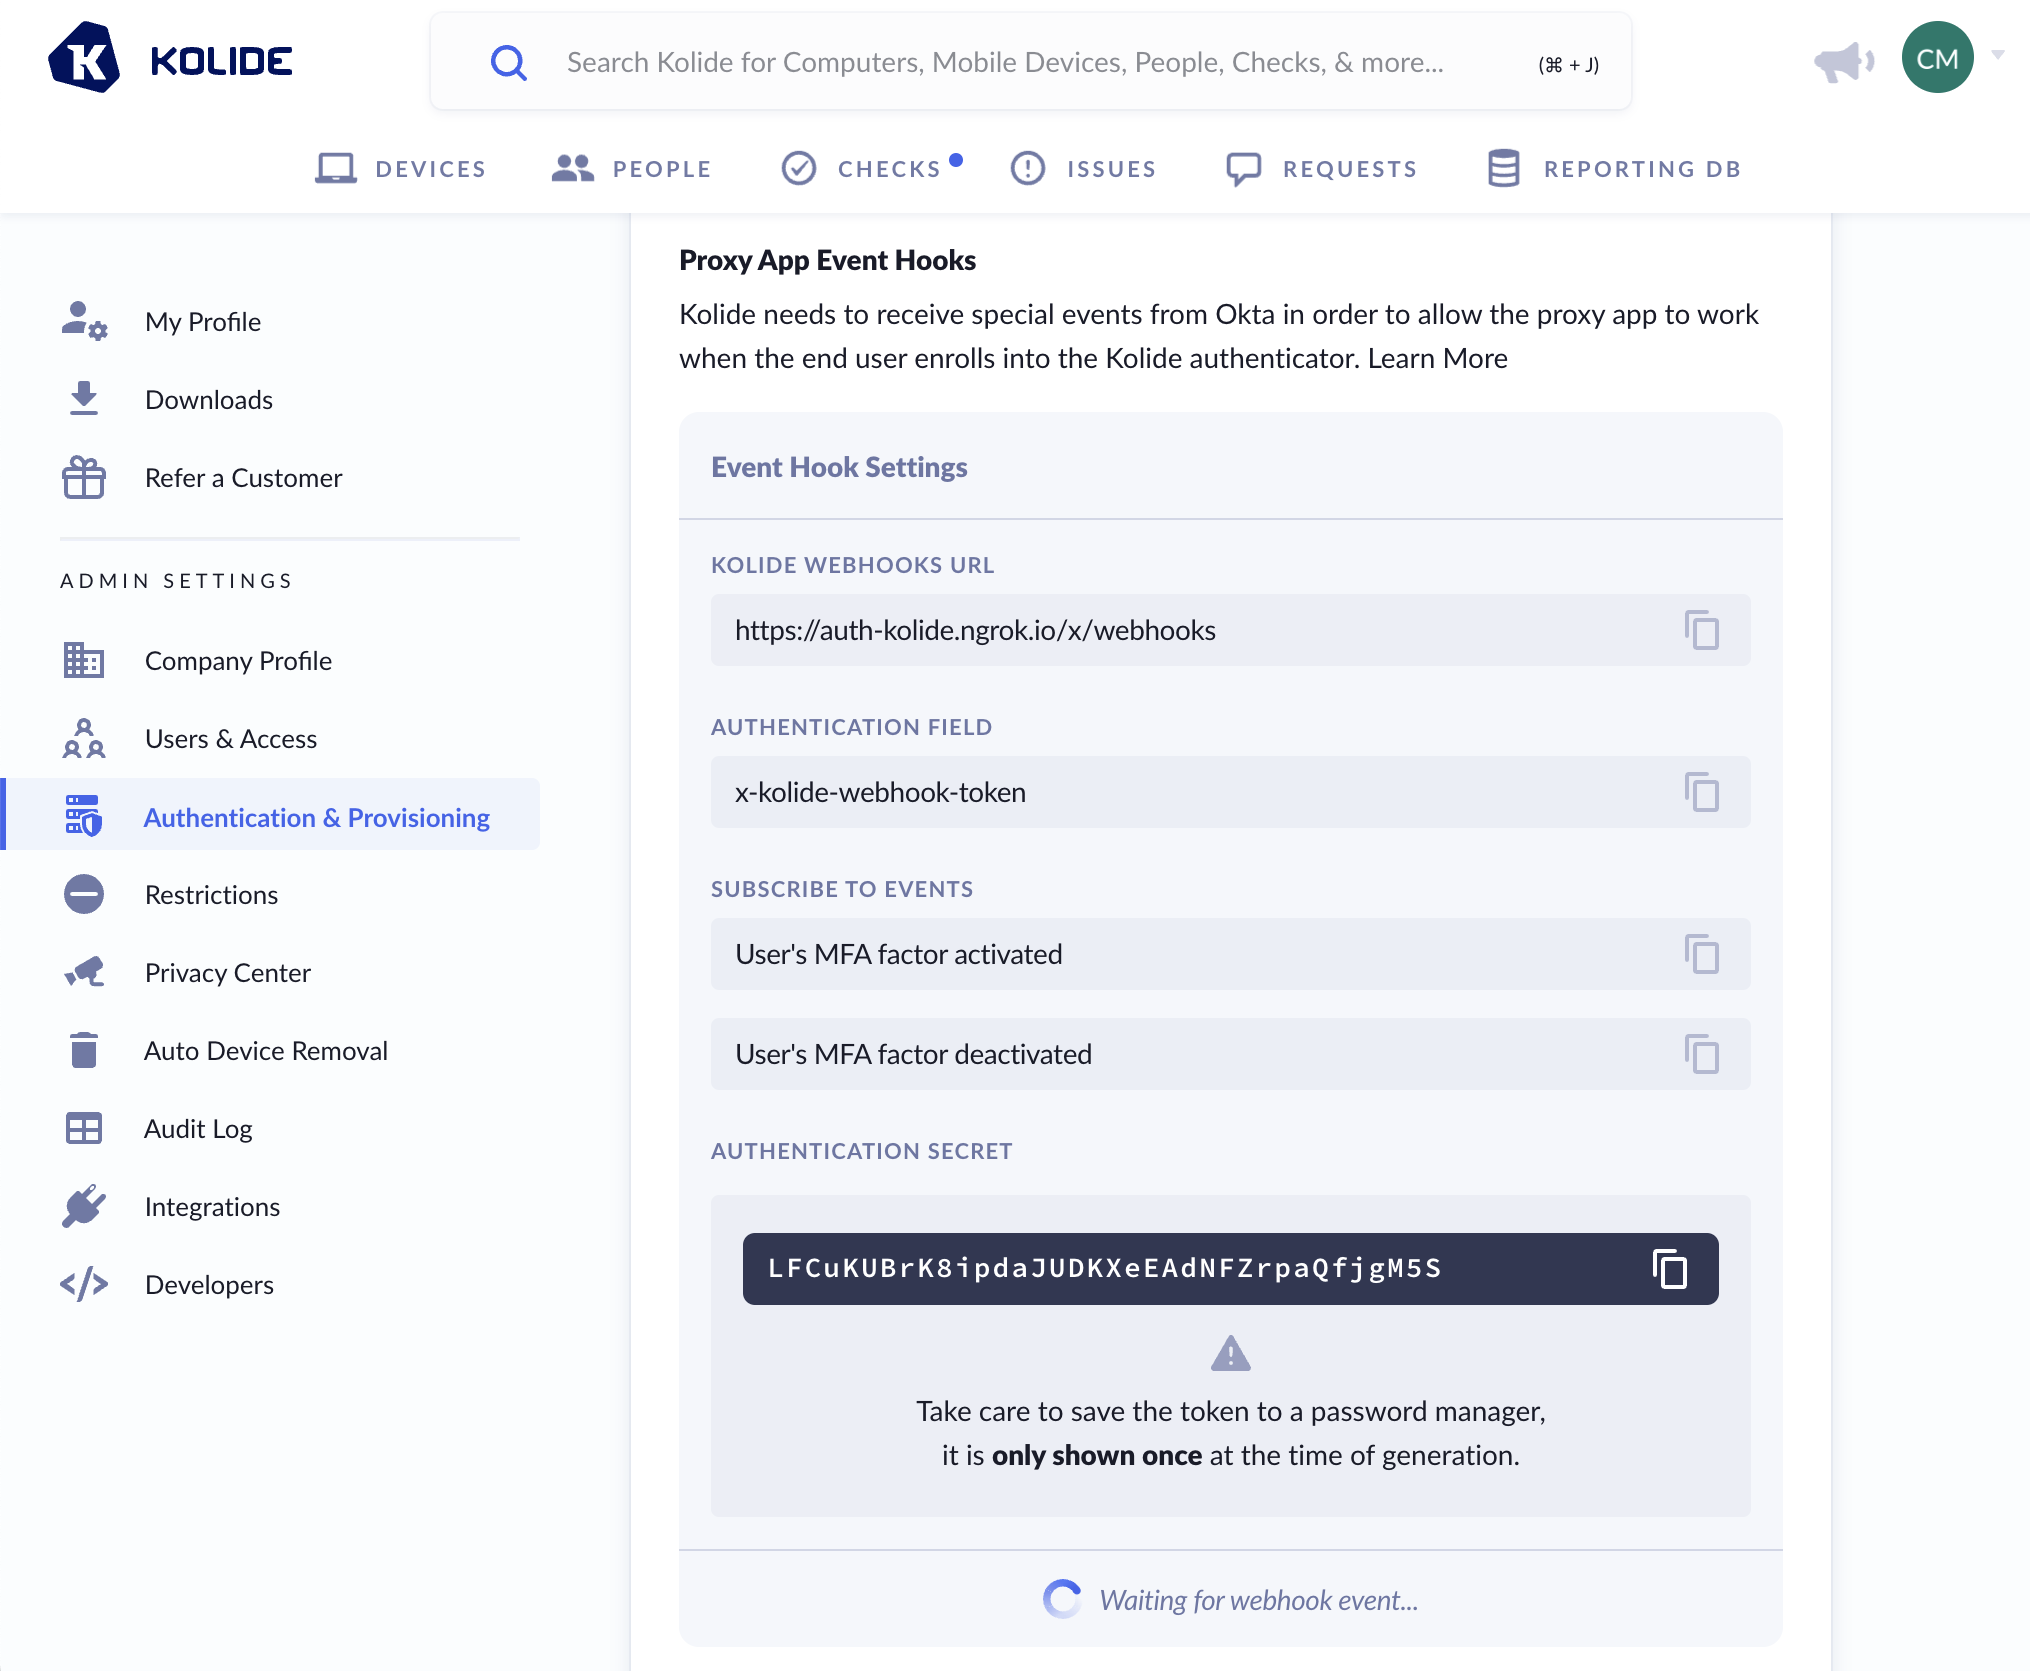
In Okta, on the left sidebar, select Workflow then click the Event Hooks link in the expanded submenu. Next, click the Create Event Hook button.
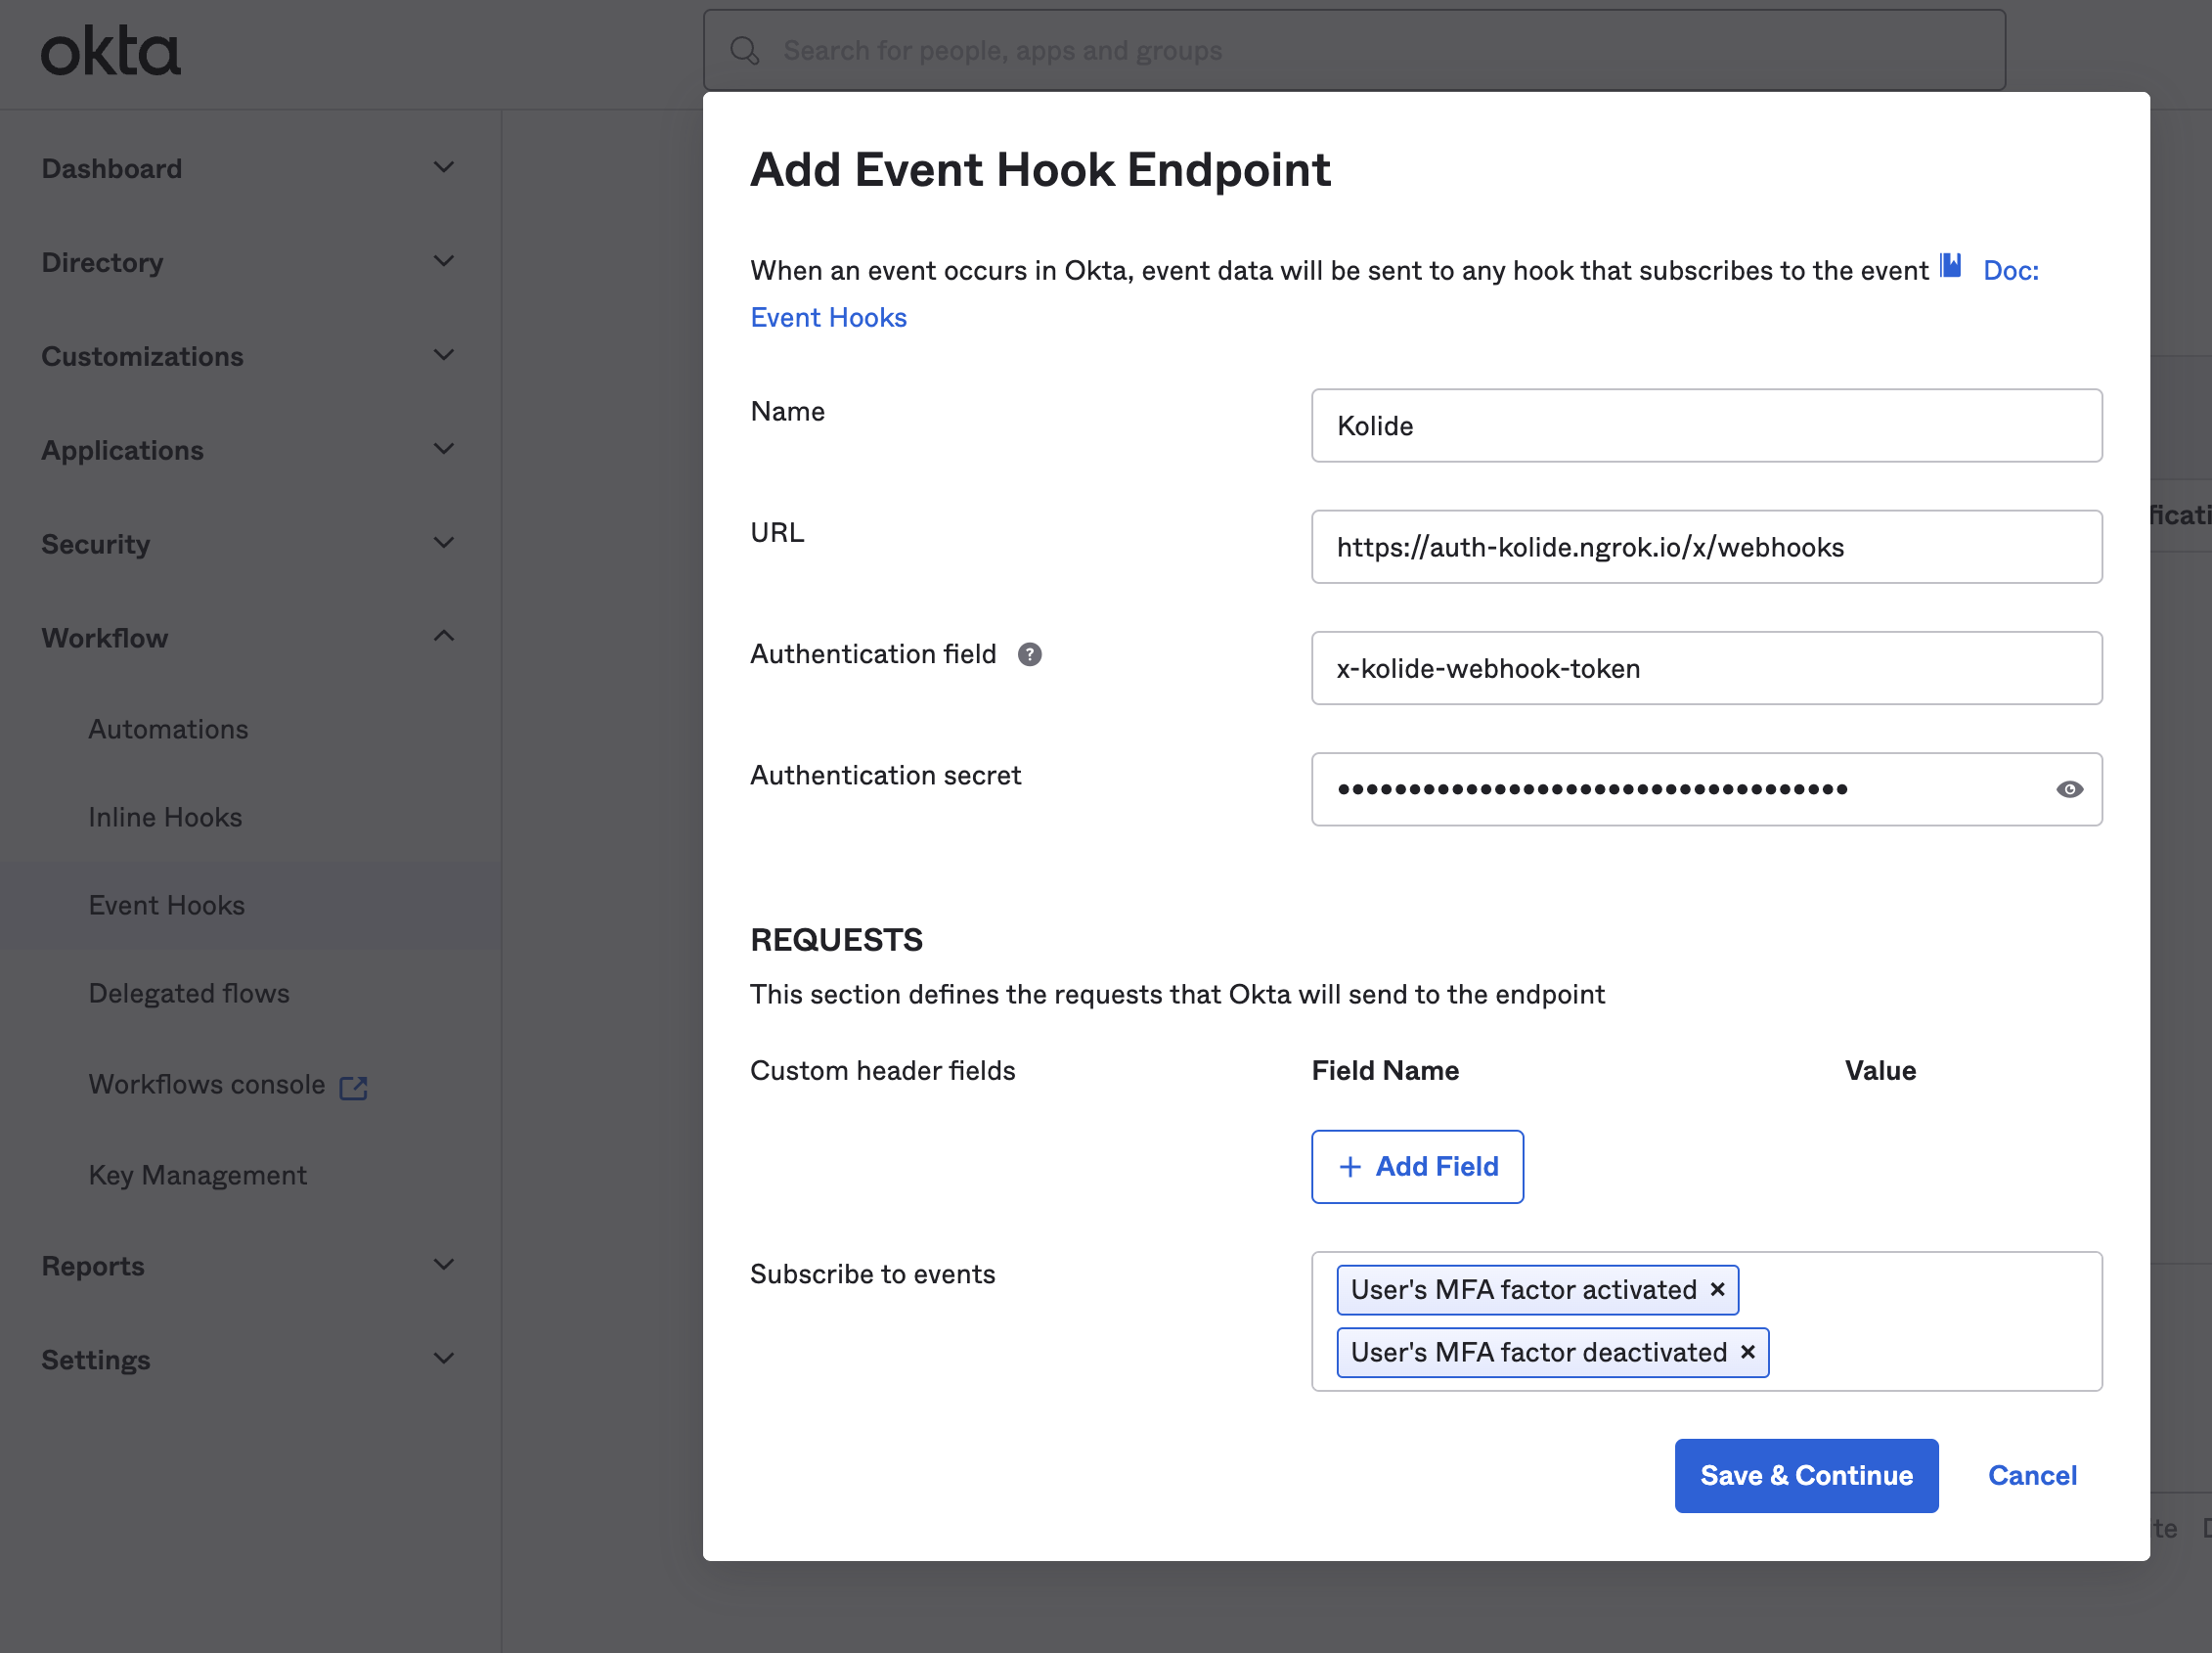
In the modal that appears, fill out the fields as follows:
- Name: Kolide Event Hook Notification
-
Subscribe to events: Select the following events:
- User’s MFA factor activated
- User’s MFA factor deactivated
- Reset all MFA factors for user by admin
You will want to copy the values from Kolide as follows:
| Okta Field | Kolide Field |
|---|---|
| URL | Kolide Webhook URL |
| Authentication Field | Authentication Field |
| Authentication secret | Authentication secret |
Once the event hook is set up in Okta, you will be asked to Verify Endpoint Ownership. To verify the endpoint, simply click the Verify button.
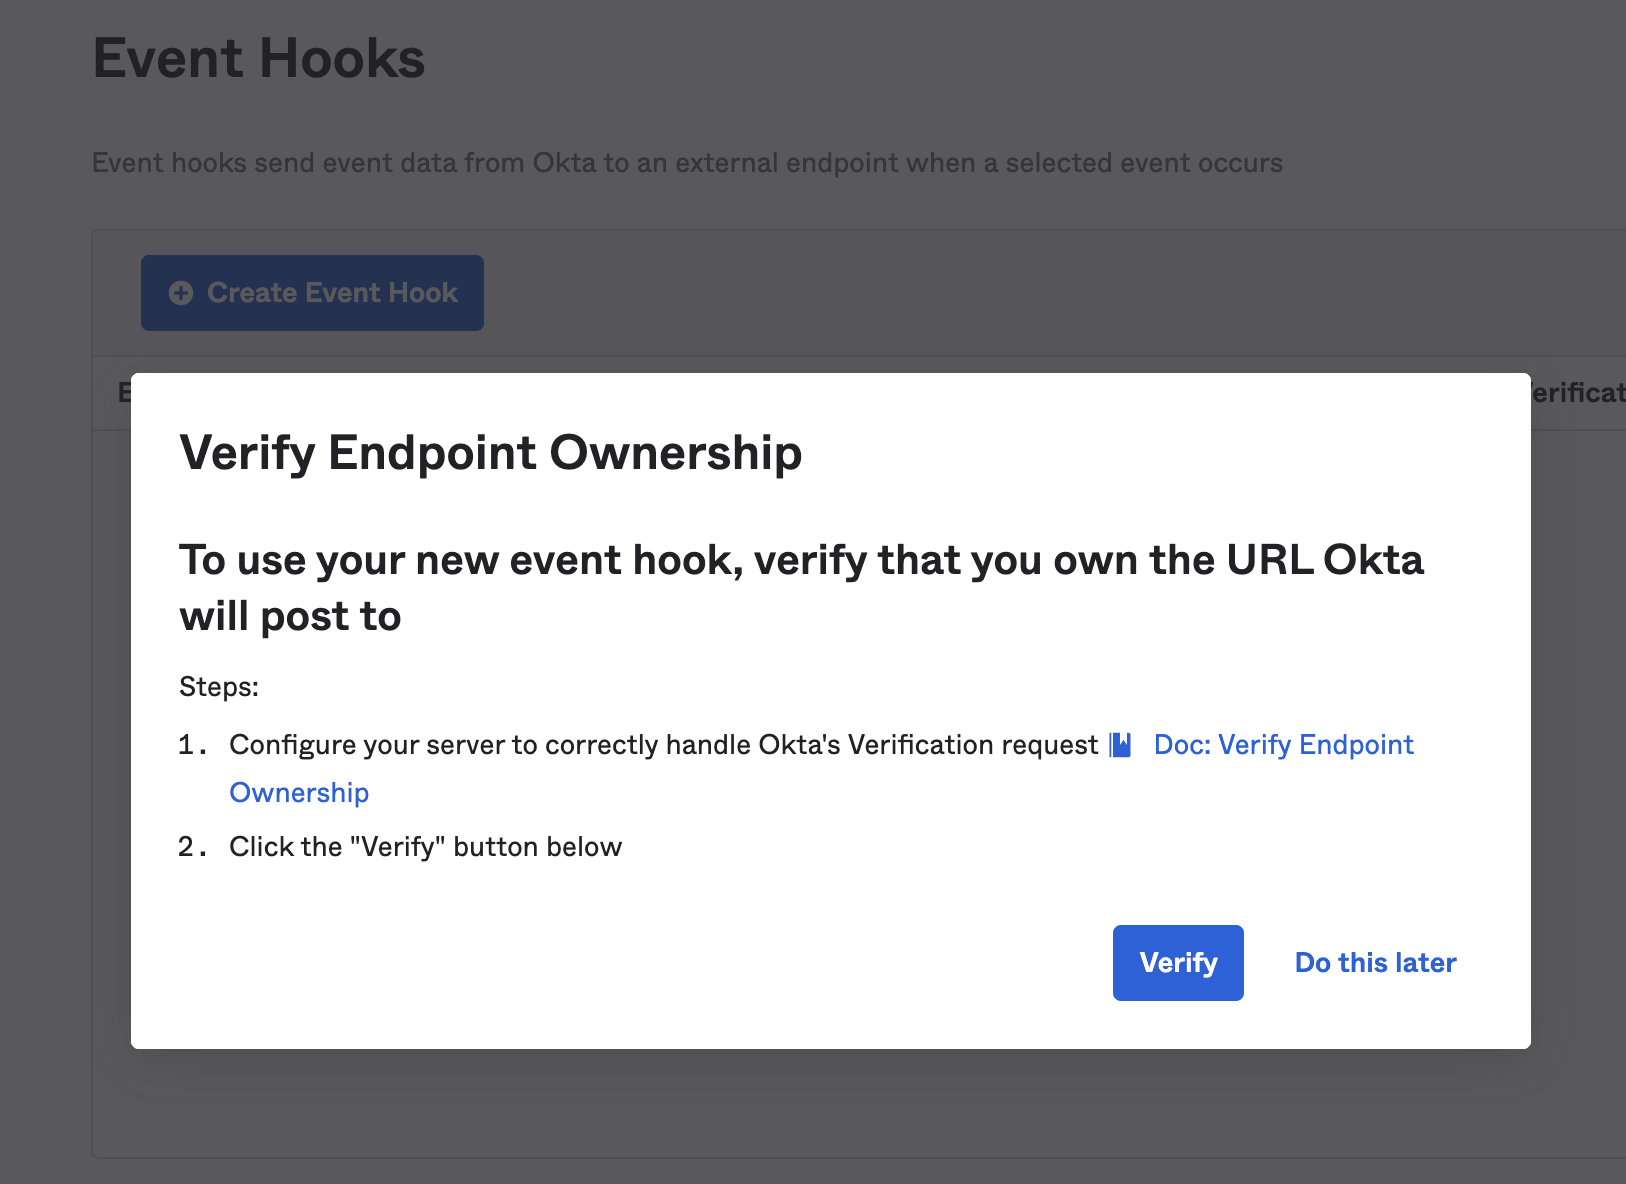
When the verification is successful, you will see the following notice in Okta: “Endpoint ownership successfully verified.”
In Kolide, you should see a green check mark and the words Webhook Event Successfully Received! at the bottom of the event hook panel.